User login
Best Practices for Capturing Clinical and Dermoscopic Images With Smartphone Photography
Best Practices for Capturing Clinical and Dermoscopic Images With Smartphone Photography
PRACTICE GAP
Photography is an essential tool in modern dermatologic practice, aiding in the evaluation, documentation, and monitoring of nevi, skin cancers, and other cutaneous pathologies.1 With the rapid technologic advancement of smartphone cameras, high-quality clinical and dermoscopic images have become increasingly easy to attain; however, best practices for optimizing smartphone photography are limited in the medical literature. We have collated a series of recommendations to help fill this knowledge gap.
A search of PubMed articles indexed for MEDLINE was conducted using the terms clinical imaging AND smartphone, clinical photography AND smartphone, dermatology AND photography, dermatology AND imaging, dermoscopy AND photography, and dermoscopy AND imaging. We also consulted with Elizabeth Seiverling, MD (Annville, Pennsylvania) and Jennifer Stein, MD (New York, New York)—both renowned experts in the fields of dermatology, dermoscopy, and medical photography—via email and video meetings conducted during the period from June 1, 2022, through August 20, 2022. Our goal in creating this guide is to facilitate standardized yet simple ways to integrate smartphone photography into current dermatologic practice.
THE TECHNIQUE
Clinical Photography
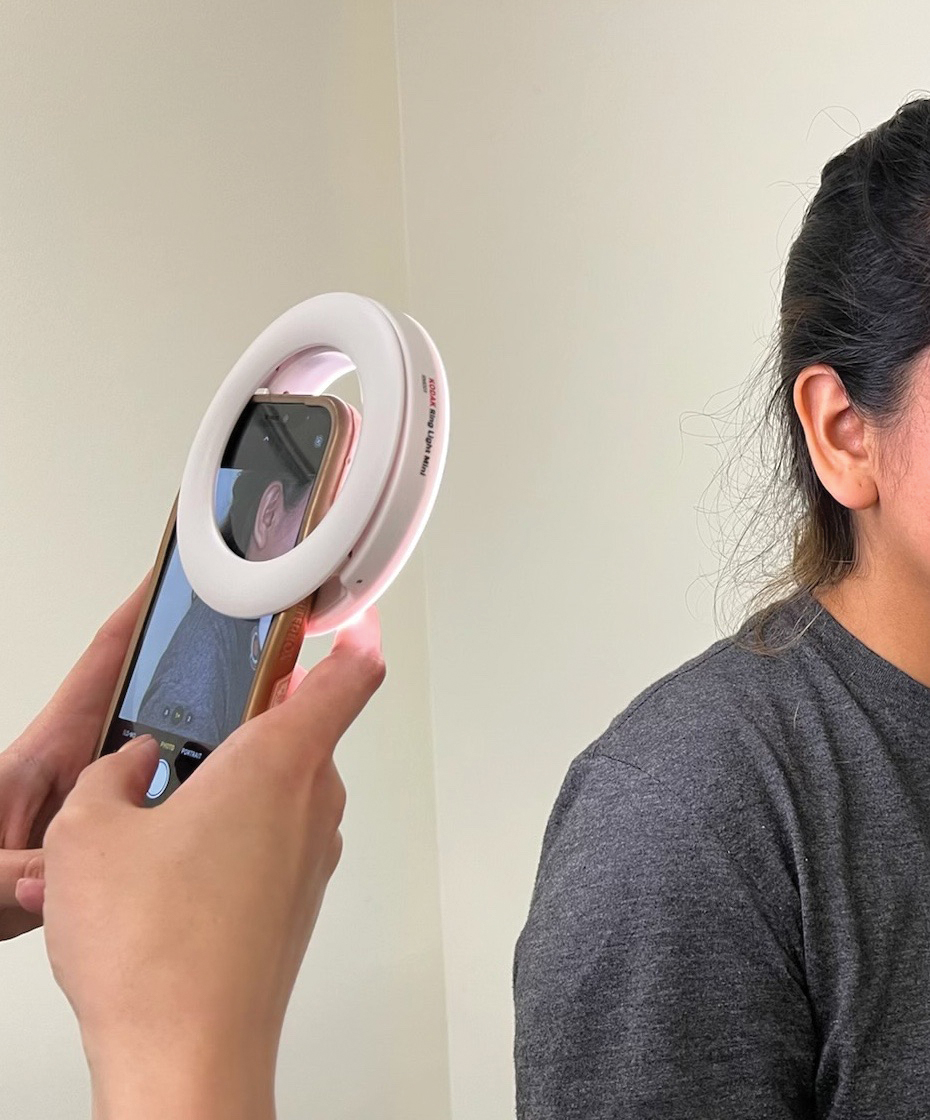
Clinical images should be captured in a space with ample indirect natural light, such as a patient examination room with frosted or draped windows, ensuring patient privacy is maintained.1,2 The smartphone’s flash can be used if natural lighting is insufficient, but caution should be exercised when photographing patients with darker skin types, as the flash may create an undesired glare. To combat this, consider using a small clip-on light-emitting diode ring light positioned at a 45° angle for more uniform lighting and reduced glare (eFigures 1 and 2).2 This additional light source helps to distribute light evenly across the patient’s skin, enhancing detail visibility, minimizing harsh shadows, and ensuring a more accurate representation of skin pigmentation.2
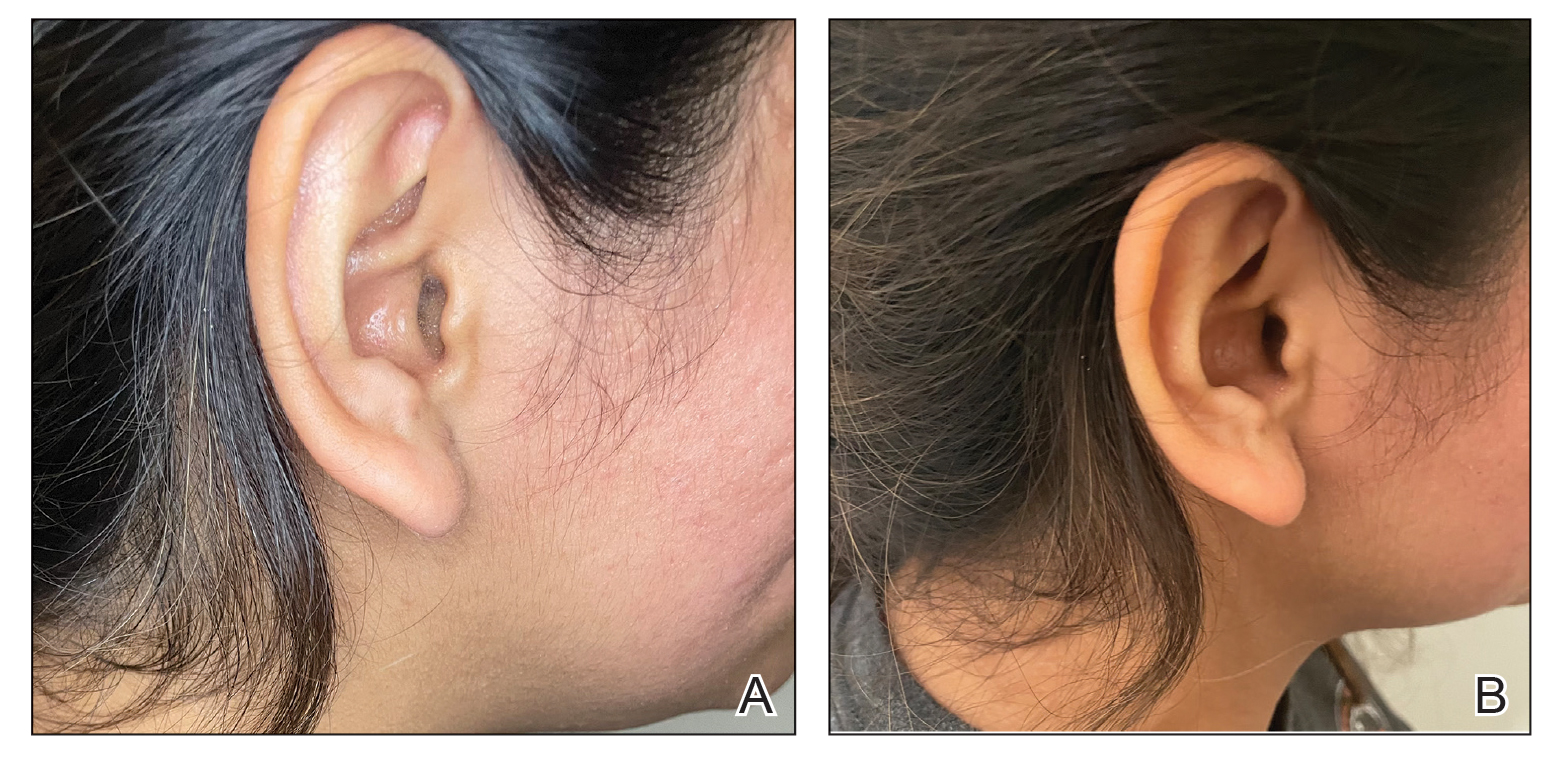
When a magnified image is required (eg, to capture suspicious lesions with unique and detailed findings such as irregular borders or atypical pigmentation), use the smartphone’s digital zoom function rather than physically moving the camera lens closer to the subject. Moving the camera too close can cause proximity distortion, artificially enlarging objects close to the lens and degrading the quality of the image.1,2 Unnecessary camera features such as portrait mode, live focus, and filters should be turned off to maintain image accuracy. It also is important to avoid excessive manual adjustments to exposure and brightness settings.1,2 The tap-to-focus feature that is integrated into many smartphone cameras can be utilized to ensure the capture of sharp, focused images. After verifying the image preview on the smartphone display, take the photograph. Immediately review the captured image to ensure it is clear and well lit and accurately depicts the area of interest, including its color, texture, and any relevant details, without glare or distortion. If the image does not meet these criteria, promptly reattempt to achieve the desired quality.
Dermoscopic Photography
Dermoscopy, which enables magnified examination of skin lesions, is increasingly being utilized in dermatology. While traditional dermoscopic photography requires specialized equipment, such as large single-lens reflex cameras with dedicated dermoscopic lens attachments, smartphone cameras now can be used to obtain dermoscopic images of reasonable quality.3,4 Adhering to specific practices can help to optimize the quality of dermoscopic images obtained via this technique.
Before capturing an image, it is essential to prepare both the lesion and the surrounding skin. Ensure the area is cleaned thoroughly and trim any hairs that may obscure the image. Apply an interface fluid such as rubbing alcohol or ultrasonography gel to improve image clarity by reducing surface tension and reflections, minimizing glare, and ensuring even light transmission throughout the lesion.5 As recommended for clinical photography, images should be captured in a space with ample indirect light. For best results, we recommend utilizing the primary photo capture option instead of portrait or panoramic mode or additional settings. It is crucial to disable features such as live focus, filters, night mode, and flash, as they may alter image accuracy; however, use of the tap-to-focus feature or manual settings adjustment is encouraged to ensure a high-resolution photograph.
Once these smartphone settings have been verified, position the dermatoscope directly over the lesion of interest. Next, place the smartphone camera lens directly against the eyepiece of the dermatoscope (Figure). Center the lesion in the field of view on the screen. Most smartphones enable adjustment to the image magnification on the photo capture screen. A single tap on the screen should populate the zoom options (eg, ×0.5, ×1, ×3) and allow for adjustment. For the majority of dermoscopic photographs, we recommend standard ×1 magnification, as it typically provides a clear and accurate representation of the lesion without introducing the possibility of image distortion. To obtain a close-up image, use the smartphone’s digital zoom function prior to taking the photograph rather than zooming in on the image after it has been captured; however, to minimize proximity distortion and maintain optimal image quality, avoid exceeding the halfway point on the camera’s zoom dial. After verifying the image preview on the smartphone display, capture the photograph. Immediate review is recommended to allow for prompt reattempt at capturing the image if needed.

PRACTICE IMPLICATIONS
The inherent convenience and accessibility offered by smartphone photography further solidifies its status as a valuable tool in modern dermatologic practice. By adhering to the best practices outlined in this guide, dermatologists can utilize smartphones to capture high-quality clinical and dermoscopic images that support accurate diagnosis and enhance patient care. This approach helps streamline workflows, enhance consistency in image quality, and standardize image capture across different settings and providers.
Additionally, smartphone photography can enhance both education and telemedicine by enabling physicians to easily share high-quality images with colleagues for virtual consultations, second opinions, and collaborative diagnoses. This sharing of images fosters learning opportunities, supports knowledge exchange, and allows for real-time feedback—all of which can improve clinical decision-making. Moreover, it broadens access to dermatologic expertise, strengthens communication between health care providers, and facilitates timely decision-making. As a result, patients benefit from more efficient, accurate, and collaborative care.
- Muraco L. Improved medical photography: key tips for creating images of lasting value. JAMA Dermatol. 2020;156:121-123. doi:10.1001 /jamadermatol.2019.3849
- Alvarado SM, Flessland P, Grant-Kels JM, et al. Practical strategies for improving clinical photography of dark skin. J Am Acad Dermatol. 2022;86:E21-E23. doi:10.1016/j.jaad.2021.09.001
- Pagliarello C, Feliciani C, Fantini C, et al. Use of the dermoscope as a smartphone close-up lens and LED annular macro ring flash. J Am Acad Dermatol. 2016;75:E27–E28. doi:10.1016/j.jaad .2015.12.04
- Zuo KJ, Guo D, Rao J. Mobile teledermatology: a promising future in clinical practice. J Cutan Med Surg. 2013;17:387-391. doi:10.2310/7750.2013.13030
- Gewirtzman AJ, Saurat J-H, Braun RP. An evaluation of dermscopy fluids and application techniques. Br J Dermatol. 2003;149:59-63. doi:10.1046/j.1365-2133.2003.05366.x
PRACTICE GAP
Photography is an essential tool in modern dermatologic practice, aiding in the evaluation, documentation, and monitoring of nevi, skin cancers, and other cutaneous pathologies.1 With the rapid technologic advancement of smartphone cameras, high-quality clinical and dermoscopic images have become increasingly easy to attain; however, best practices for optimizing smartphone photography are limited in the medical literature. We have collated a series of recommendations to help fill this knowledge gap.
A search of PubMed articles indexed for MEDLINE was conducted using the terms clinical imaging AND smartphone, clinical photography AND smartphone, dermatology AND photography, dermatology AND imaging, dermoscopy AND photography, and dermoscopy AND imaging. We also consulted with Elizabeth Seiverling, MD (Annville, Pennsylvania) and Jennifer Stein, MD (New York, New York)—both renowned experts in the fields of dermatology, dermoscopy, and medical photography—via email and video meetings conducted during the period from June 1, 2022, through August 20, 2022. Our goal in creating this guide is to facilitate standardized yet simple ways to integrate smartphone photography into current dermatologic practice.
THE TECHNIQUE
Clinical Photography
Clinical images should be captured in a space with ample indirect natural light, such as a patient examination room with frosted or draped windows, ensuring patient privacy is maintained.1,2 The smartphone’s flash can be used if natural lighting is insufficient, but caution should be exercised when photographing patients with darker skin types, as the flash may create an undesired glare. To combat this, consider using a small clip-on light-emitting diode ring light positioned at a 45° angle for more uniform lighting and reduced glare (eFigures 1 and 2).2 This additional light source helps to distribute light evenly across the patient’s skin, enhancing detail visibility, minimizing harsh shadows, and ensuring a more accurate representation of skin pigmentation.2
When a magnified image is required (eg, to capture suspicious lesions with unique and detailed findings such as irregular borders or atypical pigmentation), use the smartphone’s digital zoom function rather than physically moving the camera lens closer to the subject. Moving the camera too close can cause proximity distortion, artificially enlarging objects close to the lens and degrading the quality of the image.1,2 Unnecessary camera features such as portrait mode, live focus, and filters should be turned off to maintain image accuracy. It also is important to avoid excessive manual adjustments to exposure and brightness settings.1,2 The tap-to-focus feature that is integrated into many smartphone cameras can be utilized to ensure the capture of sharp, focused images. After verifying the image preview on the smartphone display, take the photograph. Immediately review the captured image to ensure it is clear and well lit and accurately depicts the area of interest, including its color, texture, and any relevant details, without glare or distortion. If the image does not meet these criteria, promptly reattempt to achieve the desired quality.
Dermoscopic Photography
Dermoscopy, which enables magnified examination of skin lesions, is increasingly being utilized in dermatology. While traditional dermoscopic photography requires specialized equipment, such as large single-lens reflex cameras with dedicated dermoscopic lens attachments, smartphone cameras now can be used to obtain dermoscopic images of reasonable quality.3,4 Adhering to specific practices can help to optimize the quality of dermoscopic images obtained via this technique.
Before capturing an image, it is essential to prepare both the lesion and the surrounding skin. Ensure the area is cleaned thoroughly and trim any hairs that may obscure the image. Apply an interface fluid such as rubbing alcohol or ultrasonography gel to improve image clarity by reducing surface tension and reflections, minimizing glare, and ensuring even light transmission throughout the lesion.5 As recommended for clinical photography, images should be captured in a space with ample indirect light. For best results, we recommend utilizing the primary photo capture option instead of portrait or panoramic mode or additional settings. It is crucial to disable features such as live focus, filters, night mode, and flash, as they may alter image accuracy; however, use of the tap-to-focus feature or manual settings adjustment is encouraged to ensure a high-resolution photograph.
Once these smartphone settings have been verified, position the dermatoscope directly over the lesion of interest. Next, place the smartphone camera lens directly against the eyepiece of the dermatoscope (Figure). Center the lesion in the field of view on the screen. Most smartphones enable adjustment to the image magnification on the photo capture screen. A single tap on the screen should populate the zoom options (eg, ×0.5, ×1, ×3) and allow for adjustment. For the majority of dermoscopic photographs, we recommend standard ×1 magnification, as it typically provides a clear and accurate representation of the lesion without introducing the possibility of image distortion. To obtain a close-up image, use the smartphone’s digital zoom function prior to taking the photograph rather than zooming in on the image after it has been captured; however, to minimize proximity distortion and maintain optimal image quality, avoid exceeding the halfway point on the camera’s zoom dial. After verifying the image preview on the smartphone display, capture the photograph. Immediate review is recommended to allow for prompt reattempt at capturing the image if needed.
PRACTICE IMPLICATIONS
The inherent convenience and accessibility offered by smartphone photography further solidifies its status as a valuable tool in modern dermatologic practice. By adhering to the best practices outlined in this guide, dermatologists can utilize smartphones to capture high-quality clinical and dermoscopic images that support accurate diagnosis and enhance patient care. This approach helps streamline workflows, enhance consistency in image quality, and standardize image capture across different settings and providers.
Additionally, smartphone photography can enhance both education and telemedicine by enabling physicians to easily share high-quality images with colleagues for virtual consultations, second opinions, and collaborative diagnoses. This sharing of images fosters learning opportunities, supports knowledge exchange, and allows for real-time feedback—all of which can improve clinical decision-making. Moreover, it broadens access to dermatologic expertise, strengthens communication between health care providers, and facilitates timely decision-making. As a result, patients benefit from more efficient, accurate, and collaborative care.
- Muraco L. Improved medical photography: key tips for creating images of lasting value. JAMA Dermatol. 2020;156:121-123. doi:10.1001 /jamadermatol.2019.3849
- Alvarado SM, Flessland P, Grant-Kels JM, et al. Practical strategies for improving clinical photography of dark skin. J Am Acad Dermatol. 2022;86:E21-E23. doi:10.1016/j.jaad.2021.09.001
- Pagliarello C, Feliciani C, Fantini C, et al. Use of the dermoscope as a smartphone close-up lens and LED annular macro ring flash. J Am Acad Dermatol. 2016;75:E27–E28. doi:10.1016/j.jaad .2015.12.04
- Zuo KJ, Guo D, Rao J. Mobile teledermatology: a promising future in clinical practice. J Cutan Med Surg. 2013;17:387-391. doi:10.2310/7750.2013.13030
- Gewirtzman AJ, Saurat J-H, Braun RP. An evaluation of dermscopy fluids and application techniques. Br J Dermatol. 2003;149:59-63. doi:10.1046/j.1365-2133.2003.05366.x
Best Practices for Capturing Clinical and Dermoscopic Images With Smartphone Photography
Best Practices for Capturing Clinical and Dermoscopic Images With Smartphone Photography
