User login
Waterproof Cast Protector Keeps Wound Dressing Intact Following Nail Surgery
Waterproof Cast Protector Keeps Wound Dressing Intact Following Nail Surgery
Practice Gap
Postoperative care after nail biopsies can be challenging for patients due to the bulky dressing that must remain in place for 48 hours.1 The dressing can restrict daily activities such as bathing, washing dishes, and other household tasks. A common solution is to cover the hand with a plastic bag secured with tape during water-related activities, but efficacy is variable. In one study, 23 participants tested this method by holding a paper towel with their hand covered by a plastic bag and measuring the weight of the paper towel before and after submersion of the hand in water.2 Any saturation of the paper towel was defined as failure; the failure rate was 52.2% (12/23) with motion (rotating the arm at the elbow for 30 seconds clockwise, counterclockwise, and left to right) and 60.9% (14/23) without motion. There was an average of 5.50 g of moisture accumulation without motion and 4.51 g with motion, with failure occurring most often immediately following submersion of the hand. Furthermore, the plastic bag with tape method was rated poorly by all 23 participants based on efficacy and comfort.2
In the same study, participants also reported that removal of the adhesive tape was unpleasant and irritating,2 which suggests these same complaints may apply to use of a waterproof bandage, another potential option for coverage of the wound dressing. As an alternative, we propose the use of a removable waterproof arm cast protector following nail surgery that allows patients to continue their regular activities while keeping the dressing dry and intact to allow for optimal wound healing.
The Technique
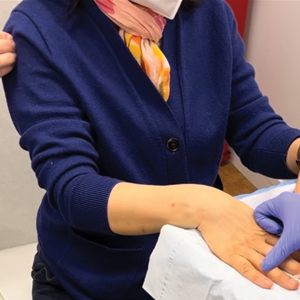
Our technique involves the use of a removable waterproof arm cast protector that is sealed with a thick rubber cuff, allowing patients to perform regular daily activities such as bathing, washing dishes, cleaning, and doing laundry without the wound dressing underneath becoming wet (Figure). Cast protectors made of flexible latex-free plastic are readily available and can slide on and off the arm as needed. We recommend that patients purchase the cast protector prior to undergoing surgery. There are options to fit most adults, with the opening generally accommodating arm diameters of 2 to 7 inches. These reusable cast protectors are available via popular online retailers and typically cost patients $10 to $15.

Practice Implications
In our experience, using a reusable waterproof cast protector following nail surgery is effective at keeping wound dressings dry and provides a practical solution for bathing and other activities involving water exposure. It is durable and easy to use, especially when compared to a plastic bag and waterproof tape. However, some patients find the waterproof seal uncomfortable, especially when worn for extended periods of time. According to online product feedback, limitations of the cast protector include potential leakage with prolonged immersion in water, swimming, or high-pressure water exposure. The cast protector should not be worn for more than 30 minutes, as it can restrict blood flow, and condensation from prolonged use may dampen the dressing. While we have not encountered allergic contact dermatitis associated with the use of cast protectors for this purpose in our practice, patients should be cautioned of this potential risk. While these cast protectors generally can accommodate a range of arm diameters, they may not fit all hand sizes or shapes and may reduce dexterity for motor tasks. Additionally, the patient must purchase the protector ahead of surgery.
Our technique involving the use of a waterproof arm cast protector is an affordable solution that allows patients to keep their wound dressing dry while continuing to perform regular daily activities. The cast protector also can be used following other dermatologic procedures (eg, biopsy, Mohs micrographic surgery) that involve the hand and lower arm when waterproof protection may be necessary.
- Ricardo JW, Lipner SR. How we do it: pressure-padded dressing with self-adherent elastic wrap for wound care after nail surgery. Dermatol Surg. 2021;47:442–444. doi:10.1097/DSS.0000000000002371
- Kwan S, Santoro A, Cheesman Q, et al. Efficacy of waterproof cast protectors and their ability to keep casts dry. J Hand Surg Am. 2023;48:803–809. doi:10.1016/j.jhsa.2022.05.006
Practice Gap
Postoperative care after nail biopsies can be challenging for patients due to the bulky dressing that must remain in place for 48 hours.1 The dressing can restrict daily activities such as bathing, washing dishes, and other household tasks. A common solution is to cover the hand with a plastic bag secured with tape during water-related activities, but efficacy is variable. In one study, 23 participants tested this method by holding a paper towel with their hand covered by a plastic bag and measuring the weight of the paper towel before and after submersion of the hand in water.2 Any saturation of the paper towel was defined as failure; the failure rate was 52.2% (12/23) with motion (rotating the arm at the elbow for 30 seconds clockwise, counterclockwise, and left to right) and 60.9% (14/23) without motion. There was an average of 5.50 g of moisture accumulation without motion and 4.51 g with motion, with failure occurring most often immediately following submersion of the hand. Furthermore, the plastic bag with tape method was rated poorly by all 23 participants based on efficacy and comfort.2
In the same study, participants also reported that removal of the adhesive tape was unpleasant and irritating,2 which suggests these same complaints may apply to use of a waterproof bandage, another potential option for coverage of the wound dressing. As an alternative, we propose the use of a removable waterproof arm cast protector following nail surgery that allows patients to continue their regular activities while keeping the dressing dry and intact to allow for optimal wound healing.
The Technique
Our technique involves the use of a removable waterproof arm cast protector that is sealed with a thick rubber cuff, allowing patients to perform regular daily activities such as bathing, washing dishes, cleaning, and doing laundry without the wound dressing underneath becoming wet (Figure). Cast protectors made of flexible latex-free plastic are readily available and can slide on and off the arm as needed. We recommend that patients purchase the cast protector prior to undergoing surgery. There are options to fit most adults, with the opening generally accommodating arm diameters of 2 to 7 inches. These reusable cast protectors are available via popular online retailers and typically cost patients $10 to $15.

Practice Implications
In our experience, using a reusable waterproof cast protector following nail surgery is effective at keeping wound dressings dry and provides a practical solution for bathing and other activities involving water exposure. It is durable and easy to use, especially when compared to a plastic bag and waterproof tape. However, some patients find the waterproof seal uncomfortable, especially when worn for extended periods of time. According to online product feedback, limitations of the cast protector include potential leakage with prolonged immersion in water, swimming, or high-pressure water exposure. The cast protector should not be worn for more than 30 minutes, as it can restrict blood flow, and condensation from prolonged use may dampen the dressing. While we have not encountered allergic contact dermatitis associated with the use of cast protectors for this purpose in our practice, patients should be cautioned of this potential risk. While these cast protectors generally can accommodate a range of arm diameters, they may not fit all hand sizes or shapes and may reduce dexterity for motor tasks. Additionally, the patient must purchase the protector ahead of surgery.
Our technique involving the use of a waterproof arm cast protector is an affordable solution that allows patients to keep their wound dressing dry while continuing to perform regular daily activities. The cast protector also can be used following other dermatologic procedures (eg, biopsy, Mohs micrographic surgery) that involve the hand and lower arm when waterproof protection may be necessary.
Practice Gap
Postoperative care after nail biopsies can be challenging for patients due to the bulky dressing that must remain in place for 48 hours.1 The dressing can restrict daily activities such as bathing, washing dishes, and other household tasks. A common solution is to cover the hand with a plastic bag secured with tape during water-related activities, but efficacy is variable. In one study, 23 participants tested this method by holding a paper towel with their hand covered by a plastic bag and measuring the weight of the paper towel before and after submersion of the hand in water.2 Any saturation of the paper towel was defined as failure; the failure rate was 52.2% (12/23) with motion (rotating the arm at the elbow for 30 seconds clockwise, counterclockwise, and left to right) and 60.9% (14/23) without motion. There was an average of 5.50 g of moisture accumulation without motion and 4.51 g with motion, with failure occurring most often immediately following submersion of the hand. Furthermore, the plastic bag with tape method was rated poorly by all 23 participants based on efficacy and comfort.2
In the same study, participants also reported that removal of the adhesive tape was unpleasant and irritating,2 which suggests these same complaints may apply to use of a waterproof bandage, another potential option for coverage of the wound dressing. As an alternative, we propose the use of a removable waterproof arm cast protector following nail surgery that allows patients to continue their regular activities while keeping the dressing dry and intact to allow for optimal wound healing.
The Technique
Our technique involves the use of a removable waterproof arm cast protector that is sealed with a thick rubber cuff, allowing patients to perform regular daily activities such as bathing, washing dishes, cleaning, and doing laundry without the wound dressing underneath becoming wet (Figure). Cast protectors made of flexible latex-free plastic are readily available and can slide on and off the arm as needed. We recommend that patients purchase the cast protector prior to undergoing surgery. There are options to fit most adults, with the opening generally accommodating arm diameters of 2 to 7 inches. These reusable cast protectors are available via popular online retailers and typically cost patients $10 to $15.

Practice Implications
In our experience, using a reusable waterproof cast protector following nail surgery is effective at keeping wound dressings dry and provides a practical solution for bathing and other activities involving water exposure. It is durable and easy to use, especially when compared to a plastic bag and waterproof tape. However, some patients find the waterproof seal uncomfortable, especially when worn for extended periods of time. According to online product feedback, limitations of the cast protector include potential leakage with prolonged immersion in water, swimming, or high-pressure water exposure. The cast protector should not be worn for more than 30 minutes, as it can restrict blood flow, and condensation from prolonged use may dampen the dressing. While we have not encountered allergic contact dermatitis associated with the use of cast protectors for this purpose in our practice, patients should be cautioned of this potential risk. While these cast protectors generally can accommodate a range of arm diameters, they may not fit all hand sizes or shapes and may reduce dexterity for motor tasks. Additionally, the patient must purchase the protector ahead of surgery.
Our technique involving the use of a waterproof arm cast protector is an affordable solution that allows patients to keep their wound dressing dry while continuing to perform regular daily activities. The cast protector also can be used following other dermatologic procedures (eg, biopsy, Mohs micrographic surgery) that involve the hand and lower arm when waterproof protection may be necessary.
- Ricardo JW, Lipner SR. How we do it: pressure-padded dressing with self-adherent elastic wrap for wound care after nail surgery. Dermatol Surg. 2021;47:442–444. doi:10.1097/DSS.0000000000002371
- Kwan S, Santoro A, Cheesman Q, et al. Efficacy of waterproof cast protectors and their ability to keep casts dry. J Hand Surg Am. 2023;48:803–809. doi:10.1016/j.jhsa.2022.05.006
Waterproof Cast Protector Keeps Wound Dressing Intact Following Nail Surgery
Waterproof Cast Protector Keeps Wound Dressing Intact Following Nail Surgery
Interactive Approach to Teaching Mohs Micrographic Surgery to Dermatology Residents
Interactive Approach to Teaching Mohs Micrographic Surgery to Dermatology Residents
Practice Gap
Tissue processing and complete margin assessment in Mohs micrographic surgery (MMS) are challenging concepts for residents, yet they are essential components of the dermatology residency curriculum. We propose a hands-on active teaching method using craft foam blocks to help residents master these techniques. Prior educational tools have included instructional videos1 as well as the peanut butter–cup and cantaloupe analogies.2,3 Specifically, our method utilizes inexpensive, readily available supplies that allow for repeated practice in a low-stakes environment without limitation of resources. This method provides an immersive, hands-on experience that allows residents to perform multiple practice excisions and simulate positive peripheral or deep margins, unlike tools that offer only fixed-depth or purely visual representations. Additionally, our learning model uniquely enables residents to flatten the simulated tissue, providing a clearer understanding of how a 3-dimensional specimen is transformed on a slide during histologic preparation. This step is particularly important, as tissue architecture can shift during processing, making it one of the most difficult concepts to grasp without hands-on experience. Having a multitude of teaching methods is crucial to accommodate various learning styles, and active learning has been shown to enhance retention for dermatology residents.4
The Technique
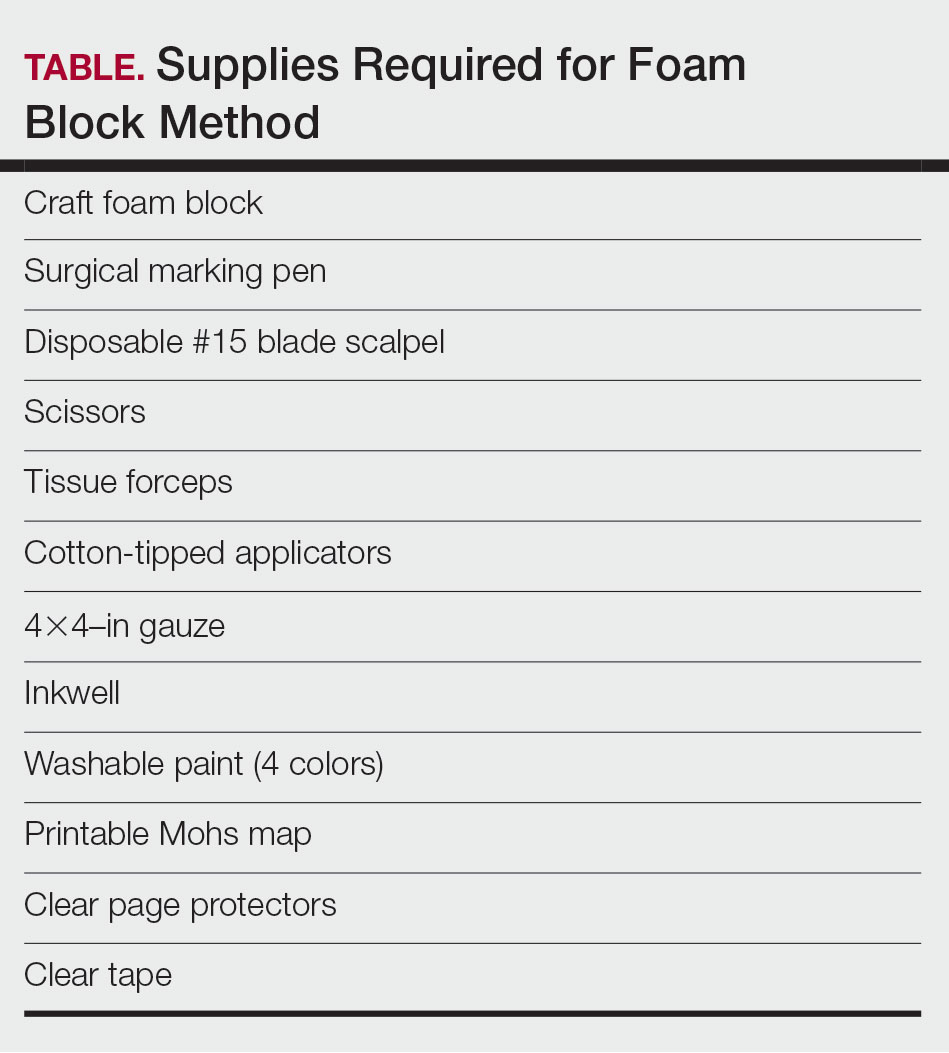
Residents use simple art supplies (including craft foam blocks and ink) and inexpensive, readily available surgical tools to simulate MMS (Table)(Figure 1). If desired, the resident can follow along with the comprehensive, stepwise textbook description of MMS, outlined by Benedetto et al5 to contextualize this hands-on exercise within a standardized didactic framework.

The foam block, which represents patient tissue, serves as the specimen. The resident begins by freehand drawing a simulated cutaneous tumor directly onto the foam using a surgical marking pen. At this point, the instructor discusses the advantages and limitations of tumor debulking with a sharp blade or curette. Residents then mark appropriate margins (1-3 mm) of normal-appearing “epidermis” on the foam block and add hash marks for orientation. This is another opportunity for the instructor to discuss common methods for marking tissue in vivo and to review situations when larger or smaller margins might be appropriate.
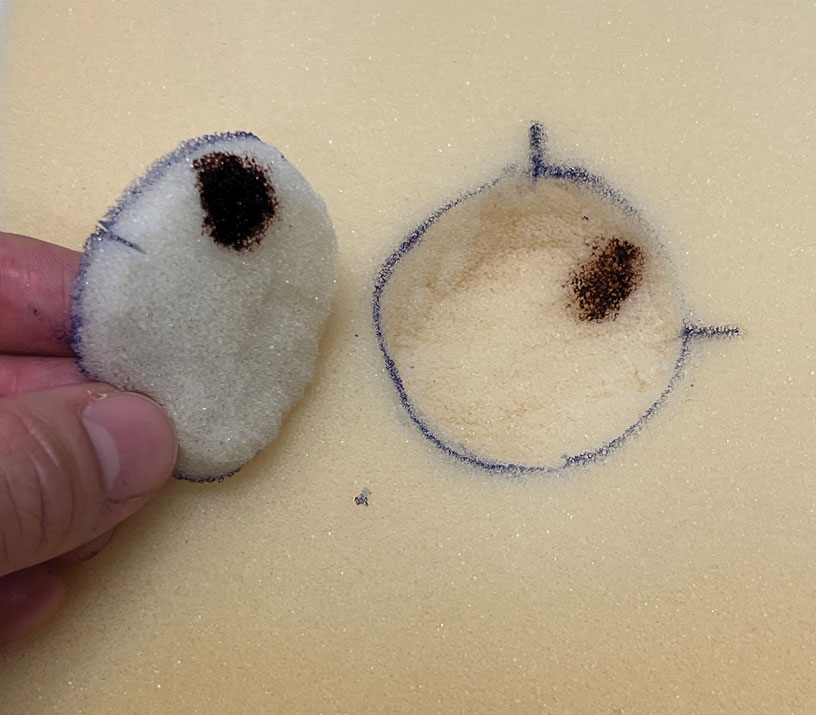
Next, the resident removes the first layer of simulated tissue using a disposable #15 blade scalpel at a 45° angle circumferentially and deep around the representative tumor. The resident also may use scissors and tissue forceps to remove the representative tumor. Next, the excised foam layer (the simulated “specimen”) is transferred to gauze. To demonstrate a positive margin, the resident or instructor marks the deep or peripheral foam block with a surgical marking pen, indicating residual tumor (Figure 2). This allows for multiple sequential layers of foam to be removed, demonstrating successive stages of MMS.
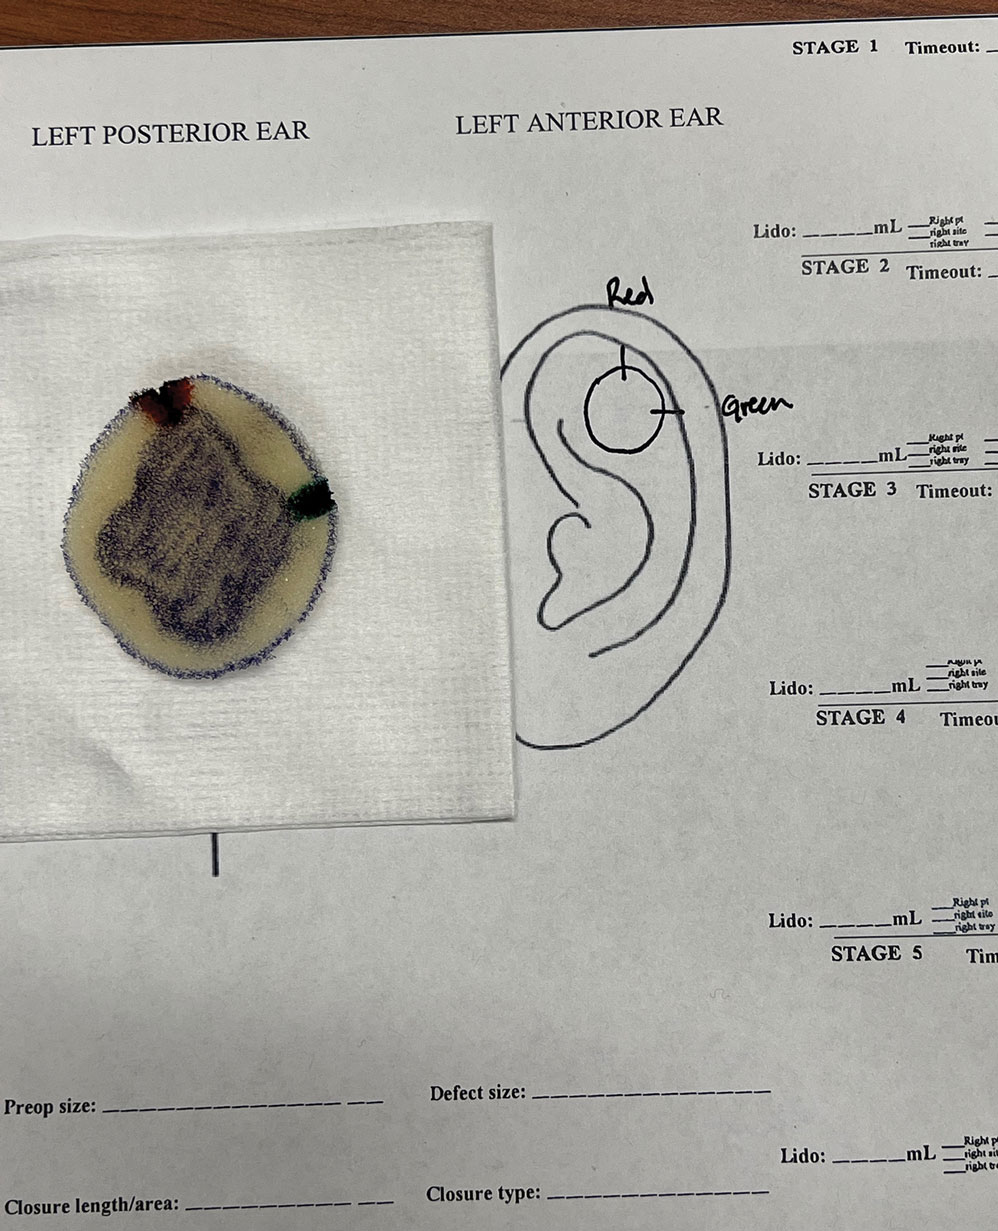
An inkwell holds different colors of washable paint to simulate tissue inking. After excision, the resident uses cotton-tipped applicators to apply different paint colors to the edges of the excised foam specimen at designated orientation points (eg, 3 o'clock and 12 o'clock). The resident then records the location of the excised sample by hand-drawing it on a printable Mohs map, labeling the corresponding paint colors to indicate orientation (Figure 3).
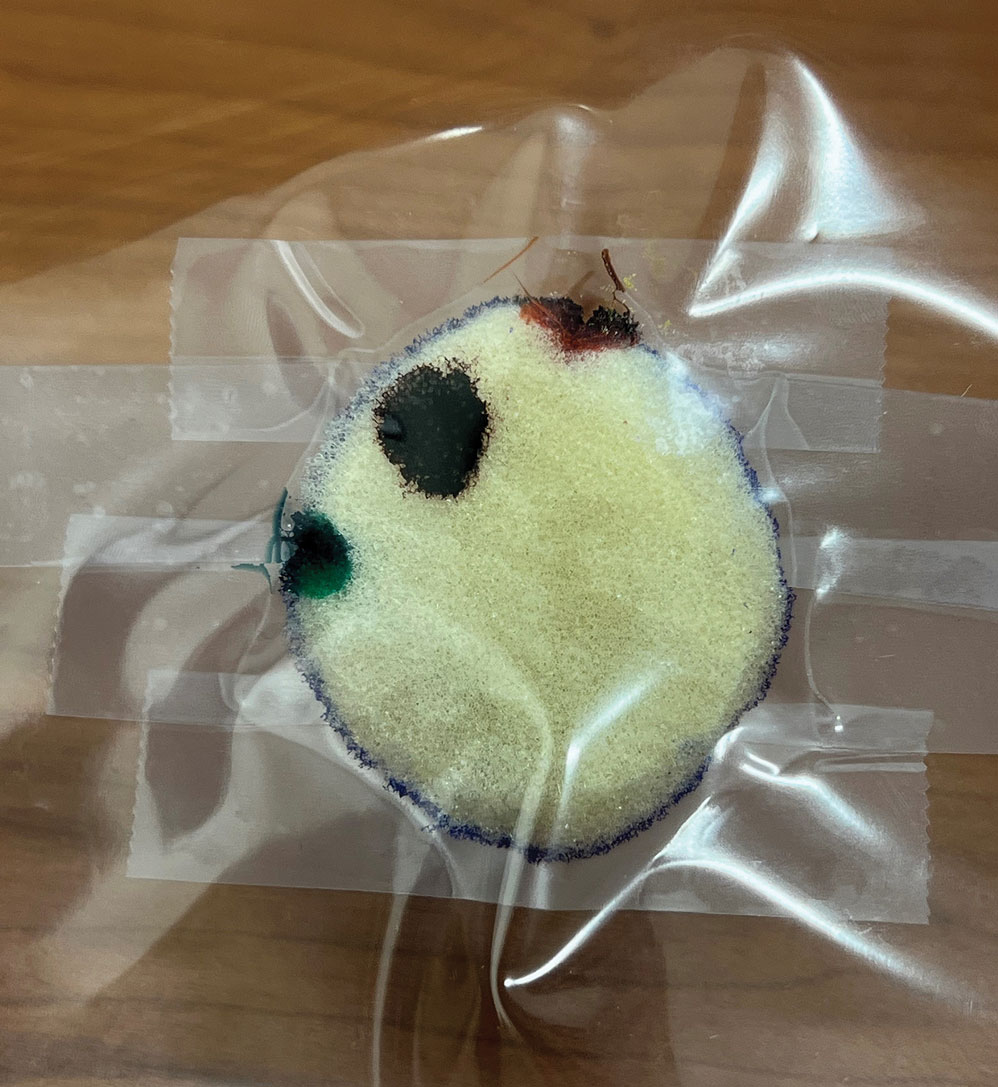
The resident then places the specimen between 2 plastic page protectors mimicking a glass slide and cover slip. Clear tape can be used to help flatten the specimen (Figure 4). The tissue is compressed between the page protector so that the simulated epidermis, dermis, and subcutaneous fat are all in the same plane. At this stage, the instructor may discuss the use of relaxing incisions, especially for deeper tissue specimens or when excision at a 45° bevel is not achieved.5 The view from the underside of the page protector reveals 100% of the specimen’s margin and mimics the first cut off the tissue block. The resident can visualize the complete circumferential, peripheral, and deep margins and can easily identify any positive margins. At this point, the exercise can conclude, or the resident can explore further stages for positive margins, bisected specimens, or other tissue preparation variations.
Practice Implications
By individually designing and removing a representative tumor with margins, creating hash marks, and preparing a tissue specimen for histologic analysis, our interactive teaching method provides dermatology residents with a relatively simple, effective, and active learning experience for MMS outside the surgical setting. Using a piece of craft foam allows the representative tissue to be manipulated and flattened, similar to cutaneous tissue. This method was implemented and refined across 3 separate teaching sessions held by teaching faculty (E.I.P and E.B.W.) at the San Antonio Uniformed Services Health Education Consortium Dermatology Residency Program (San Antonio, Texas). This method has consistently generated strong resident engagement and prompted insightful questions and discussions. Program directors at other residency programs can readily incorporate this method in their surgical curriculum by allocating a brief didactic period to the exercise and facilitating the discussion with a dermatologic surgeon. Its simplicity, low cost, and effectiveness make the foam block model an easily adoptable teaching tool for dermatology residency programs seeking to provide a comprehensive, hands-on understanding of MMS.
- McNeil E, Reich H, Hurliman E. Educational video improves dermatology residents’ understanding of Mohs micrographic surgery: a surveybased matched cohort study. J Am Acad Dermatol. 2020;83:926-927. doi:10.1016/j.jaad.2020.01.013
- Lee E, Wolverton JE, Somani AK. A simple, effective analogy to elucidate the Mohs micrographic surgery procedure—the peanut butter cup. JAMA Dermatol. 2017;153:743-744. doi:10.1001 /jamadermatol.2017.0614
- Vassantachart JM, Guccione J, Seeburger J. Clinical pearl: Mohs cantaloupe analogy for the dermatology resident. Cutis. 2018; 102:65-66.
- Stratman EJ, Vogel CA, Reck SJ, et al. Analysis of dermatology resident self-reported successful learning styles and implications for core competency curriculum development. Med Teach. 2008;30:420-425. doi:10.1080/01421590801946988
- Benedetto PX, Poblete-Lopez C. Mohs micrographic surgery technique. Dermatol Clinics. 2011;29:141-151. doi:10.1016/j.det.2011.02.002
Practice Gap
Tissue processing and complete margin assessment in Mohs micrographic surgery (MMS) are challenging concepts for residents, yet they are essential components of the dermatology residency curriculum. We propose a hands-on active teaching method using craft foam blocks to help residents master these techniques. Prior educational tools have included instructional videos1 as well as the peanut butter–cup and cantaloupe analogies.2,3 Specifically, our method utilizes inexpensive, readily available supplies that allow for repeated practice in a low-stakes environment without limitation of resources. This method provides an immersive, hands-on experience that allows residents to perform multiple practice excisions and simulate positive peripheral or deep margins, unlike tools that offer only fixed-depth or purely visual representations. Additionally, our learning model uniquely enables residents to flatten the simulated tissue, providing a clearer understanding of how a 3-dimensional specimen is transformed on a slide during histologic preparation. This step is particularly important, as tissue architecture can shift during processing, making it one of the most difficult concepts to grasp without hands-on experience. Having a multitude of teaching methods is crucial to accommodate various learning styles, and active learning has been shown to enhance retention for dermatology residents.4
The Technique
Residents use simple art supplies (including craft foam blocks and ink) and inexpensive, readily available surgical tools to simulate MMS (Table)(Figure 1). If desired, the resident can follow along with the comprehensive, stepwise textbook description of MMS, outlined by Benedetto et al5 to contextualize this hands-on exercise within a standardized didactic framework.


The foam block, which represents patient tissue, serves as the specimen. The resident begins by freehand drawing a simulated cutaneous tumor directly onto the foam using a surgical marking pen. At this point, the instructor discusses the advantages and limitations of tumor debulking with a sharp blade or curette. Residents then mark appropriate margins (1-3 mm) of normal-appearing “epidermis” on the foam block and add hash marks for orientation. This is another opportunity for the instructor to discuss common methods for marking tissue in vivo and to review situations when larger or smaller margins might be appropriate.
Next, the resident removes the first layer of simulated tissue using a disposable #15 blade scalpel at a 45° angle circumferentially and deep around the representative tumor. The resident also may use scissors and tissue forceps to remove the representative tumor. Next, the excised foam layer (the simulated “specimen”) is transferred to gauze. To demonstrate a positive margin, the resident or instructor marks the deep or peripheral foam block with a surgical marking pen, indicating residual tumor (Figure 2). This allows for multiple sequential layers of foam to be removed, demonstrating successive stages of MMS.

An inkwell holds different colors of washable paint to simulate tissue inking. After excision, the resident uses cotton-tipped applicators to apply different paint colors to the edges of the excised foam specimen at designated orientation points (eg, 3 o'clock and 12 o'clock). The resident then records the location of the excised sample by hand-drawing it on a printable Mohs map, labeling the corresponding paint colors to indicate orientation (Figure 3).

The resident then places the specimen between 2 plastic page protectors mimicking a glass slide and cover slip. Clear tape can be used to help flatten the specimen (Figure 4). The tissue is compressed between the page protector so that the simulated epidermis, dermis, and subcutaneous fat are all in the same plane. At this stage, the instructor may discuss the use of relaxing incisions, especially for deeper tissue specimens or when excision at a 45° bevel is not achieved.5 The view from the underside of the page protector reveals 100% of the specimen’s margin and mimics the first cut off the tissue block. The resident can visualize the complete circumferential, peripheral, and deep margins and can easily identify any positive margins. At this point, the exercise can conclude, or the resident can explore further stages for positive margins, bisected specimens, or other tissue preparation variations.

Practice Implications
By individually designing and removing a representative tumor with margins, creating hash marks, and preparing a tissue specimen for histologic analysis, our interactive teaching method provides dermatology residents with a relatively simple, effective, and active learning experience for MMS outside the surgical setting. Using a piece of craft foam allows the representative tissue to be manipulated and flattened, similar to cutaneous tissue. This method was implemented and refined across 3 separate teaching sessions held by teaching faculty (E.I.P and E.B.W.) at the San Antonio Uniformed Services Health Education Consortium Dermatology Residency Program (San Antonio, Texas). This method has consistently generated strong resident engagement and prompted insightful questions and discussions. Program directors at other residency programs can readily incorporate this method in their surgical curriculum by allocating a brief didactic period to the exercise and facilitating the discussion with a dermatologic surgeon. Its simplicity, low cost, and effectiveness make the foam block model an easily adoptable teaching tool for dermatology residency programs seeking to provide a comprehensive, hands-on understanding of MMS.
Practice Gap
Tissue processing and complete margin assessment in Mohs micrographic surgery (MMS) are challenging concepts for residents, yet they are essential components of the dermatology residency curriculum. We propose a hands-on active teaching method using craft foam blocks to help residents master these techniques. Prior educational tools have included instructional videos1 as well as the peanut butter–cup and cantaloupe analogies.2,3 Specifically, our method utilizes inexpensive, readily available supplies that allow for repeated practice in a low-stakes environment without limitation of resources. This method provides an immersive, hands-on experience that allows residents to perform multiple practice excisions and simulate positive peripheral or deep margins, unlike tools that offer only fixed-depth or purely visual representations. Additionally, our learning model uniquely enables residents to flatten the simulated tissue, providing a clearer understanding of how a 3-dimensional specimen is transformed on a slide during histologic preparation. This step is particularly important, as tissue architecture can shift during processing, making it one of the most difficult concepts to grasp without hands-on experience. Having a multitude of teaching methods is crucial to accommodate various learning styles, and active learning has been shown to enhance retention for dermatology residents.4
The Technique
Residents use simple art supplies (including craft foam blocks and ink) and inexpensive, readily available surgical tools to simulate MMS (Table)(Figure 1). If desired, the resident can follow along with the comprehensive, stepwise textbook description of MMS, outlined by Benedetto et al5 to contextualize this hands-on exercise within a standardized didactic framework.


The foam block, which represents patient tissue, serves as the specimen. The resident begins by freehand drawing a simulated cutaneous tumor directly onto the foam using a surgical marking pen. At this point, the instructor discusses the advantages and limitations of tumor debulking with a sharp blade or curette. Residents then mark appropriate margins (1-3 mm) of normal-appearing “epidermis” on the foam block and add hash marks for orientation. This is another opportunity for the instructor to discuss common methods for marking tissue in vivo and to review situations when larger or smaller margins might be appropriate.
Next, the resident removes the first layer of simulated tissue using a disposable #15 blade scalpel at a 45° angle circumferentially and deep around the representative tumor. The resident also may use scissors and tissue forceps to remove the representative tumor. Next, the excised foam layer (the simulated “specimen”) is transferred to gauze. To demonstrate a positive margin, the resident or instructor marks the deep or peripheral foam block with a surgical marking pen, indicating residual tumor (Figure 2). This allows for multiple sequential layers of foam to be removed, demonstrating successive stages of MMS.

An inkwell holds different colors of washable paint to simulate tissue inking. After excision, the resident uses cotton-tipped applicators to apply different paint colors to the edges of the excised foam specimen at designated orientation points (eg, 3 o'clock and 12 o'clock). The resident then records the location of the excised sample by hand-drawing it on a printable Mohs map, labeling the corresponding paint colors to indicate orientation (Figure 3).

The resident then places the specimen between 2 plastic page protectors mimicking a glass slide and cover slip. Clear tape can be used to help flatten the specimen (Figure 4). The tissue is compressed between the page protector so that the simulated epidermis, dermis, and subcutaneous fat are all in the same plane. At this stage, the instructor may discuss the use of relaxing incisions, especially for deeper tissue specimens or when excision at a 45° bevel is not achieved.5 The view from the underside of the page protector reveals 100% of the specimen’s margin and mimics the first cut off the tissue block. The resident can visualize the complete circumferential, peripheral, and deep margins and can easily identify any positive margins. At this point, the exercise can conclude, or the resident can explore further stages for positive margins, bisected specimens, or other tissue preparation variations.

Practice Implications
By individually designing and removing a representative tumor with margins, creating hash marks, and preparing a tissue specimen for histologic analysis, our interactive teaching method provides dermatology residents with a relatively simple, effective, and active learning experience for MMS outside the surgical setting. Using a piece of craft foam allows the representative tissue to be manipulated and flattened, similar to cutaneous tissue. This method was implemented and refined across 3 separate teaching sessions held by teaching faculty (E.I.P and E.B.W.) at the San Antonio Uniformed Services Health Education Consortium Dermatology Residency Program (San Antonio, Texas). This method has consistently generated strong resident engagement and prompted insightful questions and discussions. Program directors at other residency programs can readily incorporate this method in their surgical curriculum by allocating a brief didactic period to the exercise and facilitating the discussion with a dermatologic surgeon. Its simplicity, low cost, and effectiveness make the foam block model an easily adoptable teaching tool for dermatology residency programs seeking to provide a comprehensive, hands-on understanding of MMS.
- McNeil E, Reich H, Hurliman E. Educational video improves dermatology residents’ understanding of Mohs micrographic surgery: a surveybased matched cohort study. J Am Acad Dermatol. 2020;83:926-927. doi:10.1016/j.jaad.2020.01.013
- Lee E, Wolverton JE, Somani AK. A simple, effective analogy to elucidate the Mohs micrographic surgery procedure—the peanut butter cup. JAMA Dermatol. 2017;153:743-744. doi:10.1001 /jamadermatol.2017.0614
- Vassantachart JM, Guccione J, Seeburger J. Clinical pearl: Mohs cantaloupe analogy for the dermatology resident. Cutis. 2018; 102:65-66.
- Stratman EJ, Vogel CA, Reck SJ, et al. Analysis of dermatology resident self-reported successful learning styles and implications for core competency curriculum development. Med Teach. 2008;30:420-425. doi:10.1080/01421590801946988
- Benedetto PX, Poblete-Lopez C. Mohs micrographic surgery technique. Dermatol Clinics. 2011;29:141-151. doi:10.1016/j.det.2011.02.002
Interactive Approach to Teaching Mohs Micrographic Surgery to Dermatology Residents
Interactive Approach to Teaching Mohs Micrographic Surgery to Dermatology Residents
Poly-L-Lactic Acid Reconstitution Technique to Reduce Needle Obstruction
Poly-L-Lactic Acid Reconstitution Technique to Reduce Needle Obstruction
Practice Gap
Poly-L-lactic acid is approved by the US Food and Drug Administration for addressing fat loss due to HAART in patients with HIV.2,3 When used as a dermal filler for correction of facial lipoatrophy, PLLA is well tolerated and has been shown to improve quality of life.2,3 Poly-L-lactic acid is available for clinical use as microparticles of lyophilized alpha hydroxy acid polymers. Once injected (after the carrier substance is absorbed), PLLA induces an inflammatory response that ultimately leads to the production of new collagen.3 Unfortunately, PLLA microparticles often obstruct needles and make the product difficult to use, potentially hindering effective injection; thus, it is in the best interest of the patient to mitigate needle obstruction during this procedure. In this article, we describe a simple and effective way to mitigate this problem by utilizing a water bath to warm the filler prior to injection.
Technique
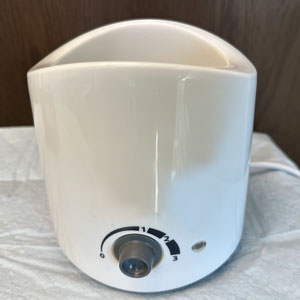
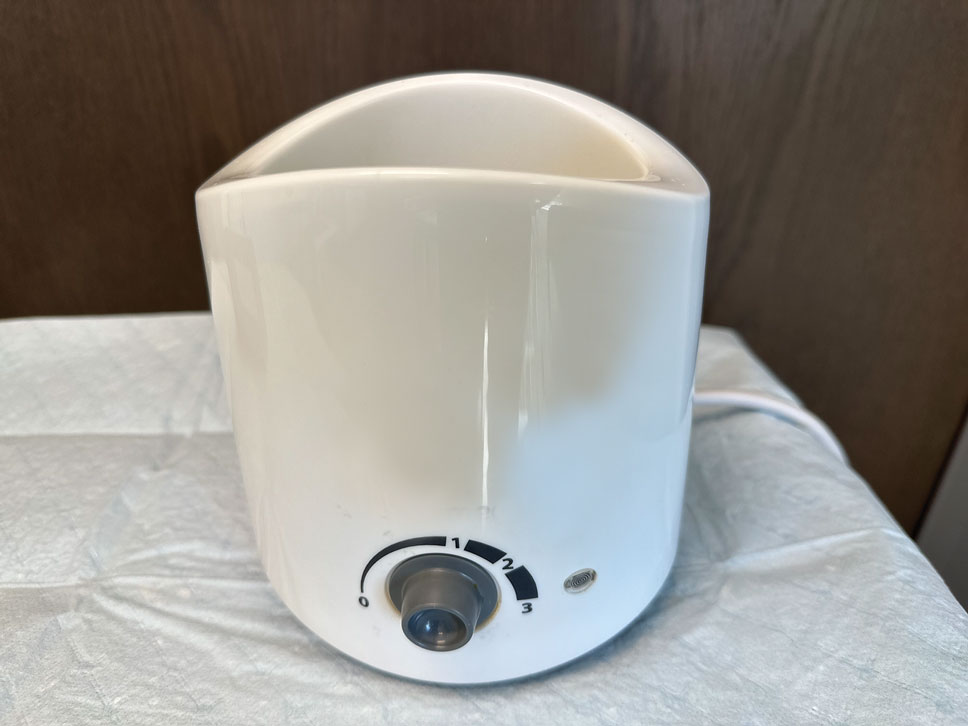
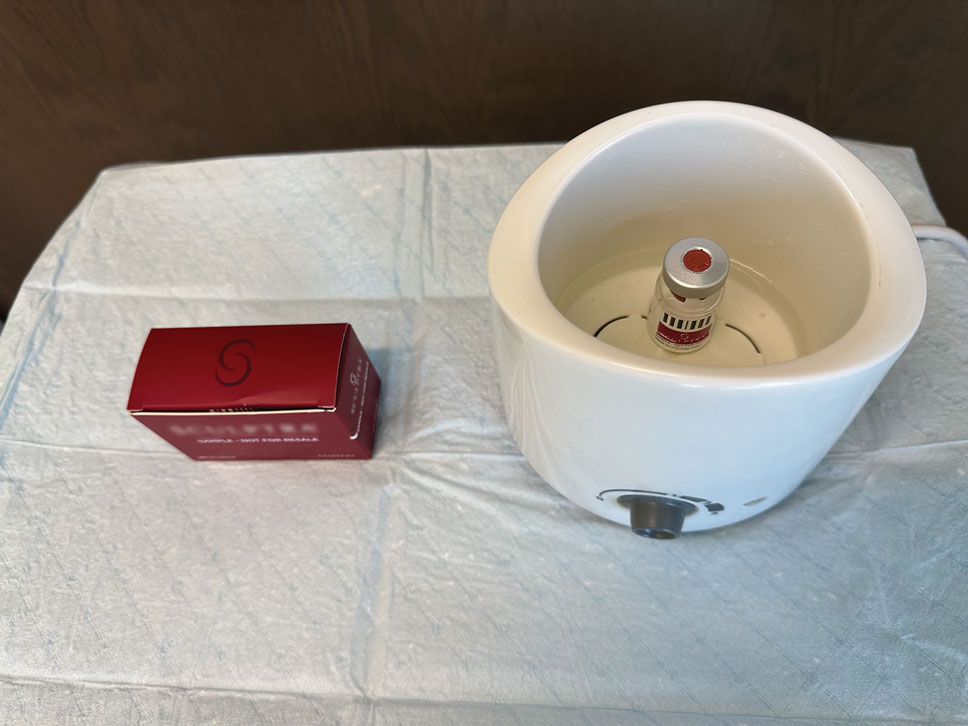
The required supplies include a thermostatic water bath, reconstituted PLLA, a syringe, and a 26-gauge injection needle. Because laboratory-grade heated water baths typically cost between $300 and $3000,4 we recommend using a more affordable, commercially available thermostatic water bath (eg, baby bottle warmer)(Figure 1) to warm the filler prior to injection, as the optimal temperature for this technique can still be achieved while remaining cost effective. Vials of PLLA reconstituted with 7 mL of sterile water and 2 mL lidocaine hydrochloride 1% should be labeled with the date of reconstitution and manually agitated for 30 seconds. The reconstituted product should be stored for 24 hours to ensure even suspension and powder saturation.5 On the day of the procedure, the vial should be placed into the water bath (heated to 100 °C) for 10 minutes prior to injection (Figure 2) and agitated again immediately before withdrawal into the syringe. The clinician then should sterilize the rubber top and draw the product from the warmed vial using the same size needle that will be used for injection. Although a larger gauge needle may make drawing up the product easier in typical practice, drawing and injecting with the same gauge needle helps prevent larger particles from clogging a smaller injection needle. Using a 26-gauge injection needle for withdrawal further reduces clogging by serving as a filter to prevent larger product particles from entering the injection syringe. The vials of PLLA can be kept in the water bath throughout the procedure between uses to keep the filler at a consistent temperature.
Practice Implications
Although many clinicians reduce needle obstructions by warming PLLA before injection, a published protocol currently is not available. One consideration when utilizing this technique is the limited data on the clinical stability and efficacy of PLLA at varying temperatures. Two studies recommend bringing the reconstituted vial to room temperature prior to injection, while others have documented an endothermic melting point in the range of 120 °C to 180
- James J, Carruthers A, Carruthers J. HIV-associated facial lipoatrophy. Dermatol Surg. 2002;28:979-986. doi:10.1046/j.1524-4725.2002.02099.x
- Duracinsky M, Leclercq P, Herrmann S, et al. Safety of poly-L-lactic acid (New-Fill®) in the treatment of facial lipoatrophy: a large observational study among HIV-positive patients. BMC Infect Dis. 2014;14:474. doi:10.1186/1471-2334-14-474
- Sickles CK, Nassereddin A, Patel P, et al. Poly-L-lactic acid. StatPearls [Internet]. Updated February 28, 2024. Accessed October 31, 2025. https://www.ncbi.nlm.nih.gov/books/NBK507871/
- Laboratory equipment: Water bath. Global Lab Supply. (n.d.). http://www.globallabsupply.com/Water-Bath-s/2122.htm
- Lin MJ, Dubin DP, Goldberg DJ, et al. Practices in the usage and reconstitution of poly-L-lactic acid. J Drugs Dermatol. 2019;18:880-886.
- Vleggaar D, Fitzgerald R, Lorenc ZP, et al. Consensus recommendations on the use of injectable poly-L-lactic acid for facial and nonfacial volumization. J Drugs Dermatol. 2014;13:s44-51.
- Sedush NG, Kalinin KT, Azarkevich PN, et al. Physicochemical characteristics and hydrolytic degradation of polylactic acid dermal fillers: a comparative study. Cosmetics. 2023;10:110. doi:10.3390/cosmetics10040110
Practice Gap
Poly-L-lactic acid is approved by the US Food and Drug Administration for addressing fat loss due to HAART in patients with HIV.2,3 When used as a dermal filler for correction of facial lipoatrophy, PLLA is well tolerated and has been shown to improve quality of life.2,3 Poly-L-lactic acid is available for clinical use as microparticles of lyophilized alpha hydroxy acid polymers. Once injected (after the carrier substance is absorbed), PLLA induces an inflammatory response that ultimately leads to the production of new collagen.3 Unfortunately, PLLA microparticles often obstruct needles and make the product difficult to use, potentially hindering effective injection; thus, it is in the best interest of the patient to mitigate needle obstruction during this procedure. In this article, we describe a simple and effective way to mitigate this problem by utilizing a water bath to warm the filler prior to injection.
Technique
The required supplies include a thermostatic water bath, reconstituted PLLA, a syringe, and a 26-gauge injection needle. Because laboratory-grade heated water baths typically cost between $300 and $3000,4 we recommend using a more affordable, commercially available thermostatic water bath (eg, baby bottle warmer)(Figure 1) to warm the filler prior to injection, as the optimal temperature for this technique can still be achieved while remaining cost effective. Vials of PLLA reconstituted with 7 mL of sterile water and 2 mL lidocaine hydrochloride 1% should be labeled with the date of reconstitution and manually agitated for 30 seconds. The reconstituted product should be stored for 24 hours to ensure even suspension and powder saturation.5 On the day of the procedure, the vial should be placed into the water bath (heated to 100 °C) for 10 minutes prior to injection (Figure 2) and agitated again immediately before withdrawal into the syringe. The clinician then should sterilize the rubber top and draw the product from the warmed vial using the same size needle that will be used for injection. Although a larger gauge needle may make drawing up the product easier in typical practice, drawing and injecting with the same gauge needle helps prevent larger particles from clogging a smaller injection needle. Using a 26-gauge injection needle for withdrawal further reduces clogging by serving as a filter to prevent larger product particles from entering the injection syringe. The vials of PLLA can be kept in the water bath throughout the procedure between uses to keep the filler at a consistent temperature.


Practice Implications
Although many clinicians reduce needle obstructions by warming PLLA before injection, a published protocol currently is not available. One consideration when utilizing this technique is the limited data on the clinical stability and efficacy of PLLA at varying temperatures. Two studies recommend bringing the reconstituted vial to room temperature prior to injection, while others have documented an endothermic melting point in the range of 120 °C to 180
Practice Gap
Poly-L-lactic acid is approved by the US Food and Drug Administration for addressing fat loss due to HAART in patients with HIV.2,3 When used as a dermal filler for correction of facial lipoatrophy, PLLA is well tolerated and has been shown to improve quality of life.2,3 Poly-L-lactic acid is available for clinical use as microparticles of lyophilized alpha hydroxy acid polymers. Once injected (after the carrier substance is absorbed), PLLA induces an inflammatory response that ultimately leads to the production of new collagen.3 Unfortunately, PLLA microparticles often obstruct needles and make the product difficult to use, potentially hindering effective injection; thus, it is in the best interest of the patient to mitigate needle obstruction during this procedure. In this article, we describe a simple and effective way to mitigate this problem by utilizing a water bath to warm the filler prior to injection.
Technique
The required supplies include a thermostatic water bath, reconstituted PLLA, a syringe, and a 26-gauge injection needle. Because laboratory-grade heated water baths typically cost between $300 and $3000,4 we recommend using a more affordable, commercially available thermostatic water bath (eg, baby bottle warmer)(Figure 1) to warm the filler prior to injection, as the optimal temperature for this technique can still be achieved while remaining cost effective. Vials of PLLA reconstituted with 7 mL of sterile water and 2 mL lidocaine hydrochloride 1% should be labeled with the date of reconstitution and manually agitated for 30 seconds. The reconstituted product should be stored for 24 hours to ensure even suspension and powder saturation.5 On the day of the procedure, the vial should be placed into the water bath (heated to 100 °C) for 10 minutes prior to injection (Figure 2) and agitated again immediately before withdrawal into the syringe. The clinician then should sterilize the rubber top and draw the product from the warmed vial using the same size needle that will be used for injection. Although a larger gauge needle may make drawing up the product easier in typical practice, drawing and injecting with the same gauge needle helps prevent larger particles from clogging a smaller injection needle. Using a 26-gauge injection needle for withdrawal further reduces clogging by serving as a filter to prevent larger product particles from entering the injection syringe. The vials of PLLA can be kept in the water bath throughout the procedure between uses to keep the filler at a consistent temperature.


Practice Implications
Although many clinicians reduce needle obstructions by warming PLLA before injection, a published protocol currently is not available. One consideration when utilizing this technique is the limited data on the clinical stability and efficacy of PLLA at varying temperatures. Two studies recommend bringing the reconstituted vial to room temperature prior to injection, while others have documented an endothermic melting point in the range of 120 °C to 180
- James J, Carruthers A, Carruthers J. HIV-associated facial lipoatrophy. Dermatol Surg. 2002;28:979-986. doi:10.1046/j.1524-4725.2002.02099.x
- Duracinsky M, Leclercq P, Herrmann S, et al. Safety of poly-L-lactic acid (New-Fill®) in the treatment of facial lipoatrophy: a large observational study among HIV-positive patients. BMC Infect Dis. 2014;14:474. doi:10.1186/1471-2334-14-474
- Sickles CK, Nassereddin A, Patel P, et al. Poly-L-lactic acid. StatPearls [Internet]. Updated February 28, 2024. Accessed October 31, 2025. https://www.ncbi.nlm.nih.gov/books/NBK507871/
- Laboratory equipment: Water bath. Global Lab Supply. (n.d.). http://www.globallabsupply.com/Water-Bath-s/2122.htm
- Lin MJ, Dubin DP, Goldberg DJ, et al. Practices in the usage and reconstitution of poly-L-lactic acid. J Drugs Dermatol. 2019;18:880-886.
- Vleggaar D, Fitzgerald R, Lorenc ZP, et al. Consensus recommendations on the use of injectable poly-L-lactic acid for facial and nonfacial volumization. J Drugs Dermatol. 2014;13:s44-51.
- Sedush NG, Kalinin KT, Azarkevich PN, et al. Physicochemical characteristics and hydrolytic degradation of polylactic acid dermal fillers: a comparative study. Cosmetics. 2023;10:110. doi:10.3390/cosmetics10040110
Poly-L-Lactic Acid Reconstitution Technique to Reduce Needle Obstruction
Poly-L-Lactic Acid Reconstitution Technique to Reduce Needle Obstruction
Conservative Thickness Layers to Preserve Tattoo Appearance During Excisional Procedures
Conservative Thickness Layers to Preserve Tattoo Appearance During Excisional Procedures
Practice Gap
Tattoos have become increasingly prevalent in Western culture, with approximately 1 in 4 Americans having at least 1 tattoo. Individuals invest money, time, and even pain in getting tattoos, many of which hold special personal, family, or religious significance.1 Various cutaneous pathologies may arise in areas of the skin with tattoos, including malignancies and inflammatory reactions to tattoo pigment, and in these cases, surgical management may be indicated.2,3
Nonmelanoma skin cancers (NMSCs) such as superficial basal cell carcinomas on broadly sun-damaged areas (eg, trunk, torso), squamous cell carcinomas, reactive keratoacanthomas, and reactive pseudoepitheliomatous squamous hyperplasia diagnosed as squamous cell carcinoma have been reported to occur in or near areas of the skin with tattoos.2 Mohs micrographic surgery (MMS) is the standard of care for removing NMSCs, particularly when they manifest in cosmetically sensitive areas.4 This treatment option allows for careful guided resection of tumors to minimize the risk for recurrence; it also preserves healthy tissue, which typically results in a smaller radial defect after the procedure is complete.
Chronic reactions to tattoo pigment may include granulomatous tattoo reactions and pseudolymphomas.3 Treatment options may include immunosuppressives such as intralesional triamcinolone as well as pigment destruction via lasers5; however, not all tattoos are responsive to these treatments. Surgical excision is an effective and definitive treatment in this context, as tattoo pigment resides in or above the mid dermis to a depth of approximately 400 μm. Intradermal excision effectively removes the antigenic pigment.5
In these clinical scenarios, patients may be hesitant to pursue surgical treatment due to concerns that it may alter tattoo appearance. Many clinicians and surgeons may consider definitive treatment and tattoo preservation to be mutually exclusive, but this is not always the case. We propose a technique that utilizes conservative thickness layers (CTL) to minimize disruption to the appearance of tattoos in MMS for treatment of cutaneous malignancies as well as intradermal excision of tattoo pigment in the setting of chronic inflammatory tattoo reactions.
The Technique
In the appropriate clinical context, CTL can effectively result in defects that heal well by secondary intention and minimize collateral tissue distortion.4 Lesions manifesting in or near tattooed skin often are responsive to treatment with CTL; furthermore, CTL may preserve some deeper tattoo pigment, resulting in only partial loss of the tattooed skin.
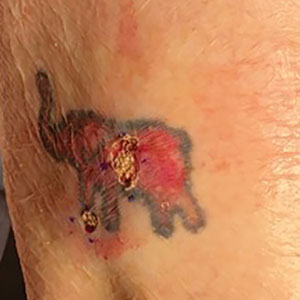
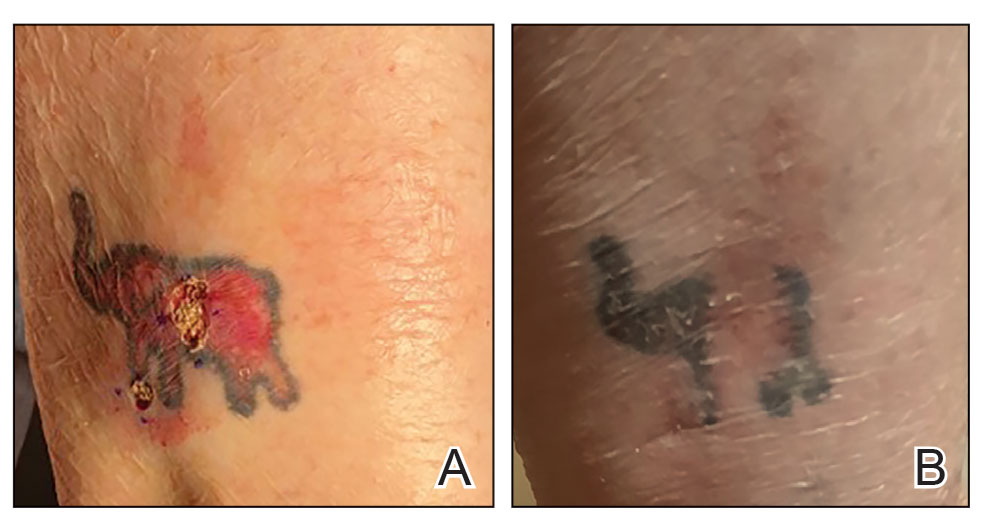
Conservative thickness layers are performed intradermally, similar to removing traditional layers in MMS. For treatment of NMSCs, a margin is scored around the lesion, and then the blade is passed carefully under the lesion nearly parallel to the skin through an intradermal plane. It is important to avoid entering the subcuticular fat (Figure 1). The tissue then is processed normally in the Mohs laboratory for complete circumferential margin evaluation. If necessary and possible, subsequent layers also can be performed in the intradermal plane. Once total circumferential margin control is obtained, the wound is allowed to granulate and heal by secondary intention. As these processes occur, we have found that wound contraction is less likely with the dermis intact, resulting in less impact on the overall appearance of the tattoo (Figures 1 and 2). For very thin lesions, resultant defects may retain some residual tattoo pigment. The residual scars also may be responsive to tattoo revision, although a period of monitoring for recurrence should be considered if there is concern that revising the tattoo could obscure early recurrent tumors. From our experience, utilizing CTL for NMSCs that arise within or near tattoos results in favorable preservation of the tattoo appearance and high patient satisfaction.
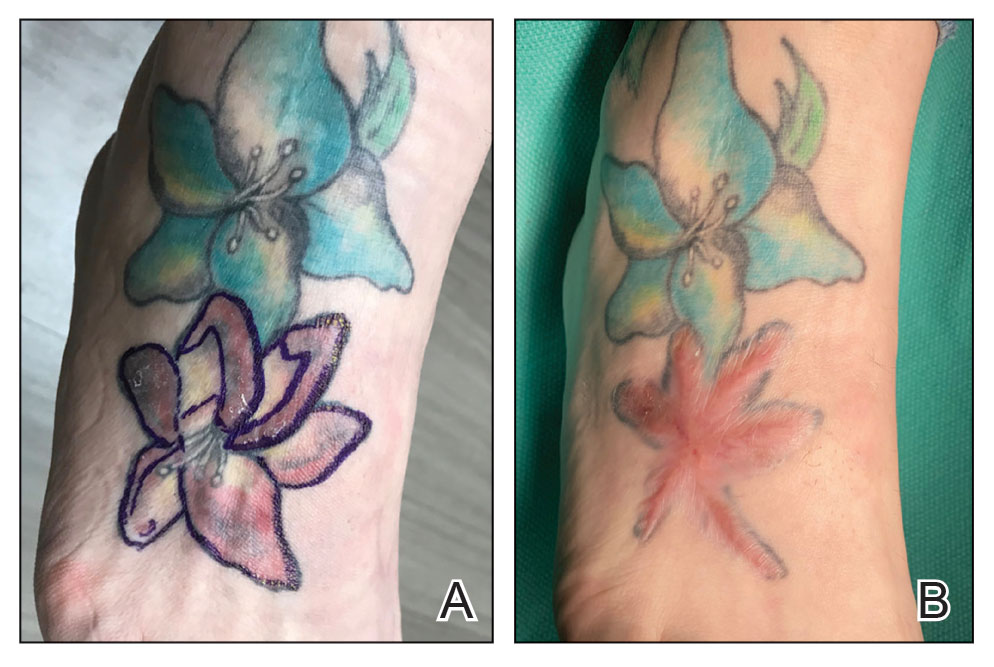
The procedure is performed similarly for removal of allergenic tattoo pigment, with careful excision to the mid dermis. Since the areas affected by the cutaneous reaction may be relatively large, surgical precision is required to maintain a uniform depth to remove the tattoo pigment and preserve the deep dermis (Figure 2). Once removed, the defect can be left to granulate and heal by secondary intention. If the patient wants to have the tattoo revised in the future, it would be prudent to utilize pigment that the patient has responded favorably to. In our experience, this approach is effective and yields high patient satisfaction and minimizes morbidity.
Practice Implications
Tattoos often hold special meaning for patients; therefore, treatment of pathologies arising in or near tattooed skin should emphasize maintaining the appearance of the tattoo while still being effective. Conservative thickness layers in MMS and intradermal excisions for allergic reactions to tattoo pigment are an effective treatment strategy that clinicians may consider.
One shortcoming of using CTL for MMS is the need for subsequent layers to clear the tumor; however, data suggest that first-stage cure rates are extremely high even with CTL for appropriately selected patients, with clearance of nearly 80% of tumors on the first stage. Tumors that may be most responsive to CTL include exophytic NMSCs and those arising in areas with a thicker dermis, including the back, legs, and scalp, although other locations including the face, hands, shins, ankles, and feet also may be well suited for CTL.4 Another shortcoming of CTL is that skin cancers arising in tattoos may not be considered appropriate for MMS based on the 2012
Conservative thickness layers in MMS and intradermal excisions of tattoo pigment are both effective techniques of minimizing disruption of tattoos while effectively treating patients.
- Roggenkamp H, Nicholls A, Pierre JM. Tattoos as a window to the psyche: how talking about skin art can inform psychiatric practice. World J Psychiatry. 2017;7:148-158. doi:10.5498/wjp.v7.i3.148
- Rubatto M, Gelato F, Mastorino L, et al. Nonmelanoma skin cancer arising on tattoos. Int J Dermatol. 2023;62:E155-E156. doi:10.1111/ijd.16381
- Atwater AR, Bembry R, Reeder M. Tattoo hypersensitivity reactions: inky business. Cutis. 2020;106:64-67. doi:10.12788/cutis.0028
- Tolkachjov SN, Cappel JA, Bryant EA, et al. Conservative thickness layers in Mohs micrographic surgery. Int J Dermatol. 2018;57:1128-1134. doi:10.1111/ijd.14043
- Sardana K, Ranjan R, Ghunawat S. Optimising laser tattoo removal. J Cutan Aesthet Surg. 2015;8:16-24. doi:10.4103/0974-2077.155068
- Connolly SM, Baker DR, Coldiron BM, et al. AAD/ACMS/ASDSA/ASMS 2012 appropriate use criteria for Mohs micrographic surgery: a report of the American Academy of Dermatology, American College of Mohs Surgery, American Society for Dermatologic Surgery Association, and the American Society for Mohs Surgery. J Am Acad Dermatol. 2012;67:531-550. doi:10.1016/j.jaad.2012.06.009.
- Amthor Croley JA. Current controversies in mohs micrographic surgery. Cutis. 2019;104:E29-E31.
Practice Gap
Tattoos have become increasingly prevalent in Western culture, with approximately 1 in 4 Americans having at least 1 tattoo. Individuals invest money, time, and even pain in getting tattoos, many of which hold special personal, family, or religious significance.1 Various cutaneous pathologies may arise in areas of the skin with tattoos, including malignancies and inflammatory reactions to tattoo pigment, and in these cases, surgical management may be indicated.2,3
Nonmelanoma skin cancers (NMSCs) such as superficial basal cell carcinomas on broadly sun-damaged areas (eg, trunk, torso), squamous cell carcinomas, reactive keratoacanthomas, and reactive pseudoepitheliomatous squamous hyperplasia diagnosed as squamous cell carcinoma have been reported to occur in or near areas of the skin with tattoos.2 Mohs micrographic surgery (MMS) is the standard of care for removing NMSCs, particularly when they manifest in cosmetically sensitive areas.4 This treatment option allows for careful guided resection of tumors to minimize the risk for recurrence; it also preserves healthy tissue, which typically results in a smaller radial defect after the procedure is complete.
Chronic reactions to tattoo pigment may include granulomatous tattoo reactions and pseudolymphomas.3 Treatment options may include immunosuppressives such as intralesional triamcinolone as well as pigment destruction via lasers5; however, not all tattoos are responsive to these treatments. Surgical excision is an effective and definitive treatment in this context, as tattoo pigment resides in or above the mid dermis to a depth of approximately 400 μm. Intradermal excision effectively removes the antigenic pigment.5
In these clinical scenarios, patients may be hesitant to pursue surgical treatment due to concerns that it may alter tattoo appearance. Many clinicians and surgeons may consider definitive treatment and tattoo preservation to be mutually exclusive, but this is not always the case. We propose a technique that utilizes conservative thickness layers (CTL) to minimize disruption to the appearance of tattoos in MMS for treatment of cutaneous malignancies as well as intradermal excision of tattoo pigment in the setting of chronic inflammatory tattoo reactions.
The Technique
In the appropriate clinical context, CTL can effectively result in defects that heal well by secondary intention and minimize collateral tissue distortion.4 Lesions manifesting in or near tattooed skin often are responsive to treatment with CTL; furthermore, CTL may preserve some deeper tattoo pigment, resulting in only partial loss of the tattooed skin.
Conservative thickness layers are performed intradermally, similar to removing traditional layers in MMS. For treatment of NMSCs, a margin is scored around the lesion, and then the blade is passed carefully under the lesion nearly parallel to the skin through an intradermal plane. It is important to avoid entering the subcuticular fat (Figure 1). The tissue then is processed normally in the Mohs laboratory for complete circumferential margin evaluation. If necessary and possible, subsequent layers also can be performed in the intradermal plane. Once total circumferential margin control is obtained, the wound is allowed to granulate and heal by secondary intention. As these processes occur, we have found that wound contraction is less likely with the dermis intact, resulting in less impact on the overall appearance of the tattoo (Figures 1 and 2). For very thin lesions, resultant defects may retain some residual tattoo pigment. The residual scars also may be responsive to tattoo revision, although a period of monitoring for recurrence should be considered if there is concern that revising the tattoo could obscure early recurrent tumors. From our experience, utilizing CTL for NMSCs that arise within or near tattoos results in favorable preservation of the tattoo appearance and high patient satisfaction.


The procedure is performed similarly for removal of allergenic tattoo pigment, with careful excision to the mid dermis. Since the areas affected by the cutaneous reaction may be relatively large, surgical precision is required to maintain a uniform depth to remove the tattoo pigment and preserve the deep dermis (Figure 2). Once removed, the defect can be left to granulate and heal by secondary intention. If the patient wants to have the tattoo revised in the future, it would be prudent to utilize pigment that the patient has responded favorably to. In our experience, this approach is effective and yields high patient satisfaction and minimizes morbidity.
Practice Implications
Tattoos often hold special meaning for patients; therefore, treatment of pathologies arising in or near tattooed skin should emphasize maintaining the appearance of the tattoo while still being effective. Conservative thickness layers in MMS and intradermal excisions for allergic reactions to tattoo pigment are an effective treatment strategy that clinicians may consider.
One shortcoming of using CTL for MMS is the need for subsequent layers to clear the tumor; however, data suggest that first-stage cure rates are extremely high even with CTL for appropriately selected patients, with clearance of nearly 80% of tumors on the first stage. Tumors that may be most responsive to CTL include exophytic NMSCs and those arising in areas with a thicker dermis, including the back, legs, and scalp, although other locations including the face, hands, shins, ankles, and feet also may be well suited for CTL.4 Another shortcoming of CTL is that skin cancers arising in tattoos may not be considered appropriate for MMS based on the 2012
Conservative thickness layers in MMS and intradermal excisions of tattoo pigment are both effective techniques of minimizing disruption of tattoos while effectively treating patients.
Practice Gap
Tattoos have become increasingly prevalent in Western culture, with approximately 1 in 4 Americans having at least 1 tattoo. Individuals invest money, time, and even pain in getting tattoos, many of which hold special personal, family, or religious significance.1 Various cutaneous pathologies may arise in areas of the skin with tattoos, including malignancies and inflammatory reactions to tattoo pigment, and in these cases, surgical management may be indicated.2,3
Nonmelanoma skin cancers (NMSCs) such as superficial basal cell carcinomas on broadly sun-damaged areas (eg, trunk, torso), squamous cell carcinomas, reactive keratoacanthomas, and reactive pseudoepitheliomatous squamous hyperplasia diagnosed as squamous cell carcinoma have been reported to occur in or near areas of the skin with tattoos.2 Mohs micrographic surgery (MMS) is the standard of care for removing NMSCs, particularly when they manifest in cosmetically sensitive areas.4 This treatment option allows for careful guided resection of tumors to minimize the risk for recurrence; it also preserves healthy tissue, which typically results in a smaller radial defect after the procedure is complete.
Chronic reactions to tattoo pigment may include granulomatous tattoo reactions and pseudolymphomas.3 Treatment options may include immunosuppressives such as intralesional triamcinolone as well as pigment destruction via lasers5; however, not all tattoos are responsive to these treatments. Surgical excision is an effective and definitive treatment in this context, as tattoo pigment resides in or above the mid dermis to a depth of approximately 400 μm. Intradermal excision effectively removes the antigenic pigment.5
In these clinical scenarios, patients may be hesitant to pursue surgical treatment due to concerns that it may alter tattoo appearance. Many clinicians and surgeons may consider definitive treatment and tattoo preservation to be mutually exclusive, but this is not always the case. We propose a technique that utilizes conservative thickness layers (CTL) to minimize disruption to the appearance of tattoos in MMS for treatment of cutaneous malignancies as well as intradermal excision of tattoo pigment in the setting of chronic inflammatory tattoo reactions.
The Technique
In the appropriate clinical context, CTL can effectively result in defects that heal well by secondary intention and minimize collateral tissue distortion.4 Lesions manifesting in or near tattooed skin often are responsive to treatment with CTL; furthermore, CTL may preserve some deeper tattoo pigment, resulting in only partial loss of the tattooed skin.
Conservative thickness layers are performed intradermally, similar to removing traditional layers in MMS. For treatment of NMSCs, a margin is scored around the lesion, and then the blade is passed carefully under the lesion nearly parallel to the skin through an intradermal plane. It is important to avoid entering the subcuticular fat (Figure 1). The tissue then is processed normally in the Mohs laboratory for complete circumferential margin evaluation. If necessary and possible, subsequent layers also can be performed in the intradermal plane. Once total circumferential margin control is obtained, the wound is allowed to granulate and heal by secondary intention. As these processes occur, we have found that wound contraction is less likely with the dermis intact, resulting in less impact on the overall appearance of the tattoo (Figures 1 and 2). For very thin lesions, resultant defects may retain some residual tattoo pigment. The residual scars also may be responsive to tattoo revision, although a period of monitoring for recurrence should be considered if there is concern that revising the tattoo could obscure early recurrent tumors. From our experience, utilizing CTL for NMSCs that arise within or near tattoos results in favorable preservation of the tattoo appearance and high patient satisfaction.


The procedure is performed similarly for removal of allergenic tattoo pigment, with careful excision to the mid dermis. Since the areas affected by the cutaneous reaction may be relatively large, surgical precision is required to maintain a uniform depth to remove the tattoo pigment and preserve the deep dermis (Figure 2). Once removed, the defect can be left to granulate and heal by secondary intention. If the patient wants to have the tattoo revised in the future, it would be prudent to utilize pigment that the patient has responded favorably to. In our experience, this approach is effective and yields high patient satisfaction and minimizes morbidity.
Practice Implications
Tattoos often hold special meaning for patients; therefore, treatment of pathologies arising in or near tattooed skin should emphasize maintaining the appearance of the tattoo while still being effective. Conservative thickness layers in MMS and intradermal excisions for allergic reactions to tattoo pigment are an effective treatment strategy that clinicians may consider.
One shortcoming of using CTL for MMS is the need for subsequent layers to clear the tumor; however, data suggest that first-stage cure rates are extremely high even with CTL for appropriately selected patients, with clearance of nearly 80% of tumors on the first stage. Tumors that may be most responsive to CTL include exophytic NMSCs and those arising in areas with a thicker dermis, including the back, legs, and scalp, although other locations including the face, hands, shins, ankles, and feet also may be well suited for CTL.4 Another shortcoming of CTL is that skin cancers arising in tattoos may not be considered appropriate for MMS based on the 2012
Conservative thickness layers in MMS and intradermal excisions of tattoo pigment are both effective techniques of minimizing disruption of tattoos while effectively treating patients.
- Roggenkamp H, Nicholls A, Pierre JM. Tattoos as a window to the psyche: how talking about skin art can inform psychiatric practice. World J Psychiatry. 2017;7:148-158. doi:10.5498/wjp.v7.i3.148
- Rubatto M, Gelato F, Mastorino L, et al. Nonmelanoma skin cancer arising on tattoos. Int J Dermatol. 2023;62:E155-E156. doi:10.1111/ijd.16381
- Atwater AR, Bembry R, Reeder M. Tattoo hypersensitivity reactions: inky business. Cutis. 2020;106:64-67. doi:10.12788/cutis.0028
- Tolkachjov SN, Cappel JA, Bryant EA, et al. Conservative thickness layers in Mohs micrographic surgery. Int J Dermatol. 2018;57:1128-1134. doi:10.1111/ijd.14043
- Sardana K, Ranjan R, Ghunawat S. Optimising laser tattoo removal. J Cutan Aesthet Surg. 2015;8:16-24. doi:10.4103/0974-2077.155068
- Connolly SM, Baker DR, Coldiron BM, et al. AAD/ACMS/ASDSA/ASMS 2012 appropriate use criteria for Mohs micrographic surgery: a report of the American Academy of Dermatology, American College of Mohs Surgery, American Society for Dermatologic Surgery Association, and the American Society for Mohs Surgery. J Am Acad Dermatol. 2012;67:531-550. doi:10.1016/j.jaad.2012.06.009.
- Amthor Croley JA. Current controversies in mohs micrographic surgery. Cutis. 2019;104:E29-E31.
Conservative Thickness Layers to Preserve Tattoo Appearance During Excisional Procedures
Conservative Thickness Layers to Preserve Tattoo Appearance During Excisional Procedures
Botulinum Toxin as a Tool to Reduce Hyperhidrosis in Amputees
Botulinum Toxin as a Tool to Reduce Hyperhidrosis in Amputees
Practice Gap
Hyperhidrosis poses a considerable challenge for many amputees who use prosthetic devices, particularly at the interface between the residual limb and the prosthetic socket. The enclosed environment of the socket often leads to excessive sweating, which can compromise suction fit and increase the risk for skin chafing, irritation, and slippage. Persistent moisture also promotes bacterial and fungal growth, raising the likelihood of infections and foul odors within the socket. Research has shown that skin complications are highly prevalent among amputees, affecting up to 73.9% of this population in the United States.1 Commonly reported complications include wounds, abscesses, and blisters, many of which can be triggered or worsened by hyperhidrosis.2 Current treatment options for residual limb sweating include topical antiperspirants, botulinum toxin (BTX) injections, iontophoresis, and liner-liner socks.
While BTX commonly is used to treat hyperhidrosis in areas such as the palms and axillae, it typically is not considered as a first-line therapy for residual limb sweating; however, both BTX type A and type B have shown safety and effectiveness in managing hyperhidrosis in amputees, enhancing prosthetic use, and improving overall quality of life.3 Despite these benefits, BTX remains relatively underutilized for
Tools and Techniques
A 64-year-old man initially presented to our dermatology clinic after undergoing an above-the-knee amputation of the left leg 1 year prior. The amputation had been performed due to chronic prosthetic joint infections with Escherichia coli. He reported persistent sweating of the residual limb, which severely limited his use of a prosthesis and led to frequent falls.
During the initial visit, treatment options for primary hyperhidrosis including topical and injectable therapies were discussed. Due to a fear of needles, the patient chose topical treatment, with the option to pursue BTX injections later if better control was needed. An aluminum chloride hexahydrate prosthetic antiperspirant was prescribed for nightly application on the anterior and posterior
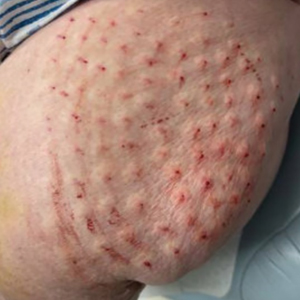
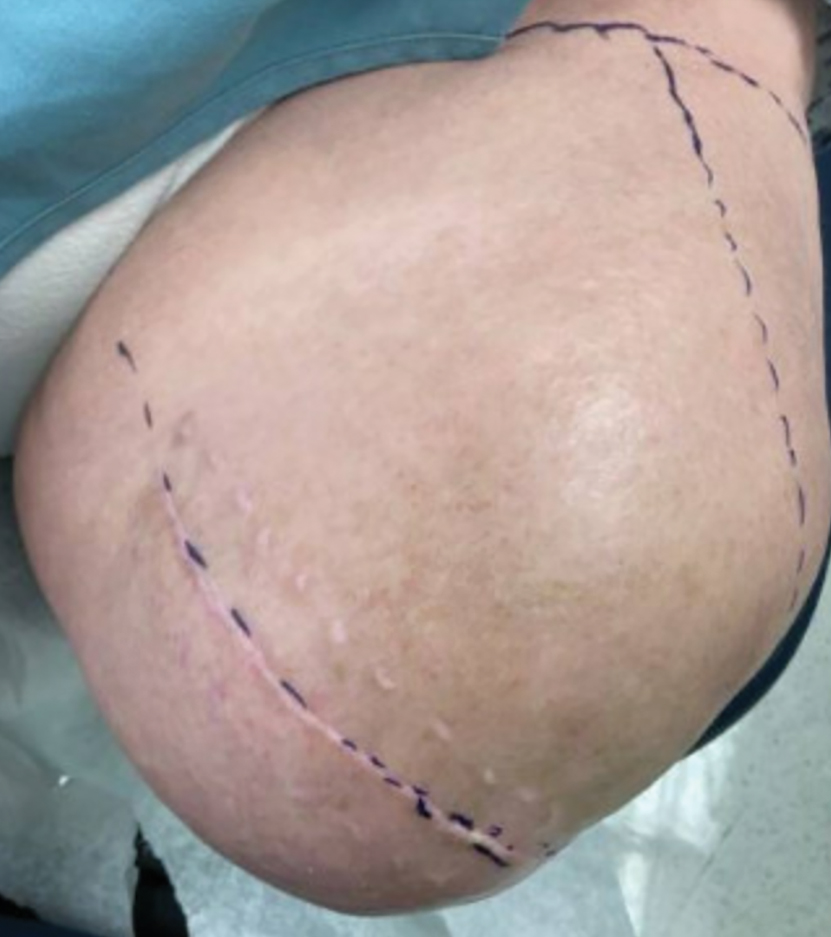
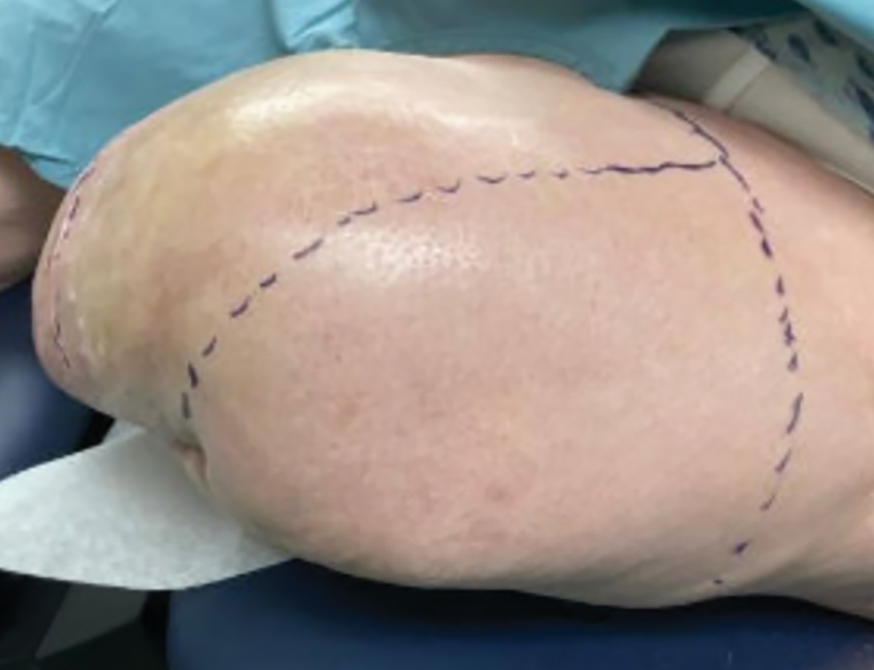
Botulinum toxin injections were administered in a grid-like pattern across the surface area where the residual limb made contact with the prosthetic. Using a surgical marker, the patient assisted the medical team in identifying the areas where sweating occurred most frequently. The area was divided into 4 equal sections, with each section treated per weekly interval sequentially over 4 weeks. The targeted areas included the left anterior (extending from the anterior tensor fasciae latae band to the lateral thigh) and left posterior residual limb (Figure 1 and eFigure 1, respectively).
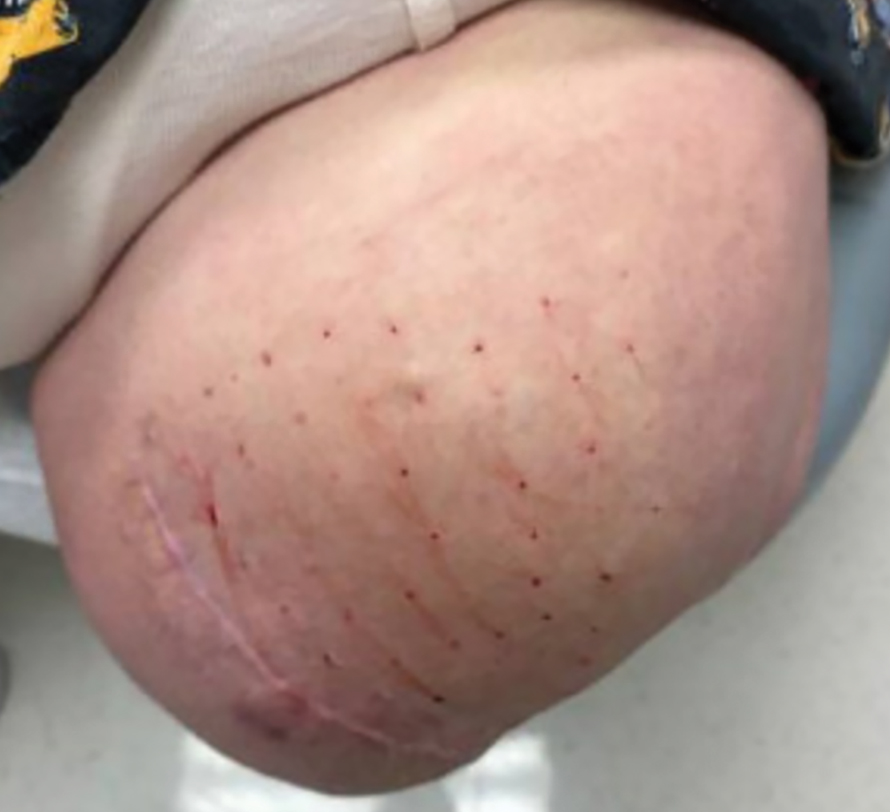
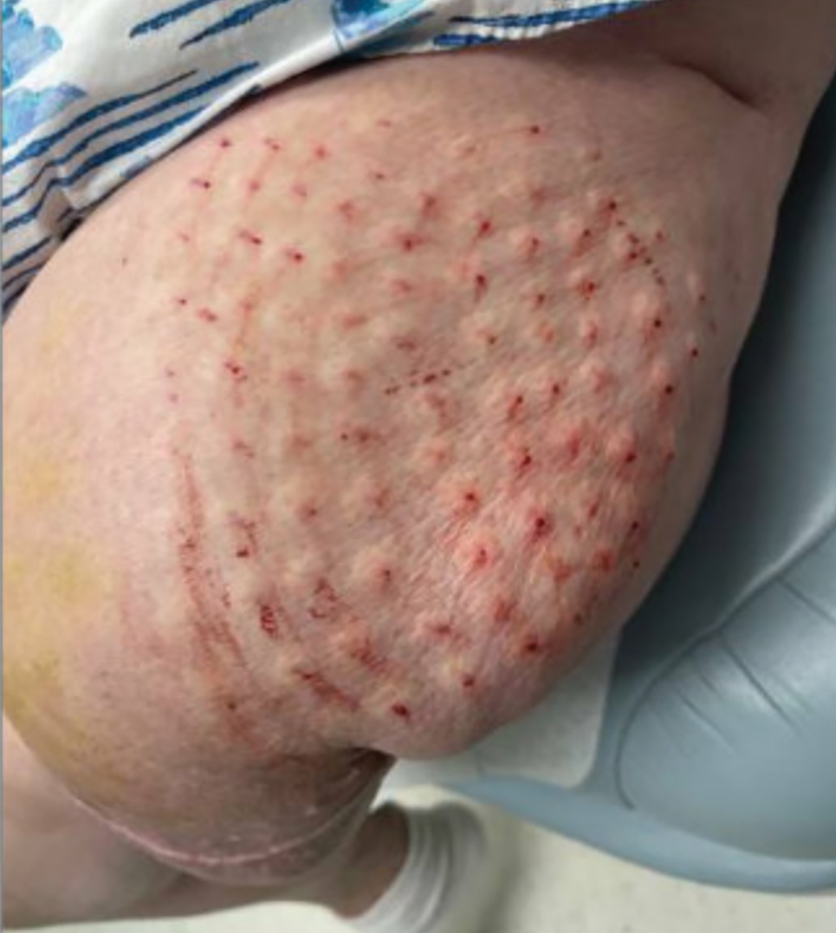
The treated section was cleaned with an alcohol wipe prior to each injection, and 50 units of BTX (diluted to 2.5 units per 0.1 mL in bacteriostatic saline) were injected intradermally into each section (Figure 2 and eFigure 2). The injections were administered in rows, with the needle inserted at evenly spaced intervals approximately 1 inch apart. A total of 100 units were administered per section at each weekly appointment. The patient tolerated the procedure well, and no complications were observed.
Practice Implications
This staged approach to administering BTX ensures even distribution of the injections, optimizes hyperhidrosis control, minimizes the risk for complications, and allows for precise targeting of the affected areas to maximize therapeutic benefit. Following the initial procedure, our patient was scheduled for follow-ups approximately every 3 to 4 months starting from the first set of injections for each area. Over 9 months, the patient successfully completed 3 treatment sessions using this method. The patient reported improved quality of life after starting the BTX injections.
After evaluating the initial treatment outcomes with 100 units per section, the dosage was increased to 200 units per section to reduce the number of visits from 4 every 3 months to cover the entire area to 2 visits every 3 months. This adjustment aimed to optimize results and better manage the patient’s ongoing symptoms. At about 1 to 2 weeks after beginning treatment, the patient noticed decreased sweating and discomfort during his daily activities and reduced friction with his prosthetic leg. No adverse effects were noted with the increased dosage during a clinical visit.
Our case highlights the importance of ensuring equitable access to hyperhidrosis treatment. Dermatologists should prioritize patient-centered care by factoring in financial constraints when recommending therapies. In this patient’s case, offering a range of options including over-the-counter antiperspirants and prescription treatments allowed for a management plan tailored to his individual needs and circumstances.
DaxibotulinumtoxinA, known for its longer duration of action compared to other BTX formulations, presents a promising alternative for treating hyperhidrosis.4 However, a gap in care emerged for our patient when prescription antiperspirant was not covered by his insurance, and daxibotulinumtoxinA, which could have offered a more durable solution, was not yet available at our clinic for hyperhidrosis management. Expanding insurance coverage for effective prescription treatments and improving access to newer treatment options are crucial for enhancing patient outcomes and ensuring more equitable care.
Focusing dermatologic care on amputees presents distinct challenges and opportunities for improving their care and decreasing discomfort. Amputees, particularly those with residual limb hyperhidrosis, often experience additional discomfort and difficulty while using prosthetics, as excessive sweating can interfere with fit and function.5,6 Dermatologists should proactively address these specific needs by tailoring treatment accordingly. Incorporating targeted therapies, such as BTX injections, in addition to education on lifestyle modifications and managing treatment expectations, ensures comprehensive care that enhances both quality of life and functional outcomes. Engaging patients in discussions about all available options, including emerging therapies, is essential for improving care for this underserved population.
- Koc E, Tunca M, Akar A, et al. Skin problems in amputees: a descriptive study. Int J Dermatol. 2008;47:463–466. doi:10.1111/j.1365-4632.2008.03604.x
- Bui KM, Raugi GJ, Nguyen VQ, et al. Skin problems in individuals with lower-limb loss: literature review and proposed classification system. J Rehabil Res Dev. 2009;46:1085-1090. doi:10.1682/jrrd.2009.04.0052
- Rocha Melo J, Rodrigues MA, Caetano M, et al. Botulinum toxin in the treatment of residual limb hyperhidrosis: a systematic review. Rehabilitacion (Madr). 2023;57:100754. doi:10.1016/j.rh.2022.07.003
- Hansen C, Godfrey B, Wixom J, et al. Incidence, severity, and impact of hyperhidrosis in people with lower-limb amputation. J Rehabil Res Dev. 2015;52:31-40. doi:10.1682/JRRD.2014.04.0108
- Lannan FM, Powell J, Kim GM, et al. Hyperhidrosis of the residual limb: a narrative review of the measurement and treatment of excess perspiration affecting individuals with amputation. Prosthet Orthot Int. 2021;45:477-486. doi:10.1097/PXR.0000000000000040
- Pace S, Kentosh J. Managing residual limb hyperhidrosis in wounded warriors. Cutis. 2016;97:401-403.
Practice Gap
Hyperhidrosis poses a considerable challenge for many amputees who use prosthetic devices, particularly at the interface between the residual limb and the prosthetic socket. The enclosed environment of the socket often leads to excessive sweating, which can compromise suction fit and increase the risk for skin chafing, irritation, and slippage. Persistent moisture also promotes bacterial and fungal growth, raising the likelihood of infections and foul odors within the socket. Research has shown that skin complications are highly prevalent among amputees, affecting up to 73.9% of this population in the United States.1 Commonly reported complications include wounds, abscesses, and blisters, many of which can be triggered or worsened by hyperhidrosis.2 Current treatment options for residual limb sweating include topical antiperspirants, botulinum toxin (BTX) injections, iontophoresis, and liner-liner socks.
While BTX commonly is used to treat hyperhidrosis in areas such as the palms and axillae, it typically is not considered as a first-line therapy for residual limb sweating; however, both BTX type A and type B have shown safety and effectiveness in managing hyperhidrosis in amputees, enhancing prosthetic use, and improving overall quality of life.3 Despite these benefits, BTX remains relatively underutilized for
Tools and Techniques
A 64-year-old man initially presented to our dermatology clinic after undergoing an above-the-knee amputation of the left leg 1 year prior. The amputation had been performed due to chronic prosthetic joint infections with Escherichia coli. He reported persistent sweating of the residual limb, which severely limited his use of a prosthesis and led to frequent falls.
During the initial visit, treatment options for primary hyperhidrosis including topical and injectable therapies were discussed. Due to a fear of needles, the patient chose topical treatment, with the option to pursue BTX injections later if better control was needed. An aluminum chloride hexahydrate prosthetic antiperspirant was prescribed for nightly application on the anterior and posterior
Botulinum toxin injections were administered in a grid-like pattern across the surface area where the residual limb made contact with the prosthetic. Using a surgical marker, the patient assisted the medical team in identifying the areas where sweating occurred most frequently. The area was divided into 4 equal sections, with each section treated per weekly interval sequentially over 4 weeks. The targeted areas included the left anterior (extending from the anterior tensor fasciae latae band to the lateral thigh) and left posterior residual limb (Figure 1 and eFigure 1, respectively).


The treated section was cleaned with an alcohol wipe prior to each injection, and 50 units of BTX (diluted to 2.5 units per 0.1 mL in bacteriostatic saline) were injected intradermally into each section (Figure 2 and eFigure 2). The injections were administered in rows, with the needle inserted at evenly spaced intervals approximately 1 inch apart. A total of 100 units were administered per section at each weekly appointment. The patient tolerated the procedure well, and no complications were observed.


Practice Implications
This staged approach to administering BTX ensures even distribution of the injections, optimizes hyperhidrosis control, minimizes the risk for complications, and allows for precise targeting of the affected areas to maximize therapeutic benefit. Following the initial procedure, our patient was scheduled for follow-ups approximately every 3 to 4 months starting from the first set of injections for each area. Over 9 months, the patient successfully completed 3 treatment sessions using this method. The patient reported improved quality of life after starting the BTX injections.
After evaluating the initial treatment outcomes with 100 units per section, the dosage was increased to 200 units per section to reduce the number of visits from 4 every 3 months to cover the entire area to 2 visits every 3 months. This adjustment aimed to optimize results and better manage the patient’s ongoing symptoms. At about 1 to 2 weeks after beginning treatment, the patient noticed decreased sweating and discomfort during his daily activities and reduced friction with his prosthetic leg. No adverse effects were noted with the increased dosage during a clinical visit.
Our case highlights the importance of ensuring equitable access to hyperhidrosis treatment. Dermatologists should prioritize patient-centered care by factoring in financial constraints when recommending therapies. In this patient’s case, offering a range of options including over-the-counter antiperspirants and prescription treatments allowed for a management plan tailored to his individual needs and circumstances.
DaxibotulinumtoxinA, known for its longer duration of action compared to other BTX formulations, presents a promising alternative for treating hyperhidrosis.4 However, a gap in care emerged for our patient when prescription antiperspirant was not covered by his insurance, and daxibotulinumtoxinA, which could have offered a more durable solution, was not yet available at our clinic for hyperhidrosis management. Expanding insurance coverage for effective prescription treatments and improving access to newer treatment options are crucial for enhancing patient outcomes and ensuring more equitable care.
Focusing dermatologic care on amputees presents distinct challenges and opportunities for improving their care and decreasing discomfort. Amputees, particularly those with residual limb hyperhidrosis, often experience additional discomfort and difficulty while using prosthetics, as excessive sweating can interfere with fit and function.5,6 Dermatologists should proactively address these specific needs by tailoring treatment accordingly. Incorporating targeted therapies, such as BTX injections, in addition to education on lifestyle modifications and managing treatment expectations, ensures comprehensive care that enhances both quality of life and functional outcomes. Engaging patients in discussions about all available options, including emerging therapies, is essential for improving care for this underserved population.
Practice Gap
Hyperhidrosis poses a considerable challenge for many amputees who use prosthetic devices, particularly at the interface between the residual limb and the prosthetic socket. The enclosed environment of the socket often leads to excessive sweating, which can compromise suction fit and increase the risk for skin chafing, irritation, and slippage. Persistent moisture also promotes bacterial and fungal growth, raising the likelihood of infections and foul odors within the socket. Research has shown that skin complications are highly prevalent among amputees, affecting up to 73.9% of this population in the United States.1 Commonly reported complications include wounds, abscesses, and blisters, many of which can be triggered or worsened by hyperhidrosis.2 Current treatment options for residual limb sweating include topical antiperspirants, botulinum toxin (BTX) injections, iontophoresis, and liner-liner socks.
While BTX commonly is used to treat hyperhidrosis in areas such as the palms and axillae, it typically is not considered as a first-line therapy for residual limb sweating; however, both BTX type A and type B have shown safety and effectiveness in managing hyperhidrosis in amputees, enhancing prosthetic use, and improving overall quality of life.3 Despite these benefits, BTX remains relatively underutilized for
Tools and Techniques
A 64-year-old man initially presented to our dermatology clinic after undergoing an above-the-knee amputation of the left leg 1 year prior. The amputation had been performed due to chronic prosthetic joint infections with Escherichia coli. He reported persistent sweating of the residual limb, which severely limited his use of a prosthesis and led to frequent falls.
During the initial visit, treatment options for primary hyperhidrosis including topical and injectable therapies were discussed. Due to a fear of needles, the patient chose topical treatment, with the option to pursue BTX injections later if better control was needed. An aluminum chloride hexahydrate prosthetic antiperspirant was prescribed for nightly application on the anterior and posterior
Botulinum toxin injections were administered in a grid-like pattern across the surface area where the residual limb made contact with the prosthetic. Using a surgical marker, the patient assisted the medical team in identifying the areas where sweating occurred most frequently. The area was divided into 4 equal sections, with each section treated per weekly interval sequentially over 4 weeks. The targeted areas included the left anterior (extending from the anterior tensor fasciae latae band to the lateral thigh) and left posterior residual limb (Figure 1 and eFigure 1, respectively).


The treated section was cleaned with an alcohol wipe prior to each injection, and 50 units of BTX (diluted to 2.5 units per 0.1 mL in bacteriostatic saline) were injected intradermally into each section (Figure 2 and eFigure 2). The injections were administered in rows, with the needle inserted at evenly spaced intervals approximately 1 inch apart. A total of 100 units were administered per section at each weekly appointment. The patient tolerated the procedure well, and no complications were observed.


Practice Implications
This staged approach to administering BTX ensures even distribution of the injections, optimizes hyperhidrosis control, minimizes the risk for complications, and allows for precise targeting of the affected areas to maximize therapeutic benefit. Following the initial procedure, our patient was scheduled for follow-ups approximately every 3 to 4 months starting from the first set of injections for each area. Over 9 months, the patient successfully completed 3 treatment sessions using this method. The patient reported improved quality of life after starting the BTX injections.
After evaluating the initial treatment outcomes with 100 units per section, the dosage was increased to 200 units per section to reduce the number of visits from 4 every 3 months to cover the entire area to 2 visits every 3 months. This adjustment aimed to optimize results and better manage the patient’s ongoing symptoms. At about 1 to 2 weeks after beginning treatment, the patient noticed decreased sweating and discomfort during his daily activities and reduced friction with his prosthetic leg. No adverse effects were noted with the increased dosage during a clinical visit.
Our case highlights the importance of ensuring equitable access to hyperhidrosis treatment. Dermatologists should prioritize patient-centered care by factoring in financial constraints when recommending therapies. In this patient’s case, offering a range of options including over-the-counter antiperspirants and prescription treatments allowed for a management plan tailored to his individual needs and circumstances.
DaxibotulinumtoxinA, known for its longer duration of action compared to other BTX formulations, presents a promising alternative for treating hyperhidrosis.4 However, a gap in care emerged for our patient when prescription antiperspirant was not covered by his insurance, and daxibotulinumtoxinA, which could have offered a more durable solution, was not yet available at our clinic for hyperhidrosis management. Expanding insurance coverage for effective prescription treatments and improving access to newer treatment options are crucial for enhancing patient outcomes and ensuring more equitable care.
Focusing dermatologic care on amputees presents distinct challenges and opportunities for improving their care and decreasing discomfort. Amputees, particularly those with residual limb hyperhidrosis, often experience additional discomfort and difficulty while using prosthetics, as excessive sweating can interfere with fit and function.5,6 Dermatologists should proactively address these specific needs by tailoring treatment accordingly. Incorporating targeted therapies, such as BTX injections, in addition to education on lifestyle modifications and managing treatment expectations, ensures comprehensive care that enhances both quality of life and functional outcomes. Engaging patients in discussions about all available options, including emerging therapies, is essential for improving care for this underserved population.
- Koc E, Tunca M, Akar A, et al. Skin problems in amputees: a descriptive study. Int J Dermatol. 2008;47:463–466. doi:10.1111/j.1365-4632.2008.03604.x
- Bui KM, Raugi GJ, Nguyen VQ, et al. Skin problems in individuals with lower-limb loss: literature review and proposed classification system. J Rehabil Res Dev. 2009;46:1085-1090. doi:10.1682/jrrd.2009.04.0052
- Rocha Melo J, Rodrigues MA, Caetano M, et al. Botulinum toxin in the treatment of residual limb hyperhidrosis: a systematic review. Rehabilitacion (Madr). 2023;57:100754. doi:10.1016/j.rh.2022.07.003
- Hansen C, Godfrey B, Wixom J, et al. Incidence, severity, and impact of hyperhidrosis in people with lower-limb amputation. J Rehabil Res Dev. 2015;52:31-40. doi:10.1682/JRRD.2014.04.0108
- Lannan FM, Powell J, Kim GM, et al. Hyperhidrosis of the residual limb: a narrative review of the measurement and treatment of excess perspiration affecting individuals with amputation. Prosthet Orthot Int. 2021;45:477-486. doi:10.1097/PXR.0000000000000040
- Pace S, Kentosh J. Managing residual limb hyperhidrosis in wounded warriors. Cutis. 2016;97:401-403.
Botulinum Toxin as a Tool to Reduce Hyperhidrosis in Amputees
Botulinum Toxin as a Tool to Reduce Hyperhidrosis in Amputees
Tapping Into Relief: A Distraction Technique to Reduce Pain During Dermatologic Procedures
Tapping Into Relief: A Distraction Technique to Reduce Pain During Dermatologic Procedures
Practice Gap
Pain during minimally invasive dermatologic procedures such as lidocaine injections, cryotherapy, nail unit injections, and cosmetic procedures including neurotoxin injections can cause patient discomfort leading to procedural anxiety, poor compliance with treatment regimens, and avoidance of necessary care. Current solutions to manage pain during dermatologic procedures present several limitations; for example, topical anesthetics seldom alleviate procedural pain,1 particularly in sensitive areas (eg, nail unit, face) or for patients with a needle phobia. Additionally, topical anesthetics often require up to 2 hours to take effect, making them impractical for quick outpatient procedures. Other pain reduction strategies including vibration devices or cold sprays2,3 can be effective but are an added expense to the physician or clinic, which may preclude their use in resource-limited settings. Psychological distraction techniques such as deep breathing require active patient participation and might reinforce pain expectations and increase patient anxiety.4 Given these challenges, there is a need for effective, affordable, nonpharmacologic pain reduction strategies that can be integrated seamlessly into clinical practice to enhance the patient experience.
The Technique
Tapping is a simple noninvasive distraction technique that may alleviate procedural pain by exploiting the gate control theory of pain.5 According to this theory, tactile stimuli activate mechanoreceptors that send inhibitory signals to the spinal cord, effectively closing the gate to pain transmission. Unlike the Helfer skin tap technique,6 which involves 15 preinjection taps and 3 postinjection taps directly on the injection site, our approach targets distant bony prominences. This modification allows for immediate needle insertion without interfering with the sterile field or increasing the risk for needlestick injuries from tapping near the injection site. Bony sites such as the shoulder or knee are ideal for this technique due to their high density and rigidity that efficiently transmit tactile stimuli––similar to how sound travels faster through solids than through liquids or gases.7
To implement this technique in practice, we first stabilize the injection site to reduce movement from tapping. This can be done by stabilizing the injection site (eg, resting the hand on an instrument stand during a nail unit injection). A second person—such as a medical assistant, medical student, resident, or even the patient’s family member—taps at a distant site at least an arm’s length away from the injection site (Figure). The tapping pressure should be firm enough for the patient to feel the vibration but not forceful enough that it becomes unpleasant or disrupts the injection area. Tapping starts just before needle insertion and continues through the injection. No warning is given to the patient, as the surprise element may help distract them from pain. Varying the rhythm, intensity, or location of the tapping can enhance its distracting effect.
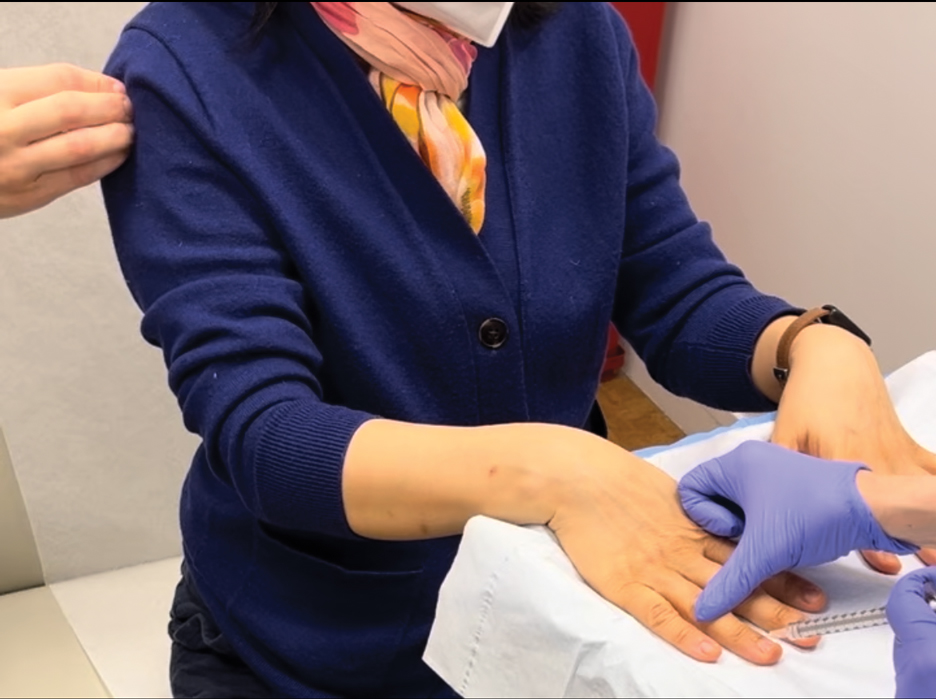
This tapping technique can be effectively combined with other pain reduction strategies in a multimodal approach; for example, when used concurrently with topical anesthetics, both the central (tapping) and peripheral (anesthetic) pain pathways are addressed, potentially yielding additive effects. For patients with a needle phobia, pairing tapping with cognitive distraction (eg, talkesthesia) may further reduce anxiety. In our nail specialty clinic at Weill Cornell Medicine (New York, New York), we often combine tapping with cold sprays and talkesthesia, which improves patient comfort without prolonging the visit. Importantly, the technique enables seamless integration with most pharmacologic and nonpharmacologic methods, eliminating the need for additional patient education or procedure time.
Practice Implications
The tapping technique described here is free, easy to implement, and requires no additional resources aside from another person to tap the patient during the procedure. It can be used for a wide range of dermatologic procedures, including biopsies, intralesional injections, and cosmetic treatments, including neurotoxin injections. The minimal learning curve and ease of integration into procedural workflows make this technique a valuable tool for dermatologists aiming to improve patient comfort without disrupting workflow. In our practice, we have observed that tapping reduces self-reported pain and helps ease anxiety, particularly in patients with a needle phobia. Its simplicity and accessibility make it a valuable addition to a wide range of dermatologic procedures. Prospective studies investigating patient-reported outcomes could help establish this technique’s role in clinical practice.
- Navarro-Rodriguez JM, Suarez-Serrano C, Martin-Valero R, et al. Effectiveness of topical anesthetics in pain management for dermal injuries: a systematic review. J Clin Med. 2021;10:2522. doi:10.3390/jcm10112522
- Lipner SR. Pain-minimizing strategies for nail surgery. Cutis. 2018;101:76-77.
- Ricardo JW, Lipner SR. Air cooling for improved analgesia during local anesthetic infiltration for nail surgery. J Am Acad Dermatol. 2021;84:e231-e232. doi:10.1016/j.jaad.2019.11.032
- Hill RC, Chernoff KA, Lipner SR. A breath of fresh air: use of deep breathing technique to minimize pain with nail injections. J Am Acad Dermatol. 2024;90:e163. doi:10.1016/j.jaad.2023.10.043
- Mendell LM. Constructing and deconstructing the gate theory of pain. Pain. 2014;155:210-216. doi:10.1016/j.pain.2013.12.010
- Jyoti G, Arora S, Sharma B. Helfer Skin Tap Tech Technique for the IM injection pain among adult patients. Nursing & Midwifery Research Journal. 2018;14:18-30. doi:10.1177/0974150X20180304
- Iowa State University. Nondestructive Evaluation Physics: Sound. Published 2021. Accessed July 31, 2025. https://www.nde-ed.org/Physics/Sound/speedinmaterials.xhtml
Practice Gap
Pain during minimally invasive dermatologic procedures such as lidocaine injections, cryotherapy, nail unit injections, and cosmetic procedures including neurotoxin injections can cause patient discomfort leading to procedural anxiety, poor compliance with treatment regimens, and avoidance of necessary care. Current solutions to manage pain during dermatologic procedures present several limitations; for example, topical anesthetics seldom alleviate procedural pain,1 particularly in sensitive areas (eg, nail unit, face) or for patients with a needle phobia. Additionally, topical anesthetics often require up to 2 hours to take effect, making them impractical for quick outpatient procedures. Other pain reduction strategies including vibration devices or cold sprays2,3 can be effective but are an added expense to the physician or clinic, which may preclude their use in resource-limited settings. Psychological distraction techniques such as deep breathing require active patient participation and might reinforce pain expectations and increase patient anxiety.4 Given these challenges, there is a need for effective, affordable, nonpharmacologic pain reduction strategies that can be integrated seamlessly into clinical practice to enhance the patient experience.
The Technique
Tapping is a simple noninvasive distraction technique that may alleviate procedural pain by exploiting the gate control theory of pain.5 According to this theory, tactile stimuli activate mechanoreceptors that send inhibitory signals to the spinal cord, effectively closing the gate to pain transmission. Unlike the Helfer skin tap technique,6 which involves 15 preinjection taps and 3 postinjection taps directly on the injection site, our approach targets distant bony prominences. This modification allows for immediate needle insertion without interfering with the sterile field or increasing the risk for needlestick injuries from tapping near the injection site. Bony sites such as the shoulder or knee are ideal for this technique due to their high density and rigidity that efficiently transmit tactile stimuli––similar to how sound travels faster through solids than through liquids or gases.7
To implement this technique in practice, we first stabilize the injection site to reduce movement from tapping. This can be done by stabilizing the injection site (eg, resting the hand on an instrument stand during a nail unit injection). A second person—such as a medical assistant, medical student, resident, or even the patient’s family member—taps at a distant site at least an arm’s length away from the injection site (Figure). The tapping pressure should be firm enough for the patient to feel the vibration but not forceful enough that it becomes unpleasant or disrupts the injection area. Tapping starts just before needle insertion and continues through the injection. No warning is given to the patient, as the surprise element may help distract them from pain. Varying the rhythm, intensity, or location of the tapping can enhance its distracting effect.

This tapping technique can be effectively combined with other pain reduction strategies in a multimodal approach; for example, when used concurrently with topical anesthetics, both the central (tapping) and peripheral (anesthetic) pain pathways are addressed, potentially yielding additive effects. For patients with a needle phobia, pairing tapping with cognitive distraction (eg, talkesthesia) may further reduce anxiety. In our nail specialty clinic at Weill Cornell Medicine (New York, New York), we often combine tapping with cold sprays and talkesthesia, which improves patient comfort without prolonging the visit. Importantly, the technique enables seamless integration with most pharmacologic and nonpharmacologic methods, eliminating the need for additional patient education or procedure time.
Practice Implications
The tapping technique described here is free, easy to implement, and requires no additional resources aside from another person to tap the patient during the procedure. It can be used for a wide range of dermatologic procedures, including biopsies, intralesional injections, and cosmetic treatments, including neurotoxin injections. The minimal learning curve and ease of integration into procedural workflows make this technique a valuable tool for dermatologists aiming to improve patient comfort without disrupting workflow. In our practice, we have observed that tapping reduces self-reported pain and helps ease anxiety, particularly in patients with a needle phobia. Its simplicity and accessibility make it a valuable addition to a wide range of dermatologic procedures. Prospective studies investigating patient-reported outcomes could help establish this technique’s role in clinical practice.
Practice Gap
Pain during minimally invasive dermatologic procedures such as lidocaine injections, cryotherapy, nail unit injections, and cosmetic procedures including neurotoxin injections can cause patient discomfort leading to procedural anxiety, poor compliance with treatment regimens, and avoidance of necessary care. Current solutions to manage pain during dermatologic procedures present several limitations; for example, topical anesthetics seldom alleviate procedural pain,1 particularly in sensitive areas (eg, nail unit, face) or for patients with a needle phobia. Additionally, topical anesthetics often require up to 2 hours to take effect, making them impractical for quick outpatient procedures. Other pain reduction strategies including vibration devices or cold sprays2,3 can be effective but are an added expense to the physician or clinic, which may preclude their use in resource-limited settings. Psychological distraction techniques such as deep breathing require active patient participation and might reinforce pain expectations and increase patient anxiety.4 Given these challenges, there is a need for effective, affordable, nonpharmacologic pain reduction strategies that can be integrated seamlessly into clinical practice to enhance the patient experience.
The Technique
Tapping is a simple noninvasive distraction technique that may alleviate procedural pain by exploiting the gate control theory of pain.5 According to this theory, tactile stimuli activate mechanoreceptors that send inhibitory signals to the spinal cord, effectively closing the gate to pain transmission. Unlike the Helfer skin tap technique,6 which involves 15 preinjection taps and 3 postinjection taps directly on the injection site, our approach targets distant bony prominences. This modification allows for immediate needle insertion without interfering with the sterile field or increasing the risk for needlestick injuries from tapping near the injection site. Bony sites such as the shoulder or knee are ideal for this technique due to their high density and rigidity that efficiently transmit tactile stimuli––similar to how sound travels faster through solids than through liquids or gases.7
To implement this technique in practice, we first stabilize the injection site to reduce movement from tapping. This can be done by stabilizing the injection site (eg, resting the hand on an instrument stand during a nail unit injection). A second person—such as a medical assistant, medical student, resident, or even the patient’s family member—taps at a distant site at least an arm’s length away from the injection site (Figure). The tapping pressure should be firm enough for the patient to feel the vibration but not forceful enough that it becomes unpleasant or disrupts the injection area. Tapping starts just before needle insertion and continues through the injection. No warning is given to the patient, as the surprise element may help distract them from pain. Varying the rhythm, intensity, or location of the tapping can enhance its distracting effect.

This tapping technique can be effectively combined with other pain reduction strategies in a multimodal approach; for example, when used concurrently with topical anesthetics, both the central (tapping) and peripheral (anesthetic) pain pathways are addressed, potentially yielding additive effects. For patients with a needle phobia, pairing tapping with cognitive distraction (eg, talkesthesia) may further reduce anxiety. In our nail specialty clinic at Weill Cornell Medicine (New York, New York), we often combine tapping with cold sprays and talkesthesia, which improves patient comfort without prolonging the visit. Importantly, the technique enables seamless integration with most pharmacologic and nonpharmacologic methods, eliminating the need for additional patient education or procedure time.
Practice Implications
The tapping technique described here is free, easy to implement, and requires no additional resources aside from another person to tap the patient during the procedure. It can be used for a wide range of dermatologic procedures, including biopsies, intralesional injections, and cosmetic treatments, including neurotoxin injections. The minimal learning curve and ease of integration into procedural workflows make this technique a valuable tool for dermatologists aiming to improve patient comfort without disrupting workflow. In our practice, we have observed that tapping reduces self-reported pain and helps ease anxiety, particularly in patients with a needle phobia. Its simplicity and accessibility make it a valuable addition to a wide range of dermatologic procedures. Prospective studies investigating patient-reported outcomes could help establish this technique’s role in clinical practice.
- Navarro-Rodriguez JM, Suarez-Serrano C, Martin-Valero R, et al. Effectiveness of topical anesthetics in pain management for dermal injuries: a systematic review. J Clin Med. 2021;10:2522. doi:10.3390/jcm10112522
- Lipner SR. Pain-minimizing strategies for nail surgery. Cutis. 2018;101:76-77.
- Ricardo JW, Lipner SR. Air cooling for improved analgesia during local anesthetic infiltration for nail surgery. J Am Acad Dermatol. 2021;84:e231-e232. doi:10.1016/j.jaad.2019.11.032
- Hill RC, Chernoff KA, Lipner SR. A breath of fresh air: use of deep breathing technique to minimize pain with nail injections. J Am Acad Dermatol. 2024;90:e163. doi:10.1016/j.jaad.2023.10.043
- Mendell LM. Constructing and deconstructing the gate theory of pain. Pain. 2014;155:210-216. doi:10.1016/j.pain.2013.12.010
- Jyoti G, Arora S, Sharma B. Helfer Skin Tap Tech Technique for the IM injection pain among adult patients. Nursing & Midwifery Research Journal. 2018;14:18-30. doi:10.1177/0974150X20180304
- Iowa State University. Nondestructive Evaluation Physics: Sound. Published 2021. Accessed July 31, 2025. https://www.nde-ed.org/Physics/Sound/speedinmaterials.xhtml
Tapping Into Relief: A Distraction Technique to Reduce Pain During Dermatologic Procedures
Tapping Into Relief: A Distraction Technique to Reduce Pain During Dermatologic Procedures
Choosing the Best Formalin-Resistant Ink for Biopsy Specimen Labeling
Choosing the Best Formalin-Resistant Ink for Biopsy Specimen Labeling
Practice Gap
Many dermatology practices utilize pens and markers to label biopsy specimen containers, but the ink may have variable susceptibility to fading and smearing when exposed to moisture before processing. Specimen containers often are placed in plastic bags for transport. If formalin accidentally spills into the bag during this time, the labels may be exposed to moisture for hours, overnight, or even over a weekend. Effective labeling with formalin-resistant ink is crucial for maintaining the clarity of anatomic location and planning treatment, especially when multiple samples are obtained.
The Technique
We tested 12 pens and markers commonly used when labeling specimen containers to determine their susceptibility to fading due to accidental formalin exposure (Figure). Various inks were allowed to dry on sample specimen labels for 5 minutes before a thin layer of 10% buffered formalin was evenly distributed over the dried ink. Photographs of the labels were taken at baseline as well as 15 minutes, 1 hour, 3 hours, and 24 hours after formalin exposure.
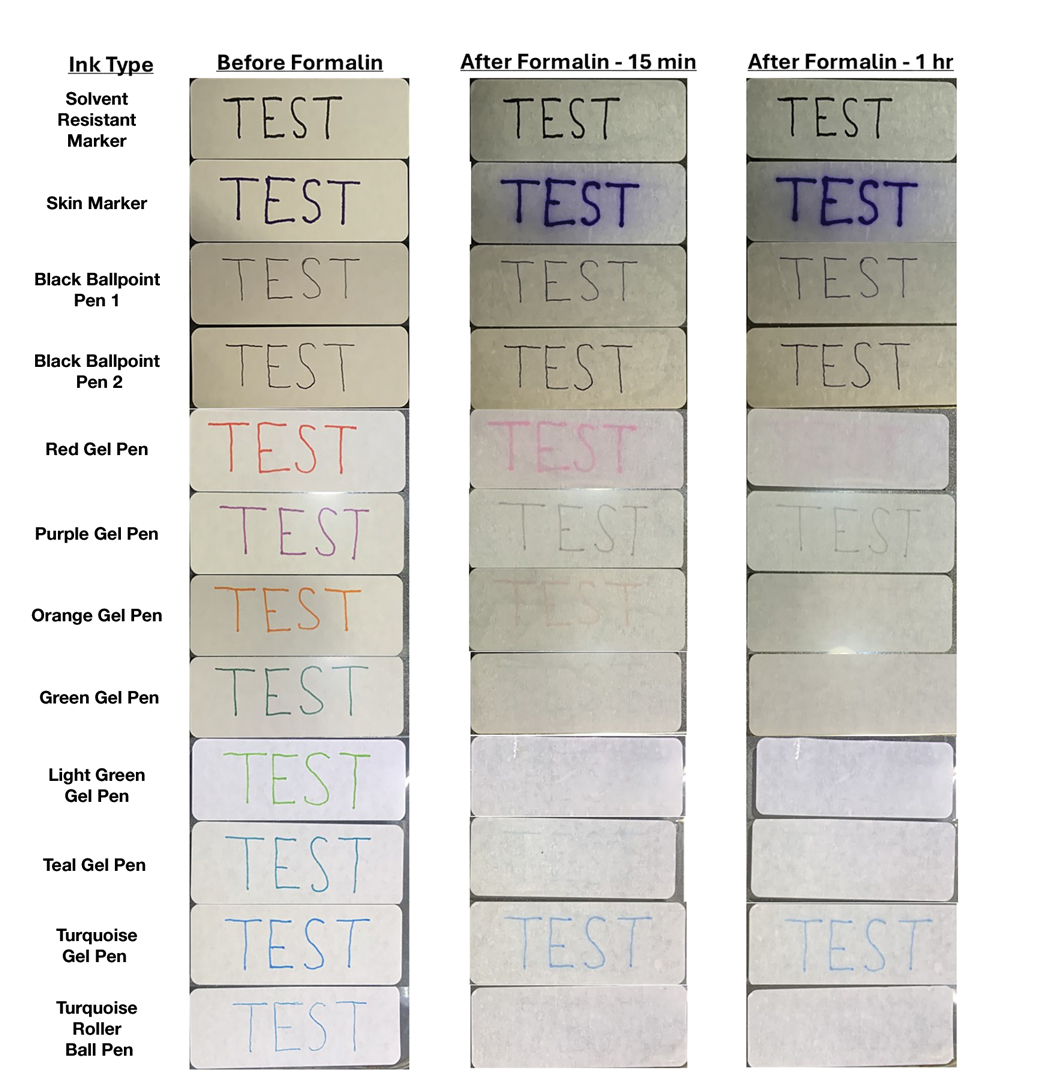
Fading was observed in both the skin marker and gel panes after 15 minutes and peaked after 1 hour. Gel pens were most susceptible to fading on exposure to formalin, and the level of fading varied by ink color, with certain colors disappearing almost entirely (Figure). The solvent-resistant marker had a robust defense to formalin, as did both ballpoint pens.
Practice Implications
Given our findings, dermatology practices should avoid using gel pens to label specimen containers. Solvent-resistant markers performed as expected; however, ballpoint pens appeared to withstand formalin exposure to a similar degree and often are more readily available. Labeling biopsy specimens with an appropriate ink ensures that each sample is clearly identified with the appropriate anatomic location and any other relevant patient information.
Practice Gap
Many dermatology practices utilize pens and markers to label biopsy specimen containers, but the ink may have variable susceptibility to fading and smearing when exposed to moisture before processing. Specimen containers often are placed in plastic bags for transport. If formalin accidentally spills into the bag during this time, the labels may be exposed to moisture for hours, overnight, or even over a weekend. Effective labeling with formalin-resistant ink is crucial for maintaining the clarity of anatomic location and planning treatment, especially when multiple samples are obtained.
The Technique
We tested 12 pens and markers commonly used when labeling specimen containers to determine their susceptibility to fading due to accidental formalin exposure (Figure). Various inks were allowed to dry on sample specimen labels for 5 minutes before a thin layer of 10% buffered formalin was evenly distributed over the dried ink. Photographs of the labels were taken at baseline as well as 15 minutes, 1 hour, 3 hours, and 24 hours after formalin exposure.

Fading was observed in both the skin marker and gel panes after 15 minutes and peaked after 1 hour. Gel pens were most susceptible to fading on exposure to formalin, and the level of fading varied by ink color, with certain colors disappearing almost entirely (Figure). The solvent-resistant marker had a robust defense to formalin, as did both ballpoint pens.
Practice Implications
Given our findings, dermatology practices should avoid using gel pens to label specimen containers. Solvent-resistant markers performed as expected; however, ballpoint pens appeared to withstand formalin exposure to a similar degree and often are more readily available. Labeling biopsy specimens with an appropriate ink ensures that each sample is clearly identified with the appropriate anatomic location and any other relevant patient information.
Practice Gap
Many dermatology practices utilize pens and markers to label biopsy specimen containers, but the ink may have variable susceptibility to fading and smearing when exposed to moisture before processing. Specimen containers often are placed in plastic bags for transport. If formalin accidentally spills into the bag during this time, the labels may be exposed to moisture for hours, overnight, or even over a weekend. Effective labeling with formalin-resistant ink is crucial for maintaining the clarity of anatomic location and planning treatment, especially when multiple samples are obtained.
The Technique
We tested 12 pens and markers commonly used when labeling specimen containers to determine their susceptibility to fading due to accidental formalin exposure (Figure). Various inks were allowed to dry on sample specimen labels for 5 minutes before a thin layer of 10% buffered formalin was evenly distributed over the dried ink. Photographs of the labels were taken at baseline as well as 15 minutes, 1 hour, 3 hours, and 24 hours after formalin exposure.

Fading was observed in both the skin marker and gel panes after 15 minutes and peaked after 1 hour. Gel pens were most susceptible to fading on exposure to formalin, and the level of fading varied by ink color, with certain colors disappearing almost entirely (Figure). The solvent-resistant marker had a robust defense to formalin, as did both ballpoint pens.
Practice Implications
Given our findings, dermatology practices should avoid using gel pens to label specimen containers. Solvent-resistant markers performed as expected; however, ballpoint pens appeared to withstand formalin exposure to a similar degree and often are more readily available. Labeling biopsy specimens with an appropriate ink ensures that each sample is clearly identified with the appropriate anatomic location and any other relevant patient information.
Choosing the Best Formalin-Resistant Ink for Biopsy Specimen Labeling
Choosing the Best Formalin-Resistant Ink for Biopsy Specimen Labeling
Continuous Testing Method for Contact Allergy to Topical Therapies in the Management of Chronic and Postoperative Wounds
Patients who undergo cutaneous surgery and chronic wound care often are exposed to various topical
Practice Gap
Contact allergies are common in patients with postoperative or chronic wounds. When patch tested, approximately 80% of patients with chronic venous ulcers demonstrated at least 1 positive allergic reaction based on a Canadian study.3 Similarly, postoperative ACD in dermatologic surgery occurs in more than 1.6% of cases in North America and Europe, a rate that is similar to or higher than the rate of postoperative infection, approximately 1% to 2%.4 Postoperative patients and those with chronic wounds have multiple risk factors for ACD. Firstly, applying topical therapies to inflamed or compromised skin increases the risk for contact sensitization.5 Additionally, multiple topical therapies containing known allergenic components may be recommended for wound care, including impregnated or organic dressings, antibiotic ointments, adhesives, antiseptic washes, and topical therapies containing inactive ingredients such as lanolin derivatives.6 Contact with numerous compounds at the same time increases the risk for a contact allergy as well as co-sensitization.7 Similarly, the longer topical agents are applied, the greater the risk for a contact allergy, with sensitization liable to occur at any point during treatment.
Preventive topical antibiotics have garnered a negative reputation among dermatologists, often due to varying data on their efficacy and the overuse of highly allergenic over-the-counter topical antibiotics such as neomycin.8 However, data also have suggested that topical antibiotics can reduce postoperative infections in higher risk surgical cases, specifically certain head and neck surgeries.9 Likewise, topical antibiotics are useful for wound colonization with Pseudomonas, which can remain superficial and slow down healing without progressing to a systemic infection.10 Such cases can be successfully treated or prevented with topical therapies, thereby bypassing the more concerning adverse effects of systemic antibiotics. In particular, systemic fluoroquinolones often are used to treat Pseudomonas and can have many serious adverse effects, including tendon rupture, drug interactions, and arrhythmias.11 Therefore, it is worth implementing topical treatments for wounds colonized with Pseudomonas to spare patients these potential complications.
When a postoperative patient develops a rash at the surgical site, it is critical to differentiate between wound infection and contact allergy, as the treatments for these two conditions may be mutually exclusive and treating the wrong condition may exacerbate the other, such as mistakenly using topical corticosteroids for a wound infection.7 Prompt treatment is necessary for wound infections, as time is limited for patch testing when a rash is already present and the diagnosis is questionable. Allergic contact dermatitis typically erupts 48 to 96 hours following exposure to a contact allergen, often manifesting as intensely pruritic erythematous patches or vesicles.6 Wound infections are characterized by pain and warmth, with erythema and edema present in both conditions. Postoperative infections manifest usually 4 to 7 days following surgery.12 Despite these differences, pruritus and pain are common in the wound healing process; thus, differentiating an infection from ACD on a clinical basis alone is not always possible. Furthermore, presentation of a contact allergy may be delayed beyond the typical 96-hour timeframe if a patient is newly sensitized to an allergen, causing the timeline of rash development to appear similar to that of a wound infection. In such cases, systemic antibiotics often are prescribed empirically; hence, clearer and timelier differentiation between contact allergy and wound infection reduces unnecessary antibiotic prescriptions, thereby avoiding systemic adverse effects and promoting responsible antibiotic stewardship.12
The Technique
Since potentially allergenic topical therapies often are indicated in wound management, we propose that patients serve as internal controls to test continuously for contact allergy sensitization. We recommend that patients apply a small amount of the topical agent, product, or dressing to the inner forearm each time they apply it to the wound. If the patient is sensitized to the product initially or becomes sensitized during treatment, evidence of ACD will be visible not only at the site of the wound but also in the area of secondary application. The inner forearm is recommended for convenience and reproducibility, but a patient may choose a different site as long as it remains consistent. Although certain contact allergens rarely may react solely at a site of inflamed skin, our team has quickly identified ACD and avoided misdiagnosis of chronic or postsurgical wound infection using this approach.13 Subsequent patch testing is indicated when a contact allergy is detected.
Practice Implications
Topical therapies including ointments, washes, and dressing components have the potential to cause sensitization and contact allergy. Despite the concern for development of ACD, topical antibiotics play a useful role in cutaneous surgery.7 Synchronous testing for contact allergy when managing wounds with topical therapies could improve diagnostic accuracy when an allergic reaction occurs. This technique provides a means of harnessing the benefits of topical agents while monitoring the risk for ACD in postoperative and chronic wound care settings.
Butler L, Mowad C. Allergic contact dermatitis in dermatologic surgery: review of common allergens. Dermatitis. 2013;24:215-221. doi:10.1097/DER.0b013e3182a0d3a9
So SP, Yoon JY, Kim JW. Postoperative contact dermatitis caused by skin adhesives used in orthopedic surgery: incidence, characteristics, and difference from surgical site infection. Medicine (Baltimore). 2021;100:e26053. doi:10.1097/md.0000000000026053
Alavi A, Sibbald RG, Ladizinski B, et al. Wound-related allergic/irritant contact dermatitis. Adv Skin Wound Care. 2016;29:278-286. doi:10.1097/01.ASW.0000482834.94375.1e
Sheth VM, Weitzul S. Postoperative topical antimicrobial use. Dermatitis. 2008;19:181-189.
Kohli N, Nedorost S. Inflamed skin predisposes to sensitization to less potent allergens. J Am Acad Dermatol. 2016;75:312-317.e1. doi:10.1016/j.jaad.2016.03.010
Cook KA, Kelso JM. Surgery-related contact dermatitis: a review of potential irritants and allergens. J Allergy Clin Immunol Pract. 2017;5:1234-1240. doi:10.1016/j.jaip.2017.03.001
Kreft B, Wohlrab J. Contact allergies to topical antibiotic applications. Allergol Select. 2022;6:18-26. doi:10.5414/alx02253e
Scherrer MAR, Abreu ÉP, Rocha VB. Neomycin: sources of contact and sensitization evaluation in 1162 patients treated at a tertiary service. An Bras Dermatol. 2023;98:487-492. doi:10.1016/j.abd.2022.07.008
Ashraf DC, Idowu OO, Wang Q, et al. The role of topical antibiotic prophylaxis in oculofacial plastic surgery: a randomized controlled study. Ophthalmology. 2020;127:1747-1754. doi:10.1016/j.ophtha.2020.07.032
Zielin´ska M, Pawłowska A, Orzeł A, et al. Wound microbiota and its impact on wound healing. Int J Mol Sci. 2023;24:17318. doi:10.3390/ijms242417318
Baggio D, Ananda-Rajah MR. Fluoroquinolone antibiotics and adverse events. Aust Prescr. 2021;44:161-164. doi:10.18773/austprescr.2021.035
Ken KM, Johnson MM, Leitenberger JJ, et al. Postoperative infections in dermatologic surgery: the role of wound cultures. Dermatol Surg. 2020;46:1294-1299. doi:10.1097/dss.0000000000002317
Wolf R. The lanolin paradox. Dermatology. 1996;192:198-202. doi:10.1159/000246365
Patients who undergo cutaneous surgery and chronic wound care often are exposed to various topical
Practice Gap
Contact allergies are common in patients with postoperative or chronic wounds. When patch tested, approximately 80% of patients with chronic venous ulcers demonstrated at least 1 positive allergic reaction based on a Canadian study.3 Similarly, postoperative ACD in dermatologic surgery occurs in more than 1.6% of cases in North America and Europe, a rate that is similar to or higher than the rate of postoperative infection, approximately 1% to 2%.4 Postoperative patients and those with chronic wounds have multiple risk factors for ACD. Firstly, applying topical therapies to inflamed or compromised skin increases the risk for contact sensitization.5 Additionally, multiple topical therapies containing known allergenic components may be recommended for wound care, including impregnated or organic dressings, antibiotic ointments, adhesives, antiseptic washes, and topical therapies containing inactive ingredients such as lanolin derivatives.6 Contact with numerous compounds at the same time increases the risk for a contact allergy as well as co-sensitization.7 Similarly, the longer topical agents are applied, the greater the risk for a contact allergy, with sensitization liable to occur at any point during treatment.
Preventive topical antibiotics have garnered a negative reputation among dermatologists, often due to varying data on their efficacy and the overuse of highly allergenic over-the-counter topical antibiotics such as neomycin.8 However, data also have suggested that topical antibiotics can reduce postoperative infections in higher risk surgical cases, specifically certain head and neck surgeries.9 Likewise, topical antibiotics are useful for wound colonization with Pseudomonas, which can remain superficial and slow down healing without progressing to a systemic infection.10 Such cases can be successfully treated or prevented with topical therapies, thereby bypassing the more concerning adverse effects of systemic antibiotics. In particular, systemic fluoroquinolones often are used to treat Pseudomonas and can have many serious adverse effects, including tendon rupture, drug interactions, and arrhythmias.11 Therefore, it is worth implementing topical treatments for wounds colonized with Pseudomonas to spare patients these potential complications.
When a postoperative patient develops a rash at the surgical site, it is critical to differentiate between wound infection and contact allergy, as the treatments for these two conditions may be mutually exclusive and treating the wrong condition may exacerbate the other, such as mistakenly using topical corticosteroids for a wound infection.7 Prompt treatment is necessary for wound infections, as time is limited for patch testing when a rash is already present and the diagnosis is questionable. Allergic contact dermatitis typically erupts 48 to 96 hours following exposure to a contact allergen, often manifesting as intensely pruritic erythematous patches or vesicles.6 Wound infections are characterized by pain and warmth, with erythema and edema present in both conditions. Postoperative infections manifest usually 4 to 7 days following surgery.12 Despite these differences, pruritus and pain are common in the wound healing process; thus, differentiating an infection from ACD on a clinical basis alone is not always possible. Furthermore, presentation of a contact allergy may be delayed beyond the typical 96-hour timeframe if a patient is newly sensitized to an allergen, causing the timeline of rash development to appear similar to that of a wound infection. In such cases, systemic antibiotics often are prescribed empirically; hence, clearer and timelier differentiation between contact allergy and wound infection reduces unnecessary antibiotic prescriptions, thereby avoiding systemic adverse effects and promoting responsible antibiotic stewardship.12
The Technique
Since potentially allergenic topical therapies often are indicated in wound management, we propose that patients serve as internal controls to test continuously for contact allergy sensitization. We recommend that patients apply a small amount of the topical agent, product, or dressing to the inner forearm each time they apply it to the wound. If the patient is sensitized to the product initially or becomes sensitized during treatment, evidence of ACD will be visible not only at the site of the wound but also in the area of secondary application. The inner forearm is recommended for convenience and reproducibility, but a patient may choose a different site as long as it remains consistent. Although certain contact allergens rarely may react solely at a site of inflamed skin, our team has quickly identified ACD and avoided misdiagnosis of chronic or postsurgical wound infection using this approach.13 Subsequent patch testing is indicated when a contact allergy is detected.
Practice Implications
Topical therapies including ointments, washes, and dressing components have the potential to cause sensitization and contact allergy. Despite the concern for development of ACD, topical antibiotics play a useful role in cutaneous surgery.7 Synchronous testing for contact allergy when managing wounds with topical therapies could improve diagnostic accuracy when an allergic reaction occurs. This technique provides a means of harnessing the benefits of topical agents while monitoring the risk for ACD in postoperative and chronic wound care settings.
Butler L, Mowad C. Allergic contact dermatitis in dermatologic surgery: review of common allergens. Dermatitis. 2013;24:215-221. doi:10.1097/DER.0b013e3182a0d3a9
So SP, Yoon JY, Kim JW. Postoperative contact dermatitis caused by skin adhesives used in orthopedic surgery: incidence, characteristics, and difference from surgical site infection. Medicine (Baltimore). 2021;100:e26053. doi:10.1097/md.0000000000026053
Alavi A, Sibbald RG, Ladizinski B, et al. Wound-related allergic/irritant contact dermatitis. Adv Skin Wound Care. 2016;29:278-286. doi:10.1097/01.ASW.0000482834.94375.1e
Sheth VM, Weitzul S. Postoperative topical antimicrobial use. Dermatitis. 2008;19:181-189.
Kohli N, Nedorost S. Inflamed skin predisposes to sensitization to less potent allergens. J Am Acad Dermatol. 2016;75:312-317.e1. doi:10.1016/j.jaad.2016.03.010
Cook KA, Kelso JM. Surgery-related contact dermatitis: a review of potential irritants and allergens. J Allergy Clin Immunol Pract. 2017;5:1234-1240. doi:10.1016/j.jaip.2017.03.001
Kreft B, Wohlrab J. Contact allergies to topical antibiotic applications. Allergol Select. 2022;6:18-26. doi:10.5414/alx02253e
Scherrer MAR, Abreu ÉP, Rocha VB. Neomycin: sources of contact and sensitization evaluation in 1162 patients treated at a tertiary service. An Bras Dermatol. 2023;98:487-492. doi:10.1016/j.abd.2022.07.008
Ashraf DC, Idowu OO, Wang Q, et al. The role of topical antibiotic prophylaxis in oculofacial plastic surgery: a randomized controlled study. Ophthalmology. 2020;127:1747-1754. doi:10.1016/j.ophtha.2020.07.032
Zielin´ska M, Pawłowska A, Orzeł A, et al. Wound microbiota and its impact on wound healing. Int J Mol Sci. 2023;24:17318. doi:10.3390/ijms242417318
Baggio D, Ananda-Rajah MR. Fluoroquinolone antibiotics and adverse events. Aust Prescr. 2021;44:161-164. doi:10.18773/austprescr.2021.035
Ken KM, Johnson MM, Leitenberger JJ, et al. Postoperative infections in dermatologic surgery: the role of wound cultures. Dermatol Surg. 2020;46:1294-1299. doi:10.1097/dss.0000000000002317
Wolf R. The lanolin paradox. Dermatology. 1996;192:198-202. doi:10.1159/000246365
Managing Seromas Following Skin Graft Placement in Dermatologic Surgery
Managing Seromas Following Skin Graft Placement in Dermatologic Surgery
A seroma is a collection of serous lymphatic fluid that forms in an anatomic or surgically created dead space—a void left between tissue layers, such as between the skin and underlying tissue, where fluid can accumulate. Seromas represent possible postoperative complications in many types of procedures, including general, oncologic, reconstructive, and dermatologic surgeries.1-3 While seroma formation following dermatologic surgery generally is uncommon, associated procedures include placement of split- or full-thickness skin grafts or liposuction.4,5 Many seromas follow a self-limited course. In some cases, seromas may cause discomfort, recur, or possibly become infected. Surgical techniques for prevention of seroma formation have been described in the dermatologic literature, but discussion of seroma management, particularly in dermatology, is not well documented. In this article, we describe a management approach for primary, recurrent, or late-stage seromas following placement of split- and full-thickness skin grafts in dermatologic surgery.
Practice Gap
To minimize the risk for seroma formation, attention should be paid to reducing dead space during graft placement. Small slits may be created in the skin graft after placement if the graft is larger than 2 to 3 cm in diameter to facilitate fluid drainage.6 Additionally, a tie-over bolster dressing that provides sustained even pressure over the entire graft should be applied and left in place for 1 week.7 Adjunctive measures, such as the use of fibrin sealants or quilting sutures, may further reduce the likelihood of fluid accumulation.7,8 Factors such as obesity, smoking, limited mobility, and inadequate elevation of the extremities undergoing surgery also should be addressed preoperatively to optimize outcomes of skin grafts.
Although these preventive strategies can be used during skin graft placement, seromas still can occur. Seromas typically manifest during the postoperative period after the removal of the protective dressings, including the bolster. The characteristic finding is the formation of a fluid-filled bulla under the graft. The associated serous lymphatic collection usually is yellow-tinged but may appear violaceous if bleeding has occurred beneath the graft. If the patient presents within 24 to 48 hours of seroma formation, the bulla may be tense or slightly tense; however, if days to weeks have passed since the seroma formed, the lesion may undergo fibrosis with thickening of the overlying tissue. If untreated, fibrosis may progress for several weeks, eventually resulting in nodule formation. Chronic seromas with retained fluid will persist for months. Seromas are more likely to develop under larger skin grafts (typically those exceeding 5-10 cm in diameter) or grafts placed in dependent positions, such as areas below the level of the heart where fluid pooling is more likely, especially on the arms and legs with associated movement.
The Technique
Our approach to seroma management is based on the timeline at presentation and whether the seroma is primary or recurrent or demonstrates late fibrosis. Successful management of primary seromas is centered on prompt drainage. Complete drainage using a #11 surgical blade may be accomplished with a single puncture to create a 2- to 3-mm opening for smaller seromas. Larger or multiple seromas under larger skin grafts may require creating multiple small punctures or small slits (ie, 5-10 mm) to allow for adequate drainage and reduce the incidence of seroma reaccumulation. Once successful drainage has occurred, a pressure dressing consisting of a thin layer of petroleum based ointment, a nonadherent dressing, gauze, and secure tape can help reduce the risk for reaccumulation.
Infrequently, seromas will reaccumulate under a skin graft. If this occurs, the graft may appear fibrous with lumps and loculations of seroma fluid separated by intact graft tissue, resulting in a “bound down” appearance (eFigure 1). This may require creating adequate slits for drainage in the graft. Multiple slits should be created if the seroma is larger (typically more than 3-4 cm in diameter) or loculations are present. If the fluid continues to reaccumulate and the drainage slits reseal, the next step is to cut a small hole in the graft to allow for uninterrupted drainage (eFigure 2). Manual digital pressure with moist gauze can assist in decompressing the seroma and removing residual fluid and gelatinous contents, promoting continuous drainage and preventing further fluid buildup (eFigure 3). These openings heal by secondary intention (eFigure 4). Local care during this time also is achieved with a thin layer of ointment, a nonstick pad, gauze, and secure tape. Dressings should be changed every 1 to 2 days until healing is complete.
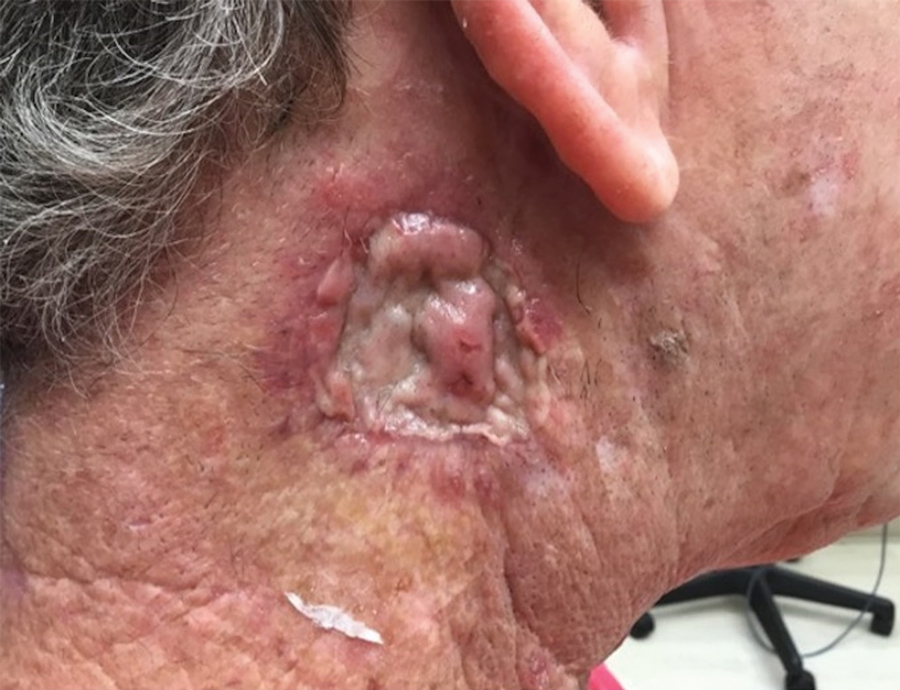
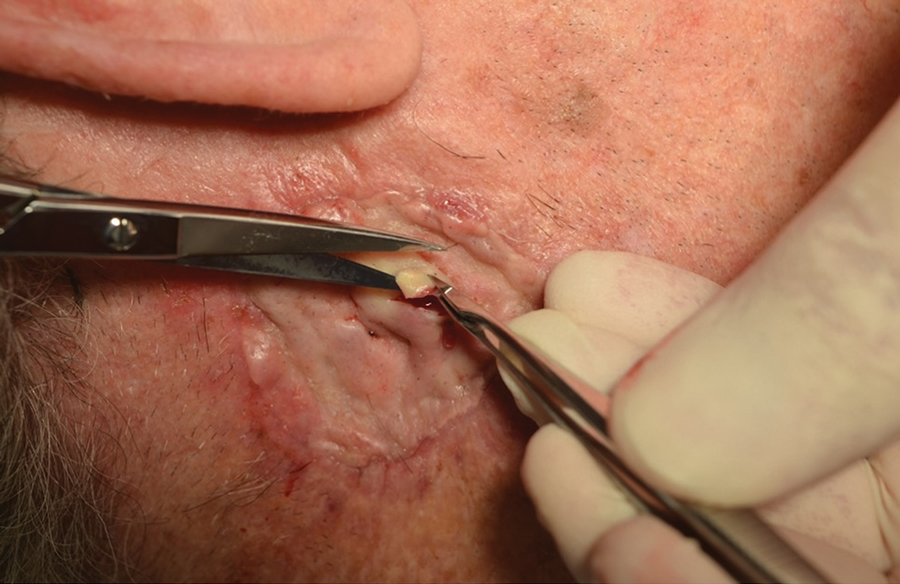
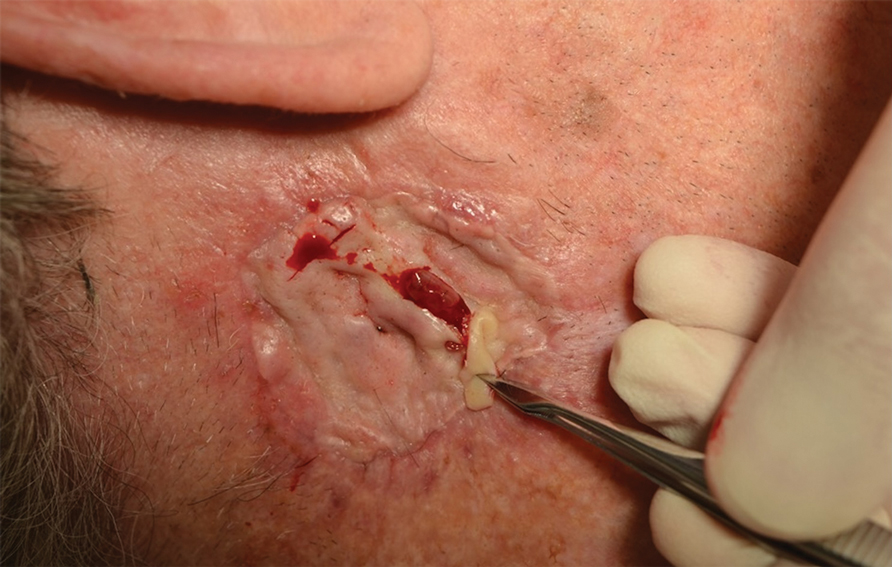
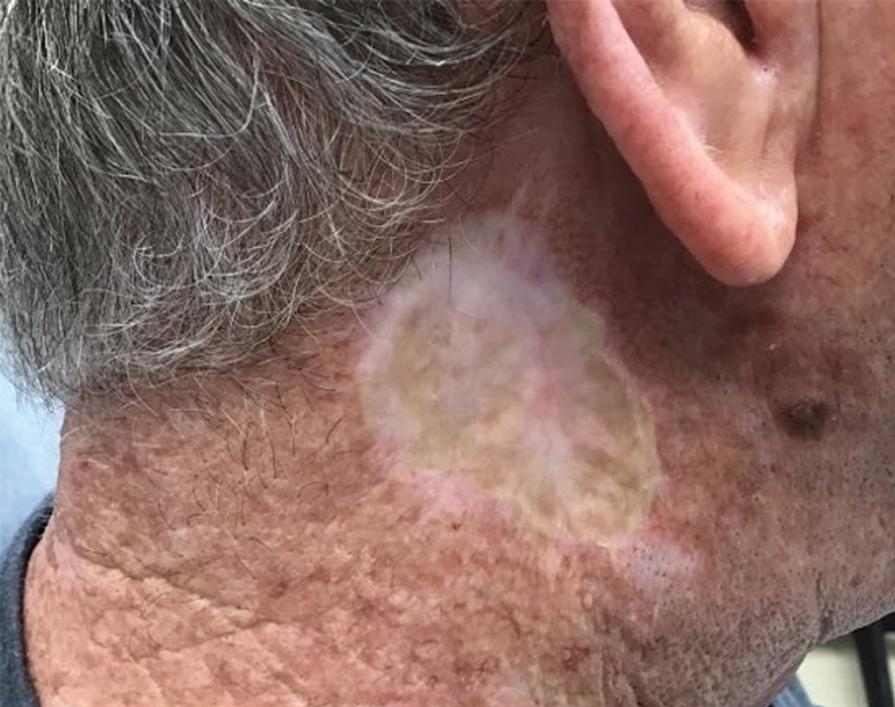
Seromas that lead to fibrotic nodule formation—typically occurring within several weeks to months if untreated—require additional steps for resolution. Once fibrosis occurs, these nodules can be managed by (1) placing adequate local anesthesia, (2) tangentially excising the nodules using either a skin biopsy blade or a #10 or #15 surgical blade, (3) using a handheld heat cautery or electrocautery device to achieve hemostasis, and (4) performing local care, as with any shave or tangential biopsy, until healing is complete. Typically, this requires a single treatment.
Practice Implications
While conservative management with continued compression dressings can be considered for postoperative seroma formation, interventional management sometimes is required. The size and duration of the seroma often guide management. For small seromas (typically less than 2-3 cm in diameter), a small slit incision with a #11 surgical blade may be performed at the dependent point of the seroma. Gentle pressure with a cotton-tipped applicator or moist gauze can be useful to express serous fluid; however, care should be taken not to disrupt adherence of the graft. Recurrent seromas or those with late fibrosis benefit from creation of a surgical window to allow uninterrupted drainage and removal of fibrous components, then can be left to heal by secondary intention with conservative local care.
- DeWitt C, Norris I, Fischer A, et al. A dermatologic approach to a recurrent auricular seroma. Dermatol Surg. 2018;44:1033-1035. doi:10.1097/DSS.0000000000001390
- Woodworth PA, McBoyle MF, Helmer SD, et al. Seroma formation after breast cancer surgery: incidence and predicting factors. Am Surg. 2000;66:444-451.
- Salari N, Fatahi B, Bartina Y, et al. The global prevalence of seroma after abdominoplasty: a systematic review and meta-analysis. Aesthetic Plast Surg. 2021;45:2821-2836. doi:10.1007/s00266-021-02365-6
- Bolognia J, Cerroni L, Schaffer JV. Dermatology. Elsevier; 2018.
- Taha AA, Wahba MM, Tahseen H. Liposuction: drains, are they adequate? Plast Reconstr Surg Glob Open. 2020;8:E2677. doi:10.1097/ GOX.0000000000002677
- Ishii N, Sakai S, Kishi K. A simple and safe method to create a drainage hole for thick skin grafts. Eplasty. 2017;17:ic27.
- Davis M, Baird D, Hill D, et al. Management of full-thickness skin grafts. Proc (Bayl Univ Med Cent). 2021;34:683-686. doi:10.1080 /08998280.2021.1953867
- Mittermayr R, Wassermann E, Thurnher M, et al. Skin graft fixation by slow clotting fibrin sealant applied as a thin layer. Burns. 2006; 32:305-311. doi:10.1016/j.burns.2005.10.010
A seroma is a collection of serous lymphatic fluid that forms in an anatomic or surgically created dead space—a void left between tissue layers, such as between the skin and underlying tissue, where fluid can accumulate. Seromas represent possible postoperative complications in many types of procedures, including general, oncologic, reconstructive, and dermatologic surgeries.1-3 While seroma formation following dermatologic surgery generally is uncommon, associated procedures include placement of split- or full-thickness skin grafts or liposuction.4,5 Many seromas follow a self-limited course. In some cases, seromas may cause discomfort, recur, or possibly become infected. Surgical techniques for prevention of seroma formation have been described in the dermatologic literature, but discussion of seroma management, particularly in dermatology, is not well documented. In this article, we describe a management approach for primary, recurrent, or late-stage seromas following placement of split- and full-thickness skin grafts in dermatologic surgery.
Practice Gap
To minimize the risk for seroma formation, attention should be paid to reducing dead space during graft placement. Small slits may be created in the skin graft after placement if the graft is larger than 2 to 3 cm in diameter to facilitate fluid drainage.6 Additionally, a tie-over bolster dressing that provides sustained even pressure over the entire graft should be applied and left in place for 1 week.7 Adjunctive measures, such as the use of fibrin sealants or quilting sutures, may further reduce the likelihood of fluid accumulation.7,8 Factors such as obesity, smoking, limited mobility, and inadequate elevation of the extremities undergoing surgery also should be addressed preoperatively to optimize outcomes of skin grafts.
Although these preventive strategies can be used during skin graft placement, seromas still can occur. Seromas typically manifest during the postoperative period after the removal of the protective dressings, including the bolster. The characteristic finding is the formation of a fluid-filled bulla under the graft. The associated serous lymphatic collection usually is yellow-tinged but may appear violaceous if bleeding has occurred beneath the graft. If the patient presents within 24 to 48 hours of seroma formation, the bulla may be tense or slightly tense; however, if days to weeks have passed since the seroma formed, the lesion may undergo fibrosis with thickening of the overlying tissue. If untreated, fibrosis may progress for several weeks, eventually resulting in nodule formation. Chronic seromas with retained fluid will persist for months. Seromas are more likely to develop under larger skin grafts (typically those exceeding 5-10 cm in diameter) or grafts placed in dependent positions, such as areas below the level of the heart where fluid pooling is more likely, especially on the arms and legs with associated movement.
The Technique
Our approach to seroma management is based on the timeline at presentation and whether the seroma is primary or recurrent or demonstrates late fibrosis. Successful management of primary seromas is centered on prompt drainage. Complete drainage using a #11 surgical blade may be accomplished with a single puncture to create a 2- to 3-mm opening for smaller seromas. Larger or multiple seromas under larger skin grafts may require creating multiple small punctures or small slits (ie, 5-10 mm) to allow for adequate drainage and reduce the incidence of seroma reaccumulation. Once successful drainage has occurred, a pressure dressing consisting of a thin layer of petroleum based ointment, a nonadherent dressing, gauze, and secure tape can help reduce the risk for reaccumulation.
Infrequently, seromas will reaccumulate under a skin graft. If this occurs, the graft may appear fibrous with lumps and loculations of seroma fluid separated by intact graft tissue, resulting in a “bound down” appearance (eFigure 1). This may require creating adequate slits for drainage in the graft. Multiple slits should be created if the seroma is larger (typically more than 3-4 cm in diameter) or loculations are present. If the fluid continues to reaccumulate and the drainage slits reseal, the next step is to cut a small hole in the graft to allow for uninterrupted drainage (eFigure 2). Manual digital pressure with moist gauze can assist in decompressing the seroma and removing residual fluid and gelatinous contents, promoting continuous drainage and preventing further fluid buildup (eFigure 3). These openings heal by secondary intention (eFigure 4). Local care during this time also is achieved with a thin layer of ointment, a nonstick pad, gauze, and secure tape. Dressings should be changed every 1 to 2 days until healing is complete.


Seromas that lead to fibrotic nodule formation—typically occurring within several weeks to months if untreated—require additional steps for resolution. Once fibrosis occurs, these nodules can be managed by (1) placing adequate local anesthesia, (2) tangentially excising the nodules using either a skin biopsy blade or a #10 or #15 surgical blade, (3) using a handheld heat cautery or electrocautery device to achieve hemostasis, and (4) performing local care, as with any shave or tangential biopsy, until healing is complete. Typically, this requires a single treatment.
Practice Implications
While conservative management with continued compression dressings can be considered for postoperative seroma formation, interventional management sometimes is required. The size and duration of the seroma often guide management. For small seromas (typically less than 2-3 cm in diameter), a small slit incision with a #11 surgical blade may be performed at the dependent point of the seroma. Gentle pressure with a cotton-tipped applicator or moist gauze can be useful to express serous fluid; however, care should be taken not to disrupt adherence of the graft. Recurrent seromas or those with late fibrosis benefit from creation of a surgical window to allow uninterrupted drainage and removal of fibrous components, then can be left to heal by secondary intention with conservative local care.
A seroma is a collection of serous lymphatic fluid that forms in an anatomic or surgically created dead space—a void left between tissue layers, such as between the skin and underlying tissue, where fluid can accumulate. Seromas represent possible postoperative complications in many types of procedures, including general, oncologic, reconstructive, and dermatologic surgeries.1-3 While seroma formation following dermatologic surgery generally is uncommon, associated procedures include placement of split- or full-thickness skin grafts or liposuction.4,5 Many seromas follow a self-limited course. In some cases, seromas may cause discomfort, recur, or possibly become infected. Surgical techniques for prevention of seroma formation have been described in the dermatologic literature, but discussion of seroma management, particularly in dermatology, is not well documented. In this article, we describe a management approach for primary, recurrent, or late-stage seromas following placement of split- and full-thickness skin grafts in dermatologic surgery.
Practice Gap
To minimize the risk for seroma formation, attention should be paid to reducing dead space during graft placement. Small slits may be created in the skin graft after placement if the graft is larger than 2 to 3 cm in diameter to facilitate fluid drainage.6 Additionally, a tie-over bolster dressing that provides sustained even pressure over the entire graft should be applied and left in place for 1 week.7 Adjunctive measures, such as the use of fibrin sealants or quilting sutures, may further reduce the likelihood of fluid accumulation.7,8 Factors such as obesity, smoking, limited mobility, and inadequate elevation of the extremities undergoing surgery also should be addressed preoperatively to optimize outcomes of skin grafts.
Although these preventive strategies can be used during skin graft placement, seromas still can occur. Seromas typically manifest during the postoperative period after the removal of the protective dressings, including the bolster. The characteristic finding is the formation of a fluid-filled bulla under the graft. The associated serous lymphatic collection usually is yellow-tinged but may appear violaceous if bleeding has occurred beneath the graft. If the patient presents within 24 to 48 hours of seroma formation, the bulla may be tense or slightly tense; however, if days to weeks have passed since the seroma formed, the lesion may undergo fibrosis with thickening of the overlying tissue. If untreated, fibrosis may progress for several weeks, eventually resulting in nodule formation. Chronic seromas with retained fluid will persist for months. Seromas are more likely to develop under larger skin grafts (typically those exceeding 5-10 cm in diameter) or grafts placed in dependent positions, such as areas below the level of the heart where fluid pooling is more likely, especially on the arms and legs with associated movement.
The Technique
Our approach to seroma management is based on the timeline at presentation and whether the seroma is primary or recurrent or demonstrates late fibrosis. Successful management of primary seromas is centered on prompt drainage. Complete drainage using a #11 surgical blade may be accomplished with a single puncture to create a 2- to 3-mm opening for smaller seromas. Larger or multiple seromas under larger skin grafts may require creating multiple small punctures or small slits (ie, 5-10 mm) to allow for adequate drainage and reduce the incidence of seroma reaccumulation. Once successful drainage has occurred, a pressure dressing consisting of a thin layer of petroleum based ointment, a nonadherent dressing, gauze, and secure tape can help reduce the risk for reaccumulation.
Infrequently, seromas will reaccumulate under a skin graft. If this occurs, the graft may appear fibrous with lumps and loculations of seroma fluid separated by intact graft tissue, resulting in a “bound down” appearance (eFigure 1). This may require creating adequate slits for drainage in the graft. Multiple slits should be created if the seroma is larger (typically more than 3-4 cm in diameter) or loculations are present. If the fluid continues to reaccumulate and the drainage slits reseal, the next step is to cut a small hole in the graft to allow for uninterrupted drainage (eFigure 2). Manual digital pressure with moist gauze can assist in decompressing the seroma and removing residual fluid and gelatinous contents, promoting continuous drainage and preventing further fluid buildup (eFigure 3). These openings heal by secondary intention (eFigure 4). Local care during this time also is achieved with a thin layer of ointment, a nonstick pad, gauze, and secure tape. Dressings should be changed every 1 to 2 days until healing is complete.


Seromas that lead to fibrotic nodule formation—typically occurring within several weeks to months if untreated—require additional steps for resolution. Once fibrosis occurs, these nodules can be managed by (1) placing adequate local anesthesia, (2) tangentially excising the nodules using either a skin biopsy blade or a #10 or #15 surgical blade, (3) using a handheld heat cautery or electrocautery device to achieve hemostasis, and (4) performing local care, as with any shave or tangential biopsy, until healing is complete. Typically, this requires a single treatment.
Practice Implications
While conservative management with continued compression dressings can be considered for postoperative seroma formation, interventional management sometimes is required. The size and duration of the seroma often guide management. For small seromas (typically less than 2-3 cm in diameter), a small slit incision with a #11 surgical blade may be performed at the dependent point of the seroma. Gentle pressure with a cotton-tipped applicator or moist gauze can be useful to express serous fluid; however, care should be taken not to disrupt adherence of the graft. Recurrent seromas or those with late fibrosis benefit from creation of a surgical window to allow uninterrupted drainage and removal of fibrous components, then can be left to heal by secondary intention with conservative local care.
- DeWitt C, Norris I, Fischer A, et al. A dermatologic approach to a recurrent auricular seroma. Dermatol Surg. 2018;44:1033-1035. doi:10.1097/DSS.0000000000001390
- Woodworth PA, McBoyle MF, Helmer SD, et al. Seroma formation after breast cancer surgery: incidence and predicting factors. Am Surg. 2000;66:444-451.
- Salari N, Fatahi B, Bartina Y, et al. The global prevalence of seroma after abdominoplasty: a systematic review and meta-analysis. Aesthetic Plast Surg. 2021;45:2821-2836. doi:10.1007/s00266-021-02365-6
- Bolognia J, Cerroni L, Schaffer JV. Dermatology. Elsevier; 2018.
- Taha AA, Wahba MM, Tahseen H. Liposuction: drains, are they adequate? Plast Reconstr Surg Glob Open. 2020;8:E2677. doi:10.1097/ GOX.0000000000002677
- Ishii N, Sakai S, Kishi K. A simple and safe method to create a drainage hole for thick skin grafts. Eplasty. 2017;17:ic27.
- Davis M, Baird D, Hill D, et al. Management of full-thickness skin grafts. Proc (Bayl Univ Med Cent). 2021;34:683-686. doi:10.1080 /08998280.2021.1953867
- Mittermayr R, Wassermann E, Thurnher M, et al. Skin graft fixation by slow clotting fibrin sealant applied as a thin layer. Burns. 2006; 32:305-311. doi:10.1016/j.burns.2005.10.010
Managing Seromas Following Skin Graft Placement in Dermatologic Surgery
Managing Seromas Following Skin Graft Placement in Dermatologic Surgery
PRACTICE POINTS
- If seromas are identified early (within 24 to 48 hours postoperatively), prompt drainage with a small incision can prevent complications, such as fibrosis or nodule formation, and improve patient comfort.
- For larger or recurrent seromas, multiple small slits or a surgical window should be created to ensure continuous drainage and prevent reaccumulation. Manual compression with moist gauze also can aid in fluid removal.
- If fibrosis develops and leads to nodule formation, early excision of the fibrotic tissue with local anesthesia is essential for resolution. This approach typically requires a single treatment, with secondary intention healing.
Repair of a Large Full-Thickness Conchal Bowl Defect
Repair of a Large Full-Thickness Conchal Bowl Defect
Practice Gap
Large full-thickness conchal bowl defects often pose a reconstructive challenge. Maintaining the shape and structural integrity of the concha is fundamental for optimal cosmetic and functional outcomes. Prior reports have suggested wedge excisions, composite grafts, interpolation flaps with or without cartilage struts, and hinge flaps as possible options for reconstruction.1-3 However, patients with large defects who prefer single-stage reconstruction procedures present a unique challenge. Herein, we describe a single-stage full-thickness hinge flap technique for a large conchal bowl defect.
The Technique
A 77-year-old man was referred to our dermatology clinic by an outside dermatologist for Mohs micrographic surgery of a biopsy-proven cutaneous squamous cell carcinoma on the right conchal bowl measuring 1.1×2.1 cm and extending to the edge of the external auditory canal (EAC). The excision was performed that same day and was completed in 2 stages, achieving negative margins and resulting in a full-thickness defect measuring 2.0×3.6 cm that included the posterior auricular sulcus, cavum, antitragus, and proximal EAC (Figure 1). The patient requested a single-stage procedure but emphasized that his main priority was an optimal cosmetic outcome.
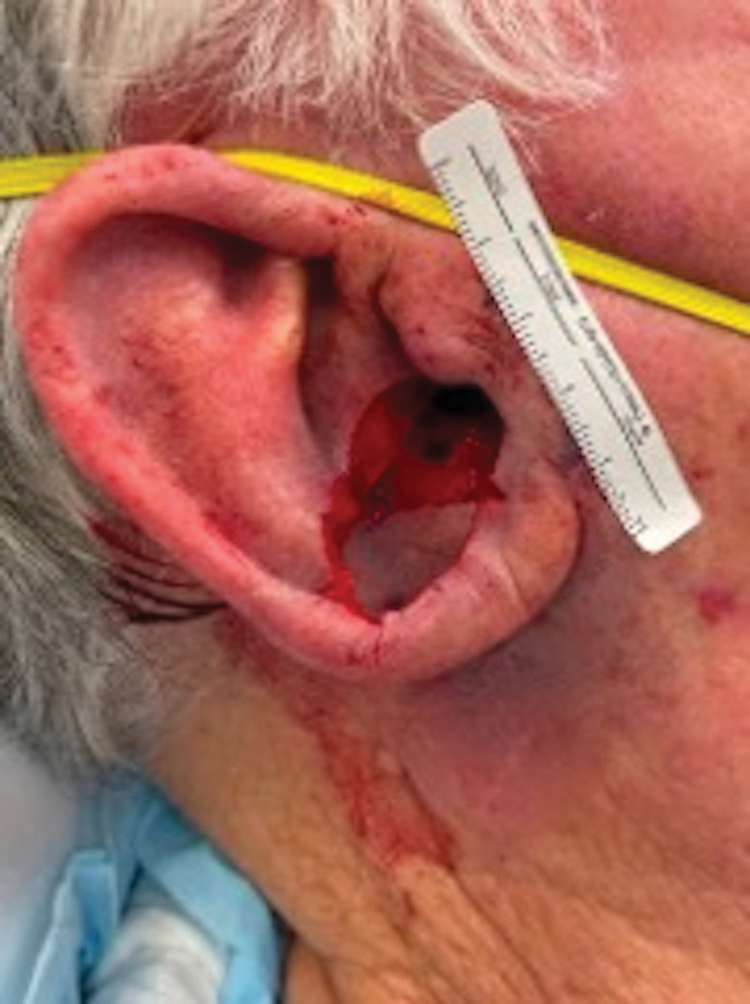
To repair this large defect, a full-thickness hinge flap with Burow graft was performed. The hinge-type flap was designed in a triangular fashion emanating at the posterior auricular sulcus adjacent to the posterior aspect of the defect and extending down the lateral neck (Figure 2). The flap was incised and the surrounding tissue was undermined, maintaining a robust pedicle in the center of its body on the superolateral neck. The flap was passed through the posterior aspect of the full-thickness defect and was secured in place with 4-0 polyglactin sutures in a buried interrupted fashion, thereby recreating the anterior portion of the defect. The superficial skin edges were reapproximated using 4-0 and 5-0 polypropylene sutures in a running interrupted fashion. The distal Burow triangle created from closure of the flap’s secondary defect was aggressively thinned and was utilized as a full-thickness graft for the residual postauricular groove defect (Figure 3). At 2 weeks’ follow-up, the patient was healing well with no postoperative issues and the sutures were removed (Figure 4).
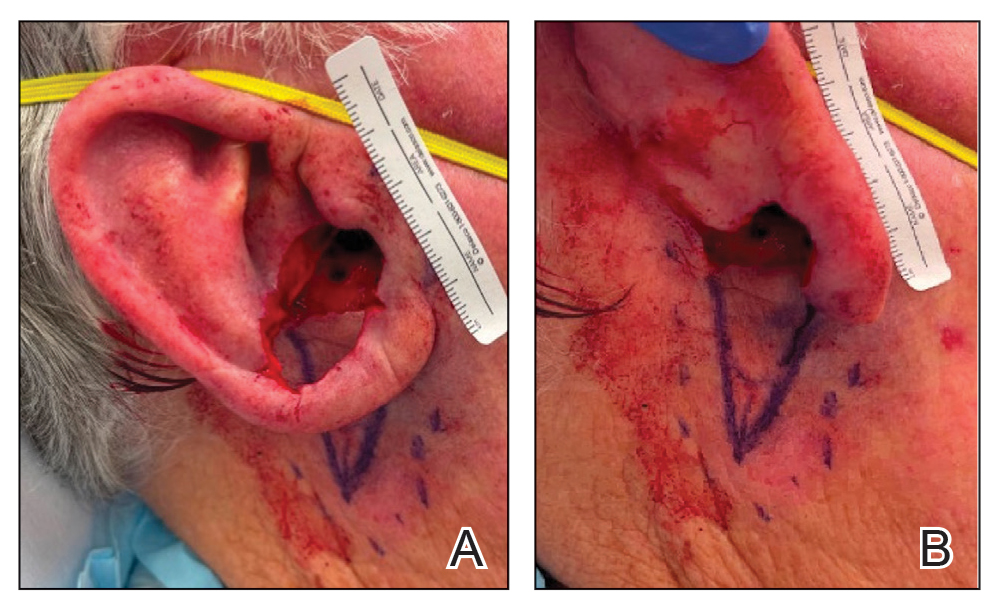
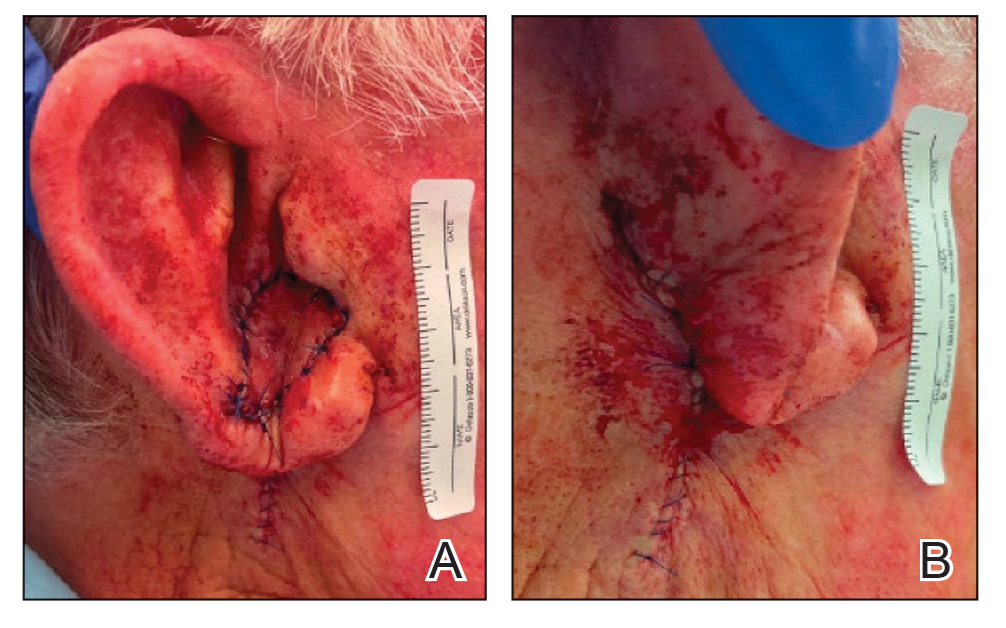
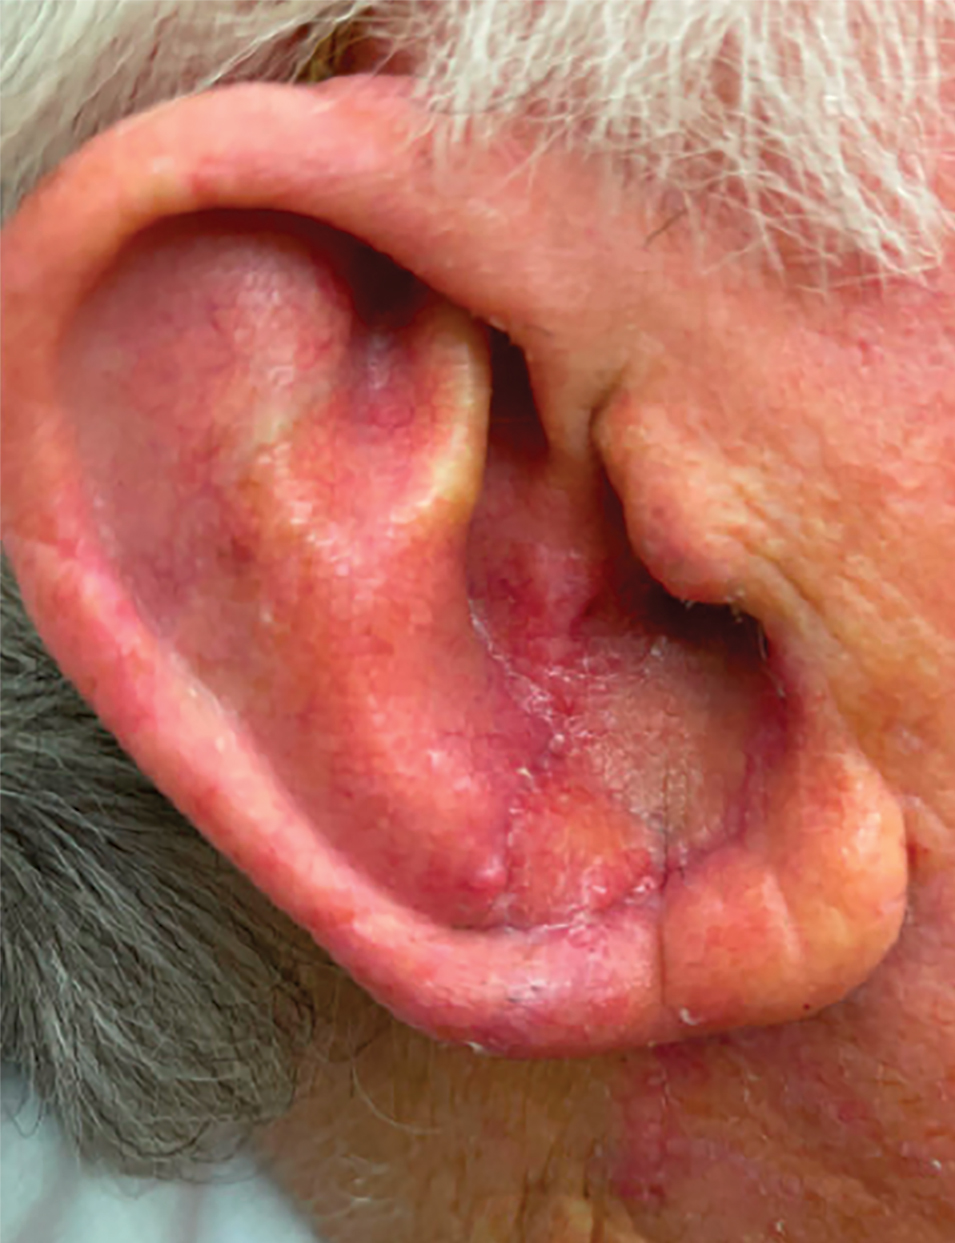
Practice Implications
There are many different reconstructive options for conchal bowl defects, including primary repair, wedge excision, composite graft and interpolation flaps with or without cartilage struts, and hinge flaps. Structural support, EAC patency, auricle symmetry, overall auricle size, and re-creation of natural contours were considered when designing the reconstruction of the defect in our patient; however, his main priority was achieving the greatest cosmetic outcome in a single-stage procedure, therefore limiting our reconstruction options.
Wedge excision, in which the residual lobule and inferior helical rim are removed, could have been considered in our patient but would have drastically altered the symmetry of the size of the ears. A folded postauricular flap, as described in the otolaryngology literature, is an interpolation flap based on the posterior auricular artery that was designed for full-thickness defects of the auricle to prevent any posterior pinning.1 This technique may have worked well in our case, but the patient preferred to avoid a multistage procedure. Additionally, the positional symmetry of the ears was maintained despite utilizing a hinge flap, which does not involve takedown of the pedicle. A composite graft from the contralateral ear could be considered for smaller conchal bowl defects but likely would have resulted in graft failure in our patient’s large defect due to its need for rich blood supply to heal and dependence on lateral wound edges. Cartilage struts in conjunction with a flap could have been considered in this scenario for greater structural support, but in our patient’s case, by maintaining the robust pedicle of our flap and having residual superior cartilage, further structural support was not necessary.
A prior case report described a partial and full-thickness defect in a similar location that was repaired with a retroauricular hinge flap, in which a portion of the flap was extensively de-epithelialized to address the varied thicknesses of the surgical defect.2 In our patient, the defect abutted the skin reservoir on the superolateral neck, and therefore no de-epithelialization was required as the entire epithelialized portion was utilized to recreate the anterior aspect of the defect. Postauricular hinge-type flaps are a reliable, single-stage surgical alternative to the 2-stage folded postauricular interpolation flap when reconstructing large conchal bowl defects. For small full-thickness defects of the ear, a composite graft may be considered; however, blood supply and other nutritional requirements limit this option for large full-thickness defects.
- Roche AM, Griffin M, Shelton R, et al. The folded postauricular flap: a novel approach to reconstruction of large full thickness defects of the conchal bowl. Am J Otolaryngol. 2017;38:706-709. doi:10.1016 /j.amjoto.2017.09.006
- Klein JC, Nijhawan RI. Retroauricular hinge flaps for full-thickness conchal bowl defects. J Am Acad Dermatol. 2024;90:E71-E72. doi:10.1016/j.jaad.2022.10.056
- Pickrell BB, Hughes CD, Maricevich RS. Partial ear defects. Semin Plast Surg. 2017 Aug;31:134-140. doi:10.1055/s-0037-1603968.
Practice Gap
Large full-thickness conchal bowl defects often pose a reconstructive challenge. Maintaining the shape and structural integrity of the concha is fundamental for optimal cosmetic and functional outcomes. Prior reports have suggested wedge excisions, composite grafts, interpolation flaps with or without cartilage struts, and hinge flaps as possible options for reconstruction.1-3 However, patients with large defects who prefer single-stage reconstruction procedures present a unique challenge. Herein, we describe a single-stage full-thickness hinge flap technique for a large conchal bowl defect.
The Technique
A 77-year-old man was referred to our dermatology clinic by an outside dermatologist for Mohs micrographic surgery of a biopsy-proven cutaneous squamous cell carcinoma on the right conchal bowl measuring 1.1×2.1 cm and extending to the edge of the external auditory canal (EAC). The excision was performed that same day and was completed in 2 stages, achieving negative margins and resulting in a full-thickness defect measuring 2.0×3.6 cm that included the posterior auricular sulcus, cavum, antitragus, and proximal EAC (Figure 1). The patient requested a single-stage procedure but emphasized that his main priority was an optimal cosmetic outcome.

To repair this large defect, a full-thickness hinge flap with Burow graft was performed. The hinge-type flap was designed in a triangular fashion emanating at the posterior auricular sulcus adjacent to the posterior aspect of the defect and extending down the lateral neck (Figure 2). The flap was incised and the surrounding tissue was undermined, maintaining a robust pedicle in the center of its body on the superolateral neck. The flap was passed through the posterior aspect of the full-thickness defect and was secured in place with 4-0 polyglactin sutures in a buried interrupted fashion, thereby recreating the anterior portion of the defect. The superficial skin edges were reapproximated using 4-0 and 5-0 polypropylene sutures in a running interrupted fashion. The distal Burow triangle created from closure of the flap’s secondary defect was aggressively thinned and was utilized as a full-thickness graft for the residual postauricular groove defect (Figure 3). At 2 weeks’ follow-up, the patient was healing well with no postoperative issues and the sutures were removed (Figure 4).


Practice Implications
There are many different reconstructive options for conchal bowl defects, including primary repair, wedge excision, composite graft and interpolation flaps with or without cartilage struts, and hinge flaps. Structural support, EAC patency, auricle symmetry, overall auricle size, and re-creation of natural contours were considered when designing the reconstruction of the defect in our patient; however, his main priority was achieving the greatest cosmetic outcome in a single-stage procedure, therefore limiting our reconstruction options.
Wedge excision, in which the residual lobule and inferior helical rim are removed, could have been considered in our patient but would have drastically altered the symmetry of the size of the ears. A folded postauricular flap, as described in the otolaryngology literature, is an interpolation flap based on the posterior auricular artery that was designed for full-thickness defects of the auricle to prevent any posterior pinning.1 This technique may have worked well in our case, but the patient preferred to avoid a multistage procedure. Additionally, the positional symmetry of the ears was maintained despite utilizing a hinge flap, which does not involve takedown of the pedicle. A composite graft from the contralateral ear could be considered for smaller conchal bowl defects but likely would have resulted in graft failure in our patient’s large defect due to its need for rich blood supply to heal and dependence on lateral wound edges. Cartilage struts in conjunction with a flap could have been considered in this scenario for greater structural support, but in our patient’s case, by maintaining the robust pedicle of our flap and having residual superior cartilage, further structural support was not necessary.
A prior case report described a partial and full-thickness defect in a similar location that was repaired with a retroauricular hinge flap, in which a portion of the flap was extensively de-epithelialized to address the varied thicknesses of the surgical defect.2 In our patient, the defect abutted the skin reservoir on the superolateral neck, and therefore no de-epithelialization was required as the entire epithelialized portion was utilized to recreate the anterior aspect of the defect. Postauricular hinge-type flaps are a reliable, single-stage surgical alternative to the 2-stage folded postauricular interpolation flap when reconstructing large conchal bowl defects. For small full-thickness defects of the ear, a composite graft may be considered; however, blood supply and other nutritional requirements limit this option for large full-thickness defects.
Practice Gap
Large full-thickness conchal bowl defects often pose a reconstructive challenge. Maintaining the shape and structural integrity of the concha is fundamental for optimal cosmetic and functional outcomes. Prior reports have suggested wedge excisions, composite grafts, interpolation flaps with or without cartilage struts, and hinge flaps as possible options for reconstruction.1-3 However, patients with large defects who prefer single-stage reconstruction procedures present a unique challenge. Herein, we describe a single-stage full-thickness hinge flap technique for a large conchal bowl defect.
The Technique
A 77-year-old man was referred to our dermatology clinic by an outside dermatologist for Mohs micrographic surgery of a biopsy-proven cutaneous squamous cell carcinoma on the right conchal bowl measuring 1.1×2.1 cm and extending to the edge of the external auditory canal (EAC). The excision was performed that same day and was completed in 2 stages, achieving negative margins and resulting in a full-thickness defect measuring 2.0×3.6 cm that included the posterior auricular sulcus, cavum, antitragus, and proximal EAC (Figure 1). The patient requested a single-stage procedure but emphasized that his main priority was an optimal cosmetic outcome.

To repair this large defect, a full-thickness hinge flap with Burow graft was performed. The hinge-type flap was designed in a triangular fashion emanating at the posterior auricular sulcus adjacent to the posterior aspect of the defect and extending down the lateral neck (Figure 2). The flap was incised and the surrounding tissue was undermined, maintaining a robust pedicle in the center of its body on the superolateral neck. The flap was passed through the posterior aspect of the full-thickness defect and was secured in place with 4-0 polyglactin sutures in a buried interrupted fashion, thereby recreating the anterior portion of the defect. The superficial skin edges were reapproximated using 4-0 and 5-0 polypropylene sutures in a running interrupted fashion. The distal Burow triangle created from closure of the flap’s secondary defect was aggressively thinned and was utilized as a full-thickness graft for the residual postauricular groove defect (Figure 3). At 2 weeks’ follow-up, the patient was healing well with no postoperative issues and the sutures were removed (Figure 4).


Practice Implications
There are many different reconstructive options for conchal bowl defects, including primary repair, wedge excision, composite graft and interpolation flaps with or without cartilage struts, and hinge flaps. Structural support, EAC patency, auricle symmetry, overall auricle size, and re-creation of natural contours were considered when designing the reconstruction of the defect in our patient; however, his main priority was achieving the greatest cosmetic outcome in a single-stage procedure, therefore limiting our reconstruction options.
Wedge excision, in which the residual lobule and inferior helical rim are removed, could have been considered in our patient but would have drastically altered the symmetry of the size of the ears. A folded postauricular flap, as described in the otolaryngology literature, is an interpolation flap based on the posterior auricular artery that was designed for full-thickness defects of the auricle to prevent any posterior pinning.1 This technique may have worked well in our case, but the patient preferred to avoid a multistage procedure. Additionally, the positional symmetry of the ears was maintained despite utilizing a hinge flap, which does not involve takedown of the pedicle. A composite graft from the contralateral ear could be considered for smaller conchal bowl defects but likely would have resulted in graft failure in our patient’s large defect due to its need for rich blood supply to heal and dependence on lateral wound edges. Cartilage struts in conjunction with a flap could have been considered in this scenario for greater structural support, but in our patient’s case, by maintaining the robust pedicle of our flap and having residual superior cartilage, further structural support was not necessary.
A prior case report described a partial and full-thickness defect in a similar location that was repaired with a retroauricular hinge flap, in which a portion of the flap was extensively de-epithelialized to address the varied thicknesses of the surgical defect.2 In our patient, the defect abutted the skin reservoir on the superolateral neck, and therefore no de-epithelialization was required as the entire epithelialized portion was utilized to recreate the anterior aspect of the defect. Postauricular hinge-type flaps are a reliable, single-stage surgical alternative to the 2-stage folded postauricular interpolation flap when reconstructing large conchal bowl defects. For small full-thickness defects of the ear, a composite graft may be considered; however, blood supply and other nutritional requirements limit this option for large full-thickness defects.
- Roche AM, Griffin M, Shelton R, et al. The folded postauricular flap: a novel approach to reconstruction of large full thickness defects of the conchal bowl. Am J Otolaryngol. 2017;38:706-709. doi:10.1016 /j.amjoto.2017.09.006
- Klein JC, Nijhawan RI. Retroauricular hinge flaps for full-thickness conchal bowl defects. J Am Acad Dermatol. 2024;90:E71-E72. doi:10.1016/j.jaad.2022.10.056
- Pickrell BB, Hughes CD, Maricevich RS. Partial ear defects. Semin Plast Surg. 2017 Aug;31:134-140. doi:10.1055/s-0037-1603968.
Repair of a Large Full-Thickness Conchal Bowl Defect
Repair of a Large Full-Thickness Conchal Bowl Defect


