User login
Choosing the Best Formalin-Resistant Ink for Biopsy Specimen Labeling
Choosing the Best Formalin-Resistant Ink for Biopsy Specimen Labeling
Practice Gap
Many dermatology practices utilize pens and markers to label biopsy specimen containers, but the ink may have variable susceptibility to fading and smearing when exposed to moisture before processing. Specimen containers often are placed in plastic bags for transport. If formalin accidentally spills into the bag during this time, the labels may be exposed to moisture for hours, overnight, or even over a weekend. Effective labeling with formalin-resistant ink is crucial for maintaining the clarity of anatomic location and planning treatment, especially when multiple samples are obtained.
The Technique
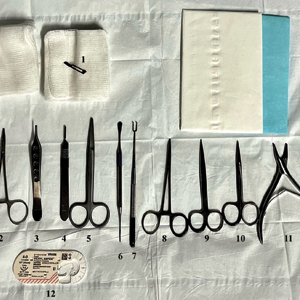
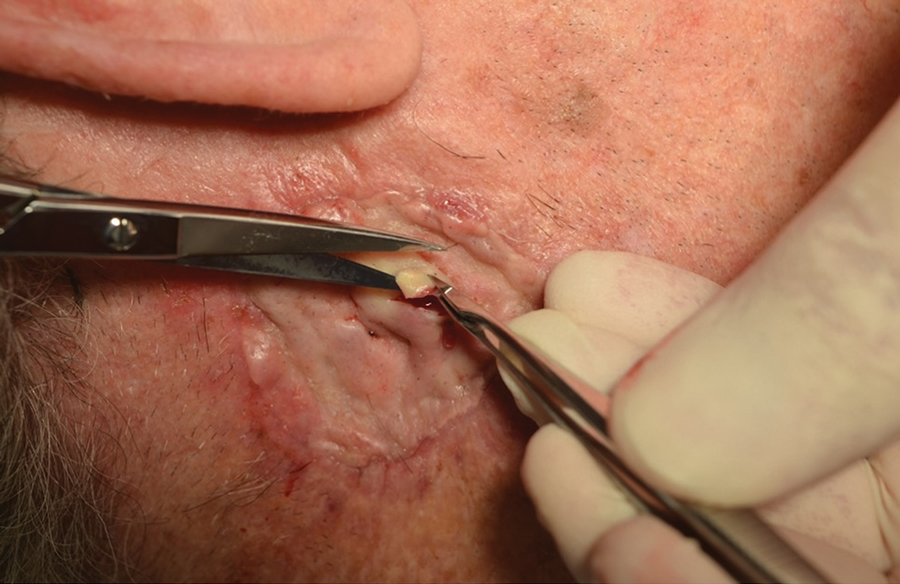
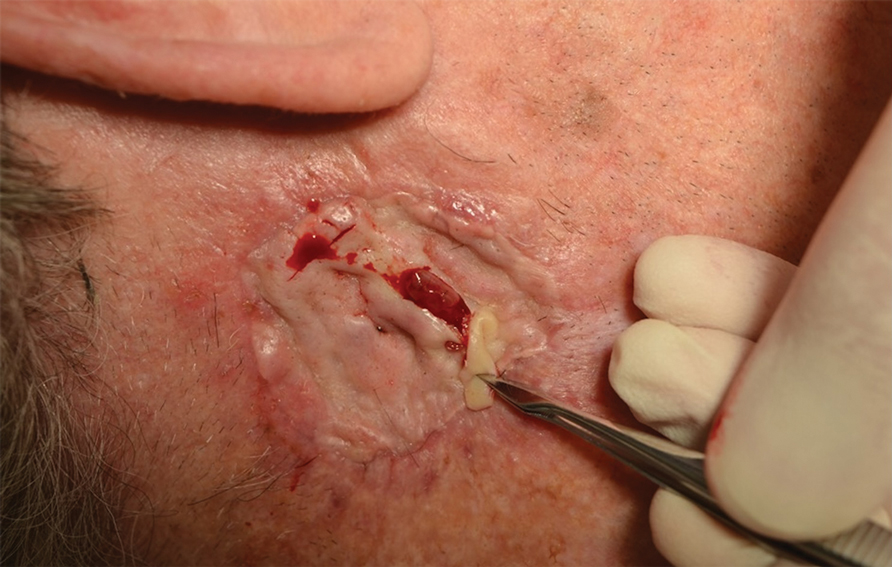
We tested 12 pens and markers commonly used when labeling specimen containers to determine their susceptibility to fading due to accidental formalin exposure (Figure). Various inks were allowed to dry on sample specimen labels for 5 minutes before a thin layer of 10% buffered formalin was evenly distributed over the dried ink. Photographs of the labels were taken at baseline as well as 15 minutes, 1 hour, 3 hours, and 24 hours after formalin exposure.
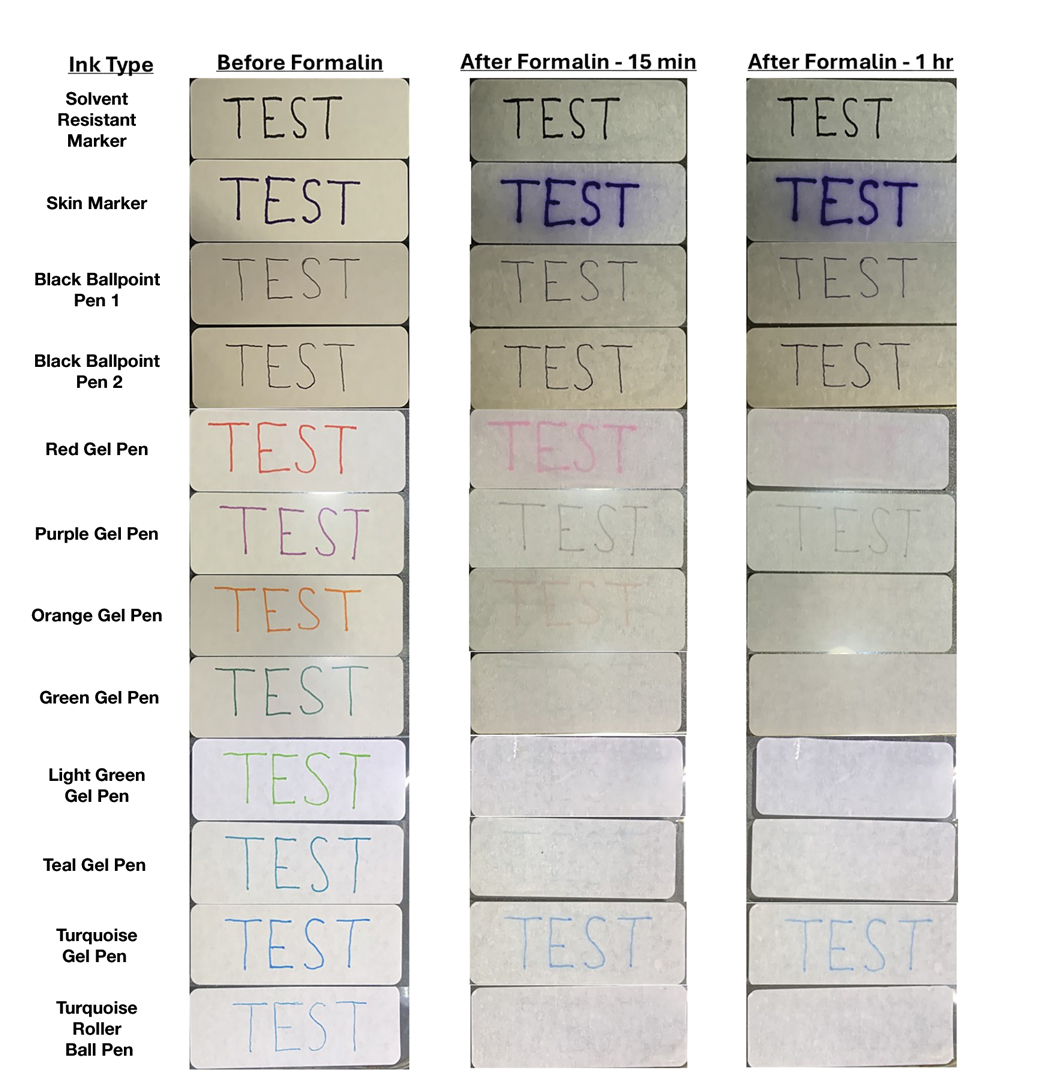
Fading was observed in both the skin marker and gel panes after 15 minutes and peaked after 1 hour. Gel pens were most susceptible to fading on exposure to formalin, and the level of fading varied by ink color, with certain colors disappearing almost entirely (Figure). The solvent-resistant marker had a robust defense to formalin, as did both ballpoint pens.
Practice Implications
Given our findings, dermatology practices should avoid using gel pens to label specimen containers. Solvent-resistant markers performed as expected; however, ballpoint pens appeared to withstand formalin exposure to a similar degree and often are more readily available. Labeling biopsy specimens with an appropriate ink ensures that each sample is clearly identified with the appropriate anatomic location and any other relevant patient information.
Practice Gap
Many dermatology practices utilize pens and markers to label biopsy specimen containers, but the ink may have variable susceptibility to fading and smearing when exposed to moisture before processing. Specimen containers often are placed in plastic bags for transport. If formalin accidentally spills into the bag during this time, the labels may be exposed to moisture for hours, overnight, or even over a weekend. Effective labeling with formalin-resistant ink is crucial for maintaining the clarity of anatomic location and planning treatment, especially when multiple samples are obtained.
The Technique
We tested 12 pens and markers commonly used when labeling specimen containers to determine their susceptibility to fading due to accidental formalin exposure (Figure). Various inks were allowed to dry on sample specimen labels for 5 minutes before a thin layer of 10% buffered formalin was evenly distributed over the dried ink. Photographs of the labels were taken at baseline as well as 15 minutes, 1 hour, 3 hours, and 24 hours after formalin exposure.
Fading was observed in both the skin marker and gel panes after 15 minutes and peaked after 1 hour. Gel pens were most susceptible to fading on exposure to formalin, and the level of fading varied by ink color, with certain colors disappearing almost entirely (Figure). The solvent-resistant marker had a robust defense to formalin, as did both ballpoint pens.
Practice Implications
Given our findings, dermatology practices should avoid using gel pens to label specimen containers. Solvent-resistant markers performed as expected; however, ballpoint pens appeared to withstand formalin exposure to a similar degree and often are more readily available. Labeling biopsy specimens with an appropriate ink ensures that each sample is clearly identified with the appropriate anatomic location and any other relevant patient information.
Choosing the Best Formalin-Resistant Ink for Biopsy Specimen Labeling
Choosing the Best Formalin-Resistant Ink for Biopsy Specimen Labeling

Continuous Testing Method for Contact Allergy to Topical Therapies in the Management of Chronic and Postoperative Wounds
Patients who undergo cutaneous surgery and chronic wound care often are exposed to various topical
Practice Gap
Contact allergies are common in patients with postoperative or chronic wounds. When patch tested, approximately 80% of patients with chronic venous ulcers demonstrated at least 1 positive allergic reaction based on a Canadian study.3 Similarly, postoperative ACD in dermatologic surgery occurs in more than 1.6% of cases in North America and Europe, a rate that is similar to or higher than the rate of postoperative infection, approximately 1% to 2%.4 Postoperative patients and those with chronic wounds have multiple risk factors for ACD. Firstly, applying topical therapies to inflamed or compromised skin increases the risk for contact sensitization.5 Additionally, multiple topical therapies containing known allergenic components may be recommended for wound care, including impregnated or organic dressings, antibiotic ointments, adhesives, antiseptic washes, and topical therapies containing inactive ingredients such as lanolin derivatives.6 Contact with numerous compounds at the same time increases the risk for a contact allergy as well as co-sensitization.7 Similarly, the longer topical agents are applied, the greater the risk for a contact allergy, with sensitization liable to occur at any point during treatment.
Preventive topical antibiotics have garnered a negative reputation among dermatologists, often due to varying data on their efficacy and the overuse of highly allergenic over-the-counter topical antibiotics such as neomycin.8 However, data also have suggested that topical antibiotics can reduce postoperative infections in higher risk surgical cases, specifically certain head and neck surgeries.9 Likewise, topical antibiotics are useful for wound colonization with Pseudomonas, which can remain superficial and slow down healing without progressing to a systemic infection.10 Such cases can be successfully treated or prevented with topical therapies, thereby bypassing the more concerning adverse effects of systemic antibiotics. In particular, systemic fluoroquinolones often are used to treat Pseudomonas and can have many serious adverse effects, including tendon rupture, drug interactions, and arrhythmias.11 Therefore, it is worth implementing topical treatments for wounds colonized with Pseudomonas to spare patients these potential complications.
When a postoperative patient develops a rash at the surgical site, it is critical to differentiate between wound infection and contact allergy, as the treatments for these two conditions may be mutually exclusive and treating the wrong condition may exacerbate the other, such as mistakenly using topical corticosteroids for a wound infection.7 Prompt treatment is necessary for wound infections, as time is limited for patch testing when a rash is already present and the diagnosis is questionable. Allergic contact dermatitis typically erupts 48 to 96 hours following exposure to a contact allergen, often manifesting as intensely pruritic erythematous patches or vesicles.6 Wound infections are characterized by pain and warmth, with erythema and edema present in both conditions. Postoperative infections manifest usually 4 to 7 days following surgery.12 Despite these differences, pruritus and pain are common in the wound healing process; thus, differentiating an infection from ACD on a clinical basis alone is not always possible. Furthermore, presentation of a contact allergy may be delayed beyond the typical 96-hour timeframe if a patient is newly sensitized to an allergen, causing the timeline of rash development to appear similar to that of a wound infection. In such cases, systemic antibiotics often are prescribed empirically; hence, clearer and timelier differentiation between contact allergy and wound infection reduces unnecessary antibiotic prescriptions, thereby avoiding systemic adverse effects and promoting responsible antibiotic stewardship.12
The Technique
Since potentially allergenic topical therapies often are indicated in wound management, we propose that patients serve as internal controls to test continuously for contact allergy sensitization. We recommend that patients apply a small amount of the topical agent, product, or dressing to the inner forearm each time they apply it to the wound. If the patient is sensitized to the product initially or becomes sensitized during treatment, evidence of ACD will be visible not only at the site of the wound but also in the area of secondary application. The inner forearm is recommended for convenience and reproducibility, but a patient may choose a different site as long as it remains consistent. Although certain contact allergens rarely may react solely at a site of inflamed skin, our team has quickly identified ACD and avoided misdiagnosis of chronic or postsurgical wound infection using this approach.13 Subsequent patch testing is indicated when a contact allergy is detected.
Practice Implications
Topical therapies including ointments, washes, and dressing components have the potential to cause sensitization and contact allergy. Despite the concern for development of ACD, topical antibiotics play a useful role in cutaneous surgery.7 Synchronous testing for contact allergy when managing wounds with topical therapies could improve diagnostic accuracy when an allergic reaction occurs. This technique provides a means of harnessing the benefits of topical agents while monitoring the risk for ACD in postoperative and chronic wound care settings.
Butler L, Mowad C. Allergic contact dermatitis in dermatologic surgery: review of common allergens. Dermatitis. 2013;24:215-221. doi:10.1097/DER.0b013e3182a0d3a9
So SP, Yoon JY, Kim JW. Postoperative contact dermatitis caused by skin adhesives used in orthopedic surgery: incidence, characteristics, and difference from surgical site infection. Medicine (Baltimore). 2021;100:e26053. doi:10.1097/md.0000000000026053
Alavi A, Sibbald RG, Ladizinski B, et al. Wound-related allergic/irritant contact dermatitis. Adv Skin Wound Care. 2016;29:278-286. doi:10.1097/01.ASW.0000482834.94375.1e
Sheth VM, Weitzul S. Postoperative topical antimicrobial use. Dermatitis. 2008;19:181-189.
Kohli N, Nedorost S. Inflamed skin predisposes to sensitization to less potent allergens. J Am Acad Dermatol. 2016;75:312-317.e1. doi:10.1016/j.jaad.2016.03.010
Cook KA, Kelso JM. Surgery-related contact dermatitis: a review of potential irritants and allergens. J Allergy Clin Immunol Pract. 2017;5:1234-1240. doi:10.1016/j.jaip.2017.03.001
Kreft B, Wohlrab J. Contact allergies to topical antibiotic applications. Allergol Select. 2022;6:18-26. doi:10.5414/alx02253e
Scherrer MAR, Abreu ÉP, Rocha VB. Neomycin: sources of contact and sensitization evaluation in 1162 patients treated at a tertiary service. An Bras Dermatol. 2023;98:487-492. doi:10.1016/j.abd.2022.07.008
Ashraf DC, Idowu OO, Wang Q, et al. The role of topical antibiotic prophylaxis in oculofacial plastic surgery: a randomized controlled study. Ophthalmology. 2020;127:1747-1754. doi:10.1016/j.ophtha.2020.07.032
Zielin´ska M, Pawłowska A, Orzeł A, et al. Wound microbiota and its impact on wound healing. Int J Mol Sci. 2023;24:17318. doi:10.3390/ijms242417318
Baggio D, Ananda-Rajah MR. Fluoroquinolone antibiotics and adverse events. Aust Prescr. 2021;44:161-164. doi:10.18773/austprescr.2021.035
Ken KM, Johnson MM, Leitenberger JJ, et al. Postoperative infections in dermatologic surgery: the role of wound cultures. Dermatol Surg. 2020;46:1294-1299. doi:10.1097/dss.0000000000002317
Wolf R. The lanolin paradox. Dermatology. 1996;192:198-202. doi:10.1159/000246365
Patients who undergo cutaneous surgery and chronic wound care often are exposed to various topical
Practice Gap
Contact allergies are common in patients with postoperative or chronic wounds. When patch tested, approximately 80% of patients with chronic venous ulcers demonstrated at least 1 positive allergic reaction based on a Canadian study.3 Similarly, postoperative ACD in dermatologic surgery occurs in more than 1.6% of cases in North America and Europe, a rate that is similar to or higher than the rate of postoperative infection, approximately 1% to 2%.4 Postoperative patients and those with chronic wounds have multiple risk factors for ACD. Firstly, applying topical therapies to inflamed or compromised skin increases the risk for contact sensitization.5 Additionally, multiple topical therapies containing known allergenic components may be recommended for wound care, including impregnated or organic dressings, antibiotic ointments, adhesives, antiseptic washes, and topical therapies containing inactive ingredients such as lanolin derivatives.6 Contact with numerous compounds at the same time increases the risk for a contact allergy as well as co-sensitization.7 Similarly, the longer topical agents are applied, the greater the risk for a contact allergy, with sensitization liable to occur at any point during treatment.
Preventive topical antibiotics have garnered a negative reputation among dermatologists, often due to varying data on their efficacy and the overuse of highly allergenic over-the-counter topical antibiotics such as neomycin.8 However, data also have suggested that topical antibiotics can reduce postoperative infections in higher risk surgical cases, specifically certain head and neck surgeries.9 Likewise, topical antibiotics are useful for wound colonization with Pseudomonas, which can remain superficial and slow down healing without progressing to a systemic infection.10 Such cases can be successfully treated or prevented with topical therapies, thereby bypassing the more concerning adverse effects of systemic antibiotics. In particular, systemic fluoroquinolones often are used to treat Pseudomonas and can have many serious adverse effects, including tendon rupture, drug interactions, and arrhythmias.11 Therefore, it is worth implementing topical treatments for wounds colonized with Pseudomonas to spare patients these potential complications.
When a postoperative patient develops a rash at the surgical site, it is critical to differentiate between wound infection and contact allergy, as the treatments for these two conditions may be mutually exclusive and treating the wrong condition may exacerbate the other, such as mistakenly using topical corticosteroids for a wound infection.7 Prompt treatment is necessary for wound infections, as time is limited for patch testing when a rash is already present and the diagnosis is questionable. Allergic contact dermatitis typically erupts 48 to 96 hours following exposure to a contact allergen, often manifesting as intensely pruritic erythematous patches or vesicles.6 Wound infections are characterized by pain and warmth, with erythema and edema present in both conditions. Postoperative infections manifest usually 4 to 7 days following surgery.12 Despite these differences, pruritus and pain are common in the wound healing process; thus, differentiating an infection from ACD on a clinical basis alone is not always possible. Furthermore, presentation of a contact allergy may be delayed beyond the typical 96-hour timeframe if a patient is newly sensitized to an allergen, causing the timeline of rash development to appear similar to that of a wound infection. In such cases, systemic antibiotics often are prescribed empirically; hence, clearer and timelier differentiation between contact allergy and wound infection reduces unnecessary antibiotic prescriptions, thereby avoiding systemic adverse effects and promoting responsible antibiotic stewardship.12
The Technique
Since potentially allergenic topical therapies often are indicated in wound management, we propose that patients serve as internal controls to test continuously for contact allergy sensitization. We recommend that patients apply a small amount of the topical agent, product, or dressing to the inner forearm each time they apply it to the wound. If the patient is sensitized to the product initially or becomes sensitized during treatment, evidence of ACD will be visible not only at the site of the wound but also in the area of secondary application. The inner forearm is recommended for convenience and reproducibility, but a patient may choose a different site as long as it remains consistent. Although certain contact allergens rarely may react solely at a site of inflamed skin, our team has quickly identified ACD and avoided misdiagnosis of chronic or postsurgical wound infection using this approach.13 Subsequent patch testing is indicated when a contact allergy is detected.
Practice Implications
Topical therapies including ointments, washes, and dressing components have the potential to cause sensitization and contact allergy. Despite the concern for development of ACD, topical antibiotics play a useful role in cutaneous surgery.7 Synchronous testing for contact allergy when managing wounds with topical therapies could improve diagnostic accuracy when an allergic reaction occurs. This technique provides a means of harnessing the benefits of topical agents while monitoring the risk for ACD in postoperative and chronic wound care settings.
Butler L, Mowad C. Allergic contact dermatitis in dermatologic surgery: review of common allergens. Dermatitis. 2013;24:215-221. doi:10.1097/DER.0b013e3182a0d3a9
So SP, Yoon JY, Kim JW. Postoperative contact dermatitis caused by skin adhesives used in orthopedic surgery: incidence, characteristics, and difference from surgical site infection. Medicine (Baltimore). 2021;100:e26053. doi:10.1097/md.0000000000026053
Alavi A, Sibbald RG, Ladizinski B, et al. Wound-related allergic/irritant contact dermatitis. Adv Skin Wound Care. 2016;29:278-286. doi:10.1097/01.ASW.0000482834.94375.1e
Sheth VM, Weitzul S. Postoperative topical antimicrobial use. Dermatitis. 2008;19:181-189.
Kohli N, Nedorost S. Inflamed skin predisposes to sensitization to less potent allergens. J Am Acad Dermatol. 2016;75:312-317.e1. doi:10.1016/j.jaad.2016.03.010
Cook KA, Kelso JM. Surgery-related contact dermatitis: a review of potential irritants and allergens. J Allergy Clin Immunol Pract. 2017;5:1234-1240. doi:10.1016/j.jaip.2017.03.001
Kreft B, Wohlrab J. Contact allergies to topical antibiotic applications. Allergol Select. 2022;6:18-26. doi:10.5414/alx02253e
Scherrer MAR, Abreu ÉP, Rocha VB. Neomycin: sources of contact and sensitization evaluation in 1162 patients treated at a tertiary service. An Bras Dermatol. 2023;98:487-492. doi:10.1016/j.abd.2022.07.008
Ashraf DC, Idowu OO, Wang Q, et al. The role of topical antibiotic prophylaxis in oculofacial plastic surgery: a randomized controlled study. Ophthalmology. 2020;127:1747-1754. doi:10.1016/j.ophtha.2020.07.032
Zielin´ska M, Pawłowska A, Orzeł A, et al. Wound microbiota and its impact on wound healing. Int J Mol Sci. 2023;24:17318. doi:10.3390/ijms242417318
Baggio D, Ananda-Rajah MR. Fluoroquinolone antibiotics and adverse events. Aust Prescr. 2021;44:161-164. doi:10.18773/austprescr.2021.035
Ken KM, Johnson MM, Leitenberger JJ, et al. Postoperative infections in dermatologic surgery: the role of wound cultures. Dermatol Surg. 2020;46:1294-1299. doi:10.1097/dss.0000000000002317
Wolf R. The lanolin paradox. Dermatology. 1996;192:198-202. doi:10.1159/000246365
Managing Seromas Following Skin Graft Placement in Dermatologic Surgery
Managing Seromas Following Skin Graft Placement in Dermatologic Surgery
A seroma is a collection of serous lymphatic fluid that forms in an anatomic or surgically created dead space—a void left between tissue layers, such as between the skin and underlying tissue, where fluid can accumulate. Seromas represent possible postoperative complications in many types of procedures, including general, oncologic, reconstructive, and dermatologic surgeries.1-3 While seroma formation following dermatologic surgery generally is uncommon, associated procedures include placement of split- or full-thickness skin grafts or liposuction.4,5 Many seromas follow a self-limited course. In some cases, seromas may cause discomfort, recur, or possibly become infected. Surgical techniques for prevention of seroma formation have been described in the dermatologic literature, but discussion of seroma management, particularly in dermatology, is not well documented. In this article, we describe a management approach for primary, recurrent, or late-stage seromas following placement of split- and full-thickness skin grafts in dermatologic surgery.
Practice Gap
To minimize the risk for seroma formation, attention should be paid to reducing dead space during graft placement. Small slits may be created in the skin graft after placement if the graft is larger than 2 to 3 cm in diameter to facilitate fluid drainage.6 Additionally, a tie-over bolster dressing that provides sustained even pressure over the entire graft should be applied and left in place for 1 week.7 Adjunctive measures, such as the use of fibrin sealants or quilting sutures, may further reduce the likelihood of fluid accumulation.7,8 Factors such as obesity, smoking, limited mobility, and inadequate elevation of the extremities undergoing surgery also should be addressed preoperatively to optimize outcomes of skin grafts.
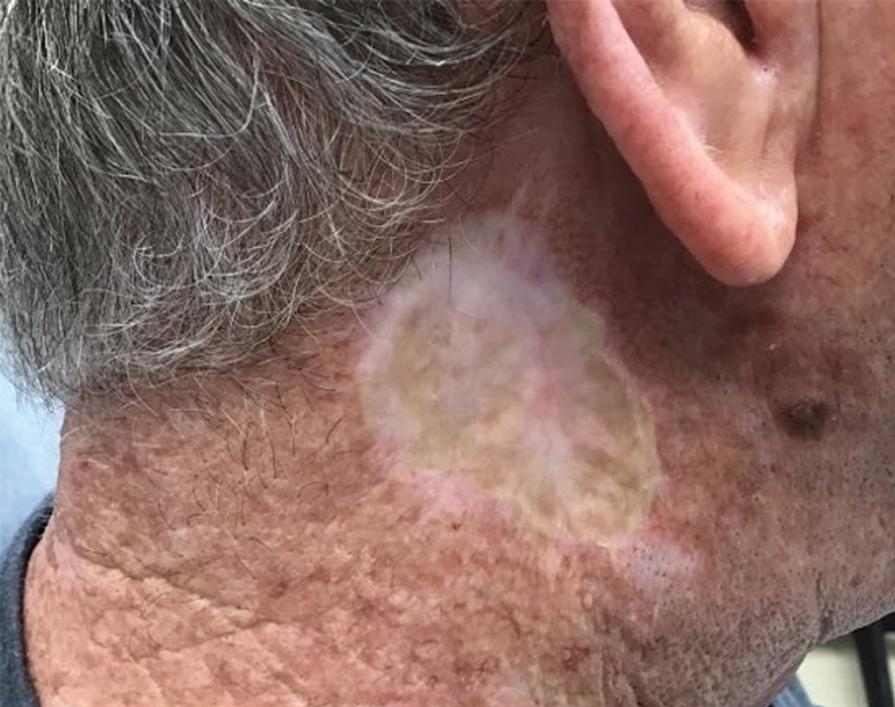
Although these preventive strategies can be used during skin graft placement, seromas still can occur. Seromas typically manifest during the postoperative period after the removal of the protective dressings, including the bolster. The characteristic finding is the formation of a fluid-filled bulla under the graft. The associated serous lymphatic collection usually is yellow-tinged but may appear violaceous if bleeding has occurred beneath the graft. If the patient presents within 24 to 48 hours of seroma formation, the bulla may be tense or slightly tense; however, if days to weeks have passed since the seroma formed, the lesion may undergo fibrosis with thickening of the overlying tissue. If untreated, fibrosis may progress for several weeks, eventually resulting in nodule formation. Chronic seromas with retained fluid will persist for months. Seromas are more likely to develop under larger skin grafts (typically those exceeding 5-10 cm in diameter) or grafts placed in dependent positions, such as areas below the level of the heart where fluid pooling is more likely, especially on the arms and legs with associated movement.
The Technique
Our approach to seroma management is based on the timeline at presentation and whether the seroma is primary or recurrent or demonstrates late fibrosis. Successful management of primary seromas is centered on prompt drainage. Complete drainage using a #11 surgical blade may be accomplished with a single puncture to create a 2- to 3-mm opening for smaller seromas. Larger or multiple seromas under larger skin grafts may require creating multiple small punctures or small slits (ie, 5-10 mm) to allow for adequate drainage and reduce the incidence of seroma reaccumulation. Once successful drainage has occurred, a pressure dressing consisting of a thin layer of petroleum based ointment, a nonadherent dressing, gauze, and secure tape can help reduce the risk for reaccumulation.
Infrequently, seromas will reaccumulate under a skin graft. If this occurs, the graft may appear fibrous with lumps and loculations of seroma fluid separated by intact graft tissue, resulting in a “bound down” appearance (eFigure 1). This may require creating adequate slits for drainage in the graft. Multiple slits should be created if the seroma is larger (typically more than 3-4 cm in diameter) or loculations are present. If the fluid continues to reaccumulate and the drainage slits reseal, the next step is to cut a small hole in the graft to allow for uninterrupted drainage (eFigure 2). Manual digital pressure with moist gauze can assist in decompressing the seroma and removing residual fluid and gelatinous contents, promoting continuous drainage and preventing further fluid buildup (eFigure 3). These openings heal by secondary intention (eFigure 4). Local care during this time also is achieved with a thin layer of ointment, a nonstick pad, gauze, and secure tape. Dressings should be changed every 1 to 2 days until healing is complete.
Seromas that lead to fibrotic nodule formation—typically occurring within several weeks to months if untreated—require additional steps for resolution. Once fibrosis occurs, these nodules can be managed by (1) placing adequate local anesthesia, (2) tangentially excising the nodules using either a skin biopsy blade or a #10 or #15 surgical blade, (3) using a handheld heat cautery or electrocautery device to achieve hemostasis, and (4) performing local care, as with any shave or tangential biopsy, until healing is complete. Typically, this requires a single treatment.
Practice Implications
While conservative management with continued compression dressings can be considered for postoperative seroma formation, interventional management sometimes is required. The size and duration of the seroma often guide management. For small seromas (typically less than 2-3 cm in diameter), a small slit incision with a #11 surgical blade may be performed at the dependent point of the seroma. Gentle pressure with a cotton-tipped applicator or moist gauze can be useful to express serous fluid; however, care should be taken not to disrupt adherence of the graft. Recurrent seromas or those with late fibrosis benefit from creation of a surgical window to allow uninterrupted drainage and removal of fibrous components, then can be left to heal by secondary intention with conservative local care.
- DeWitt C, Norris I, Fischer A, et al. A dermatologic approach to a recurrent auricular seroma. Dermatol Surg. 2018;44:1033-1035. doi:10.1097/DSS.0000000000001390
- Woodworth PA, McBoyle MF, Helmer SD, et al. Seroma formation after breast cancer surgery: incidence and predicting factors. Am Surg. 2000;66:444-451.
- Salari N, Fatahi B, Bartina Y, et al. The global prevalence of seroma after abdominoplasty: a systematic review and meta-analysis. Aesthetic Plast Surg. 2021;45:2821-2836. doi:10.1007/s00266-021-02365-6
- Bolognia J, Cerroni L, Schaffer JV. Dermatology. Elsevier; 2018.
- Taha AA, Wahba MM, Tahseen H. Liposuction: drains, are they adequate? Plast Reconstr Surg Glob Open. 2020;8:E2677. doi:10.1097/ GOX.0000000000002677
- Ishii N, Sakai S, Kishi K. A simple and safe method to create a drainage hole for thick skin grafts. Eplasty. 2017;17:ic27.
- Davis M, Baird D, Hill D, et al. Management of full-thickness skin grafts. Proc (Bayl Univ Med Cent). 2021;34:683-686. doi:10.1080 /08998280.2021.1953867
- Mittermayr R, Wassermann E, Thurnher M, et al. Skin graft fixation by slow clotting fibrin sealant applied as a thin layer. Burns. 2006; 32:305-311. doi:10.1016/j.burns.2005.10.010
A seroma is a collection of serous lymphatic fluid that forms in an anatomic or surgically created dead space—a void left between tissue layers, such as between the skin and underlying tissue, where fluid can accumulate. Seromas represent possible postoperative complications in many types of procedures, including general, oncologic, reconstructive, and dermatologic surgeries.1-3 While seroma formation following dermatologic surgery generally is uncommon, associated procedures include placement of split- or full-thickness skin grafts or liposuction.4,5 Many seromas follow a self-limited course. In some cases, seromas may cause discomfort, recur, or possibly become infected. Surgical techniques for prevention of seroma formation have been described in the dermatologic literature, but discussion of seroma management, particularly in dermatology, is not well documented. In this article, we describe a management approach for primary, recurrent, or late-stage seromas following placement of split- and full-thickness skin grafts in dermatologic surgery.
Practice Gap
To minimize the risk for seroma formation, attention should be paid to reducing dead space during graft placement. Small slits may be created in the skin graft after placement if the graft is larger than 2 to 3 cm in diameter to facilitate fluid drainage.6 Additionally, a tie-over bolster dressing that provides sustained even pressure over the entire graft should be applied and left in place for 1 week.7 Adjunctive measures, such as the use of fibrin sealants or quilting sutures, may further reduce the likelihood of fluid accumulation.7,8 Factors such as obesity, smoking, limited mobility, and inadequate elevation of the extremities undergoing surgery also should be addressed preoperatively to optimize outcomes of skin grafts.
Although these preventive strategies can be used during skin graft placement, seromas still can occur. Seromas typically manifest during the postoperative period after the removal of the protective dressings, including the bolster. The characteristic finding is the formation of a fluid-filled bulla under the graft. The associated serous lymphatic collection usually is yellow-tinged but may appear violaceous if bleeding has occurred beneath the graft. If the patient presents within 24 to 48 hours of seroma formation, the bulla may be tense or slightly tense; however, if days to weeks have passed since the seroma formed, the lesion may undergo fibrosis with thickening of the overlying tissue. If untreated, fibrosis may progress for several weeks, eventually resulting in nodule formation. Chronic seromas with retained fluid will persist for months. Seromas are more likely to develop under larger skin grafts (typically those exceeding 5-10 cm in diameter) or grafts placed in dependent positions, such as areas below the level of the heart where fluid pooling is more likely, especially on the arms and legs with associated movement.
The Technique
Our approach to seroma management is based on the timeline at presentation and whether the seroma is primary or recurrent or demonstrates late fibrosis. Successful management of primary seromas is centered on prompt drainage. Complete drainage using a #11 surgical blade may be accomplished with a single puncture to create a 2- to 3-mm opening for smaller seromas. Larger or multiple seromas under larger skin grafts may require creating multiple small punctures or small slits (ie, 5-10 mm) to allow for adequate drainage and reduce the incidence of seroma reaccumulation. Once successful drainage has occurred, a pressure dressing consisting of a thin layer of petroleum based ointment, a nonadherent dressing, gauze, and secure tape can help reduce the risk for reaccumulation.
Infrequently, seromas will reaccumulate under a skin graft. If this occurs, the graft may appear fibrous with lumps and loculations of seroma fluid separated by intact graft tissue, resulting in a “bound down” appearance (eFigure 1). This may require creating adequate slits for drainage in the graft. Multiple slits should be created if the seroma is larger (typically more than 3-4 cm in diameter) or loculations are present. If the fluid continues to reaccumulate and the drainage slits reseal, the next step is to cut a small hole in the graft to allow for uninterrupted drainage (eFigure 2). Manual digital pressure with moist gauze can assist in decompressing the seroma and removing residual fluid and gelatinous contents, promoting continuous drainage and preventing further fluid buildup (eFigure 3). These openings heal by secondary intention (eFigure 4). Local care during this time also is achieved with a thin layer of ointment, a nonstick pad, gauze, and secure tape. Dressings should be changed every 1 to 2 days until healing is complete.
Seromas that lead to fibrotic nodule formation—typically occurring within several weeks to months if untreated—require additional steps for resolution. Once fibrosis occurs, these nodules can be managed by (1) placing adequate local anesthesia, (2) tangentially excising the nodules using either a skin biopsy blade or a #10 or #15 surgical blade, (3) using a handheld heat cautery or electrocautery device to achieve hemostasis, and (4) performing local care, as with any shave or tangential biopsy, until healing is complete. Typically, this requires a single treatment.
Practice Implications
While conservative management with continued compression dressings can be considered for postoperative seroma formation, interventional management sometimes is required. The size and duration of the seroma often guide management. For small seromas (typically less than 2-3 cm in diameter), a small slit incision with a #11 surgical blade may be performed at the dependent point of the seroma. Gentle pressure with a cotton-tipped applicator or moist gauze can be useful to express serous fluid; however, care should be taken not to disrupt adherence of the graft. Recurrent seromas or those with late fibrosis benefit from creation of a surgical window to allow uninterrupted drainage and removal of fibrous components, then can be left to heal by secondary intention with conservative local care.
- DeWitt C, Norris I, Fischer A, et al. A dermatologic approach to a recurrent auricular seroma. Dermatol Surg. 2018;44:1033-1035. doi:10.1097/DSS.0000000000001390
- Woodworth PA, McBoyle MF, Helmer SD, et al. Seroma formation after breast cancer surgery: incidence and predicting factors. Am Surg. 2000;66:444-451.
- Salari N, Fatahi B, Bartina Y, et al. The global prevalence of seroma after abdominoplasty: a systematic review and meta-analysis. Aesthetic Plast Surg. 2021;45:2821-2836. doi:10.1007/s00266-021-02365-6
- Bolognia J, Cerroni L, Schaffer JV. Dermatology. Elsevier; 2018.
- Taha AA, Wahba MM, Tahseen H. Liposuction: drains, are they adequate? Plast Reconstr Surg Glob Open. 2020;8:E2677. doi:10.1097/ GOX.0000000000002677
- Ishii N, Sakai S, Kishi K. A simple and safe method to create a drainage hole for thick skin grafts. Eplasty. 2017;17:ic27.
- Davis M, Baird D, Hill D, et al. Management of full-thickness skin grafts. Proc (Bayl Univ Med Cent). 2021;34:683-686. doi:10.1080 /08998280.2021.1953867
- Mittermayr R, Wassermann E, Thurnher M, et al. Skin graft fixation by slow clotting fibrin sealant applied as a thin layer. Burns. 2006; 32:305-311. doi:10.1016/j.burns.2005.10.010
Managing Seromas Following Skin Graft Placement in Dermatologic Surgery
Managing Seromas Following Skin Graft Placement in Dermatologic Surgery
PRACTICE POINTS
- If seromas are identified early (within 24 to 48 hours postoperatively), prompt drainage with a small incision can prevent complications, such as fibrosis or nodule formation, and improve patient comfort.
- For larger or recurrent seromas, multiple small slits or a surgical window should be created to ensure continuous drainage and prevent reaccumulation. Manual compression with moist gauze also can aid in fluid removal.
- If fibrosis develops and leads to nodule formation, early excision of the fibrotic tissue with local anesthesia is essential for resolution. This approach typically requires a single treatment, with secondary intention healing.

Repair of a Large Full-Thickness Conchal Bowl Defect
Repair of a Large Full-Thickness Conchal Bowl Defect
Practice Gap
Large full-thickness conchal bowl defects often pose a reconstructive challenge. Maintaining the shape and structural integrity of the concha is fundamental for optimal cosmetic and functional outcomes. Prior reports have suggested wedge excisions, composite grafts, interpolation flaps with or without cartilage struts, and hinge flaps as possible options for reconstruction.1-3 However, patients with large defects who prefer single-stage reconstruction procedures present a unique challenge. Herein, we describe a single-stage full-thickness hinge flap technique for a large conchal bowl defect.
The Technique
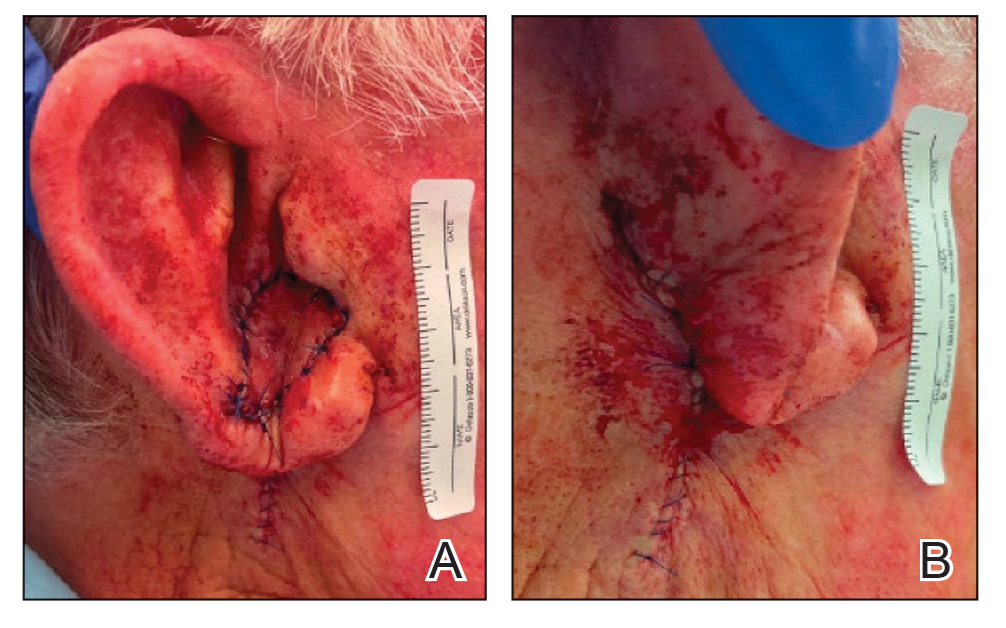
A 77-year-old man was referred to our dermatology clinic by an outside dermatologist for Mohs micrographic surgery of a biopsy-proven cutaneous squamous cell carcinoma on the right conchal bowl measuring 1.1×2.1 cm and extending to the edge of the external auditory canal (EAC). The excision was performed that same day and was completed in 2 stages, achieving negative margins and resulting in a full-thickness defect measuring 2.0×3.6 cm that included the posterior auricular sulcus, cavum, antitragus, and proximal EAC (Figure 1). The patient requested a single-stage procedure but emphasized that his main priority was an optimal cosmetic outcome.
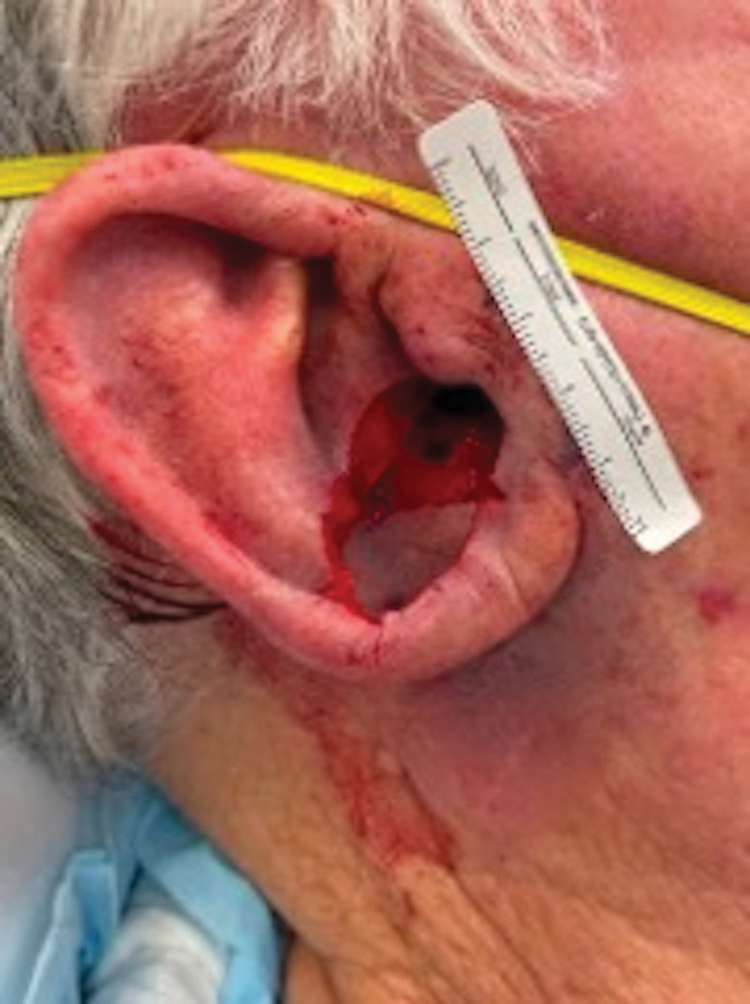
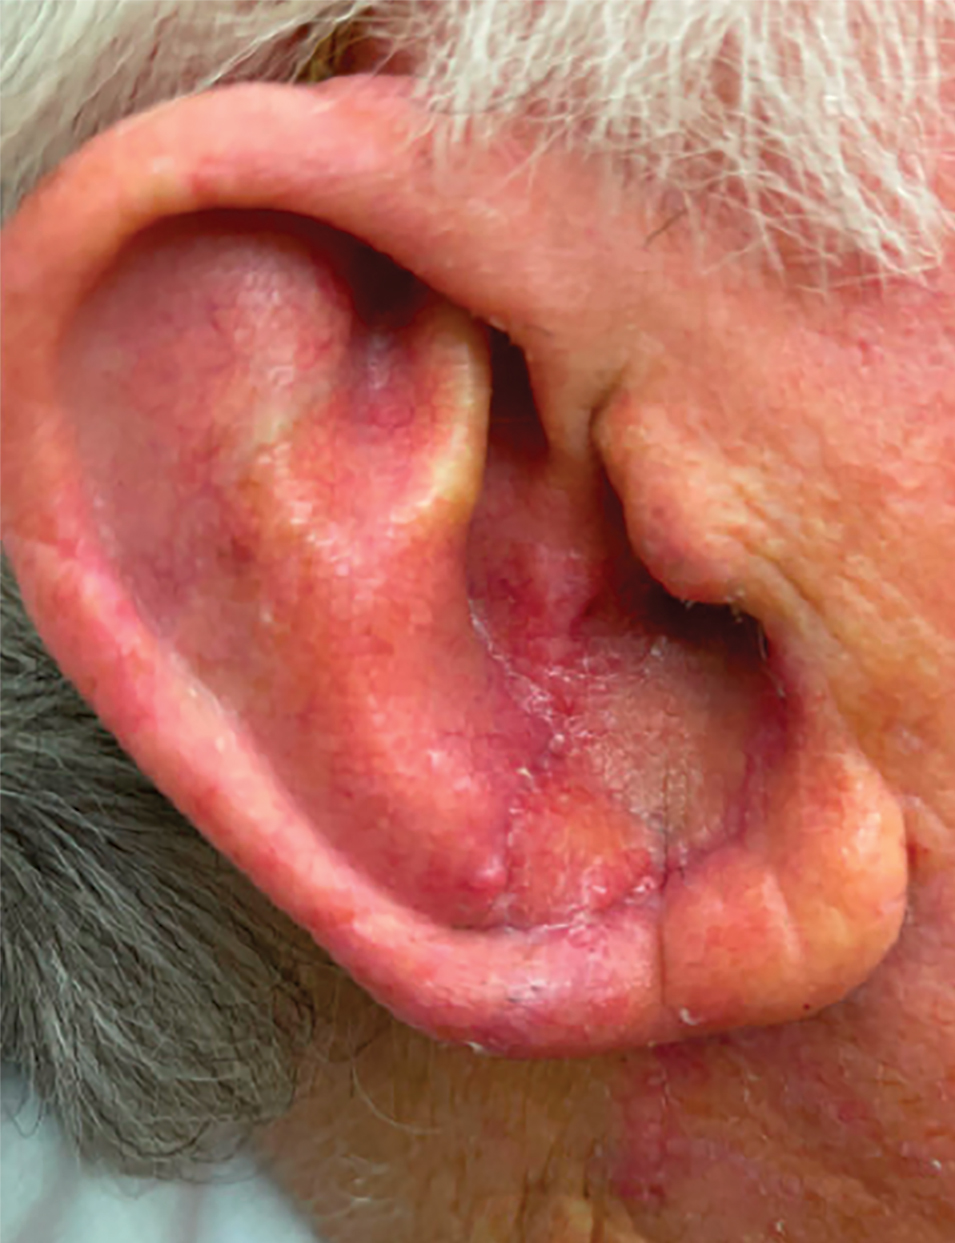
To repair this large defect, a full-thickness hinge flap with Burow graft was performed. The hinge-type flap was designed in a triangular fashion emanating at the posterior auricular sulcus adjacent to the posterior aspect of the defect and extending down the lateral neck (Figure 2). The flap was incised and the surrounding tissue was undermined, maintaining a robust pedicle in the center of its body on the superolateral neck. The flap was passed through the posterior aspect of the full-thickness defect and was secured in place with 4-0 polyglactin sutures in a buried interrupted fashion, thereby recreating the anterior portion of the defect. The superficial skin edges were reapproximated using 4-0 and 5-0 polypropylene sutures in a running interrupted fashion. The distal Burow triangle created from closure of the flap’s secondary defect was aggressively thinned and was utilized as a full-thickness graft for the residual postauricular groove defect (Figure 3). At 2 weeks’ follow-up, the patient was healing well with no postoperative issues and the sutures were removed (Figure 4).

Practice Implications
There are many different reconstructive options for conchal bowl defects, including primary repair, wedge excision, composite graft and interpolation flaps with or without cartilage struts, and hinge flaps. Structural support, EAC patency, auricle symmetry, overall auricle size, and re-creation of natural contours were considered when designing the reconstruction of the defect in our patient; however, his main priority was achieving the greatest cosmetic outcome in a single-stage procedure, therefore limiting our reconstruction options.
Wedge excision, in which the residual lobule and inferior helical rim are removed, could have been considered in our patient but would have drastically altered the symmetry of the size of the ears. A folded postauricular flap, as described in the otolaryngology literature, is an interpolation flap based on the posterior auricular artery that was designed for full-thickness defects of the auricle to prevent any posterior pinning.1 This technique may have worked well in our case, but the patient preferred to avoid a multistage procedure. Additionally, the positional symmetry of the ears was maintained despite utilizing a hinge flap, which does not involve takedown of the pedicle. A composite graft from the contralateral ear could be considered for smaller conchal bowl defects but likely would have resulted in graft failure in our patient’s large defect due to its need for rich blood supply to heal and dependence on lateral wound edges. Cartilage struts in conjunction with a flap could have been considered in this scenario for greater structural support, but in our patient’s case, by maintaining the robust pedicle of our flap and having residual superior cartilage, further structural support was not necessary.
A prior case report described a partial and full-thickness defect in a similar location that was repaired with a retroauricular hinge flap, in which a portion of the flap was extensively de-epithelialized to address the varied thicknesses of the surgical defect.2 In our patient, the defect abutted the skin reservoir on the superolateral neck, and therefore no de-epithelialization was required as the entire epithelialized portion was utilized to recreate the anterior aspect of the defect. Postauricular hinge-type flaps are a reliable, single-stage surgical alternative to the 2-stage folded postauricular interpolation flap when reconstructing large conchal bowl defects. For small full-thickness defects of the ear, a composite graft may be considered; however, blood supply and other nutritional requirements limit this option for large full-thickness defects.
- Roche AM, Griffin M, Shelton R, et al. The folded postauricular flap: a novel approach to reconstruction of large full thickness defects of the conchal bowl. Am J Otolaryngol. 2017;38:706-709. doi:10.1016 /j.amjoto.2017.09.006
- Klein JC, Nijhawan RI. Retroauricular hinge flaps for full-thickness conchal bowl defects. J Am Acad Dermatol. 2024;90:E71-E72. doi:10.1016/j.jaad.2022.10.056
- Pickrell BB, Hughes CD, Maricevich RS. Partial ear defects. Semin Plast Surg. 2017 Aug;31:134-140. doi:10.1055/s-0037-1603968.
Practice Gap
Large full-thickness conchal bowl defects often pose a reconstructive challenge. Maintaining the shape and structural integrity of the concha is fundamental for optimal cosmetic and functional outcomes. Prior reports have suggested wedge excisions, composite grafts, interpolation flaps with or without cartilage struts, and hinge flaps as possible options for reconstruction.1-3 However, patients with large defects who prefer single-stage reconstruction procedures present a unique challenge. Herein, we describe a single-stage full-thickness hinge flap technique for a large conchal bowl defect.
The Technique
A 77-year-old man was referred to our dermatology clinic by an outside dermatologist for Mohs micrographic surgery of a biopsy-proven cutaneous squamous cell carcinoma on the right conchal bowl measuring 1.1×2.1 cm and extending to the edge of the external auditory canal (EAC). The excision was performed that same day and was completed in 2 stages, achieving negative margins and resulting in a full-thickness defect measuring 2.0×3.6 cm that included the posterior auricular sulcus, cavum, antitragus, and proximal EAC (Figure 1). The patient requested a single-stage procedure but emphasized that his main priority was an optimal cosmetic outcome.
To repair this large defect, a full-thickness hinge flap with Burow graft was performed. The hinge-type flap was designed in a triangular fashion emanating at the posterior auricular sulcus adjacent to the posterior aspect of the defect and extending down the lateral neck (Figure 2). The flap was incised and the surrounding tissue was undermined, maintaining a robust pedicle in the center of its body on the superolateral neck. The flap was passed through the posterior aspect of the full-thickness defect and was secured in place with 4-0 polyglactin sutures in a buried interrupted fashion, thereby recreating the anterior portion of the defect. The superficial skin edges were reapproximated using 4-0 and 5-0 polypropylene sutures in a running interrupted fashion. The distal Burow triangle created from closure of the flap’s secondary defect was aggressively thinned and was utilized as a full-thickness graft for the residual postauricular groove defect (Figure 3). At 2 weeks’ follow-up, the patient was healing well with no postoperative issues and the sutures were removed (Figure 4).
Practice Implications
There are many different reconstructive options for conchal bowl defects, including primary repair, wedge excision, composite graft and interpolation flaps with or without cartilage struts, and hinge flaps. Structural support, EAC patency, auricle symmetry, overall auricle size, and re-creation of natural contours were considered when designing the reconstruction of the defect in our patient; however, his main priority was achieving the greatest cosmetic outcome in a single-stage procedure, therefore limiting our reconstruction options.
Wedge excision, in which the residual lobule and inferior helical rim are removed, could have been considered in our patient but would have drastically altered the symmetry of the size of the ears. A folded postauricular flap, as described in the otolaryngology literature, is an interpolation flap based on the posterior auricular artery that was designed for full-thickness defects of the auricle to prevent any posterior pinning.1 This technique may have worked well in our case, but the patient preferred to avoid a multistage procedure. Additionally, the positional symmetry of the ears was maintained despite utilizing a hinge flap, which does not involve takedown of the pedicle. A composite graft from the contralateral ear could be considered for smaller conchal bowl defects but likely would have resulted in graft failure in our patient’s large defect due to its need for rich blood supply to heal and dependence on lateral wound edges. Cartilage struts in conjunction with a flap could have been considered in this scenario for greater structural support, but in our patient’s case, by maintaining the robust pedicle of our flap and having residual superior cartilage, further structural support was not necessary.
A prior case report described a partial and full-thickness defect in a similar location that was repaired with a retroauricular hinge flap, in which a portion of the flap was extensively de-epithelialized to address the varied thicknesses of the surgical defect.2 In our patient, the defect abutted the skin reservoir on the superolateral neck, and therefore no de-epithelialization was required as the entire epithelialized portion was utilized to recreate the anterior aspect of the defect. Postauricular hinge-type flaps are a reliable, single-stage surgical alternative to the 2-stage folded postauricular interpolation flap when reconstructing large conchal bowl defects. For small full-thickness defects of the ear, a composite graft may be considered; however, blood supply and other nutritional requirements limit this option for large full-thickness defects.
- Roche AM, Griffin M, Shelton R, et al. The folded postauricular flap: a novel approach to reconstruction of large full thickness defects of the conchal bowl. Am J Otolaryngol. 2017;38:706-709. doi:10.1016 /j.amjoto.2017.09.006
- Klein JC, Nijhawan RI. Retroauricular hinge flaps for full-thickness conchal bowl defects. J Am Acad Dermatol. 2024;90:E71-E72. doi:10.1016/j.jaad.2022.10.056
- Pickrell BB, Hughes CD, Maricevich RS. Partial ear defects. Semin Plast Surg. 2017 Aug;31:134-140. doi:10.1055/s-0037-1603968.
Repair of a Large Full-Thickness Conchal Bowl Defect
Repair of a Large Full-Thickness Conchal Bowl Defect

Using Superficial Curettage to Diagnose Talon Noir
Using Superficial Curettage to Diagnose Talon Noir
Practice Gap
Brown macules on the feet can pose diagnostic challenges, often raising suspicion of acral melanoma. Talon noir, which is benign and self-resolving, is characterized by dark patches on the skin of the feet due to hemorrhage within the stratum corneum and commonly is observed in athletes who sustain repetitive foot trauma. In one study, nearly 50% (9/20) of talon noir cases initially were misdiagnosed as acral melanoma or melanocytic nevi.1 Accurate identification of talon noir is essential to prevent unnecessary interventions or delayed treatment of malignant lesions. Here, we describe a low-risk, cost-effective, and time-efficient diagnostic technique for talon noir using a disposable curette to potentially avoid more invasive procedures.
The Technique
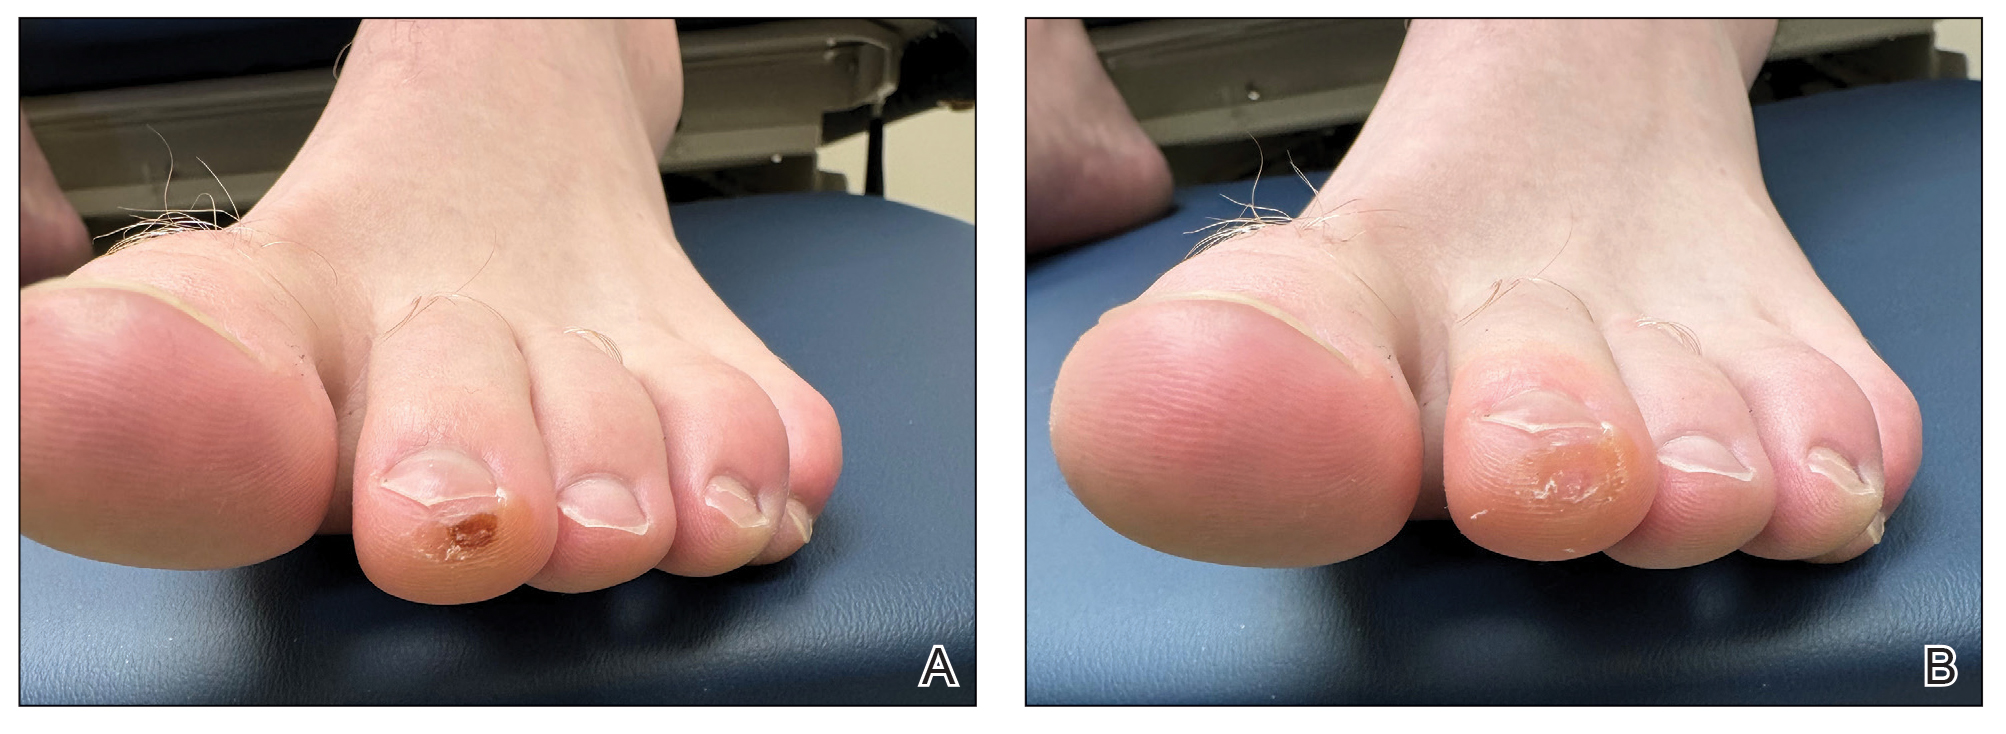
A 34-year-old man presented to the dermatology department with a new brown macule on the second toe. The lesion had been present and stable for more than 4 months, showing no changes in shape or color. The patient reported that he was a frequent runner but did not recall any trauma to the toe, and he denied any associated pain, pruritus, or bleeding. Physical examination revealed a 6-mm dark-brown macule on the hyponychium of the left second toe, with numerous petechiae noted on dermoscopic examination. The findings were consistent with talon noir.
Given the clinical suspicion of talon noir, we used a 5-mm disposable curette to gently pare the superficial epidermis. The superficial curettage effectively removed the lesion, leaving behind a healthy epidermis with no pinpoint bleeding, which confirmed the diagnosis of talon noir (Figure). Pathologic changes from acral melanoma reside deeper than talon noir and consequently cannot be effectively removed by superficial curettage alone. Curettage acts as a curative technique for talon noir, but also as a low-risk, cost-effective, and time-efficient diagnostic technique to rule out insidious diagnoses, including acral melanoma.2 A follow-up examination performed several weeks later showed no pigmentation or recurrence of the lesion in our patient, further supporting the diagnosis of talon noir.
Practice Implications
Talon noir refers to localized accumulation of blood within the epidermis due to repetitive trauma, pressure, and shearing forces on the skin that results in pigmented macules.3-5 Repetitive trauma damages the microvasculature in areas of the skin with minimal subcutaneous adipose tissue.6 Talon noir also is known as subcorneal hematoma, intracorneal hematoma, black heel, hyperkeratosis hemorrhagica, and basketball heel.1,3 First described by Crissey and Peachey3 in 1961 as calcaneal petechiae, the condition was identified in basketball players with well-circumscribed, deep-red lesions on the posterior lateral heels, located between the Achilles tendon insertion and calcaneal fat pad.3 Subsequent reports have documented talon noir in athletes from a range of sports such as tennis and football, whose activities involve rapid directional changes and shearing forces on the feet.6 Similar lesions, termed tache noir, have been observed on the hands of athletes including gymnasts, weightlifters, golfers, and climbers due to repetitive hand trauma.6 Gross examination reveals blood collecting in the thickened stratum corneum.5
The cutaneous manifestations of talon noir can mimic acral melanoma, highlighting the need for dermatologists to understand its clinical, dermoscopic, and microscopic features. Poor patient recall can complicate diagnosis; for instance, in one study only 20% (4/20) of patients remembered the inciting trauma that caused the subcorneal hematomas.1 Balancing vigilance for melanoma with recognition of more benign conditions such as talon noir—particularly in younger active populations—is essential to minimize patient anxiety and avoid invasive procedures.
Further investigation is warranted in lesions that persist without obvious cause or in those that demonstrate concerning features such as extensive growth. One case of talon noir in a patient with diabetes required an excisional biopsy due to its atypical progression over 1 year with considerable hyperpigmentation and friability.7 Additional investigation such as dermoscopy may be required with paring of the skin to establish a diagnosis.1 Using a curette to pare the thickened stratum corneum, which has no nerve endings, does not require anesthetics.8 In talon noir, paring completely removes the lesion, leaving behind unaffected skin, while melanomas would retain their pigmentation due to melanin in the basal layer.2
Talon noir is a benign condition frequently misdiagnosed due to its resemblance to more serious pathologies such as melanoma. Awareness of its clinical and dermoscopic features can promote cost-effective care while reducing unnecessary procedures. Diagnostic paring of the skin with a curette offers a simple and reliable means of distinguishing talon noir from acral melanoma and other potential conditions.
- Elmas OF, Akdeniz N. Subcorneal hematoma as an imitator of acral melanoma: dermoscopic diagnosis. North Clin Istanb. 2019;7:56-59. doi:10.14744/nci.2019.65481
- Googe AB, Schulmeier JS, Jackson AR, et al. Talon noir: paring can eliminate the need for a biopsy. Postgrad Med J. 2014;90:730-731. doi:10.1136/postgradmedj-2014-132996
- Crissey JT, Peachey JC. Calcaneal petechiae. Arch Dermatol. 1961;83:501. doi:10.1001/archderm.1961.01580090151017
- Martin SB, Lucas JK, Posa M, et al. Talon noir in a young baseball player: a case report. J Pediatr Health Care. 2021;35:235-238. doi:10.1016 /j.pedhc.2020.10.009
- Bolognia JL, Schaffer JV, Duncan KO, et al. Dermatology Essentials. 2nd ed. Elsevier; 2022.
- Emer J, Sivek R, Marciniak B. Sports dermatology: part 1 of 2 traumatic or mechanical injuries, inflammatory conditions, and exacerbations of pre-existing conditions. J Clin Aesthetic Dermatol. 2015; 8:31-43.
- Choudhury S, Mandal A. Talon noir: a case report and literature review. Cureus. 2023;15:E35905. doi:10.7759/cureus.35905
- Oberdorfer KL, Farshchian M, Moossavi M. Paring of skin for superficially lodged foreign body removal. Cureus. 2023;15:E42396. doi:10.7759/cureus.42396
Practice Gap
Brown macules on the feet can pose diagnostic challenges, often raising suspicion of acral melanoma. Talon noir, which is benign and self-resolving, is characterized by dark patches on the skin of the feet due to hemorrhage within the stratum corneum and commonly is observed in athletes who sustain repetitive foot trauma. In one study, nearly 50% (9/20) of talon noir cases initially were misdiagnosed as acral melanoma or melanocytic nevi.1 Accurate identification of talon noir is essential to prevent unnecessary interventions or delayed treatment of malignant lesions. Here, we describe a low-risk, cost-effective, and time-efficient diagnostic technique for talon noir using a disposable curette to potentially avoid more invasive procedures.
The Technique
A 34-year-old man presented to the dermatology department with a new brown macule on the second toe. The lesion had been present and stable for more than 4 months, showing no changes in shape or color. The patient reported that he was a frequent runner but did not recall any trauma to the toe, and he denied any associated pain, pruritus, or bleeding. Physical examination revealed a 6-mm dark-brown macule on the hyponychium of the left second toe, with numerous petechiae noted on dermoscopic examination. The findings were consistent with talon noir.
Given the clinical suspicion of talon noir, we used a 5-mm disposable curette to gently pare the superficial epidermis. The superficial curettage effectively removed the lesion, leaving behind a healthy epidermis with no pinpoint bleeding, which confirmed the diagnosis of talon noir (Figure). Pathologic changes from acral melanoma reside deeper than talon noir and consequently cannot be effectively removed by superficial curettage alone. Curettage acts as a curative technique for talon noir, but also as a low-risk, cost-effective, and time-efficient diagnostic technique to rule out insidious diagnoses, including acral melanoma.2 A follow-up examination performed several weeks later showed no pigmentation or recurrence of the lesion in our patient, further supporting the diagnosis of talon noir.
Practice Implications
Talon noir refers to localized accumulation of blood within the epidermis due to repetitive trauma, pressure, and shearing forces on the skin that results in pigmented macules.3-5 Repetitive trauma damages the microvasculature in areas of the skin with minimal subcutaneous adipose tissue.6 Talon noir also is known as subcorneal hematoma, intracorneal hematoma, black heel, hyperkeratosis hemorrhagica, and basketball heel.1,3 First described by Crissey and Peachey3 in 1961 as calcaneal petechiae, the condition was identified in basketball players with well-circumscribed, deep-red lesions on the posterior lateral heels, located between the Achilles tendon insertion and calcaneal fat pad.3 Subsequent reports have documented talon noir in athletes from a range of sports such as tennis and football, whose activities involve rapid directional changes and shearing forces on the feet.6 Similar lesions, termed tache noir, have been observed on the hands of athletes including gymnasts, weightlifters, golfers, and climbers due to repetitive hand trauma.6 Gross examination reveals blood collecting in the thickened stratum corneum.5
The cutaneous manifestations of talon noir can mimic acral melanoma, highlighting the need for dermatologists to understand its clinical, dermoscopic, and microscopic features. Poor patient recall can complicate diagnosis; for instance, in one study only 20% (4/20) of patients remembered the inciting trauma that caused the subcorneal hematomas.1 Balancing vigilance for melanoma with recognition of more benign conditions such as talon noir—particularly in younger active populations—is essential to minimize patient anxiety and avoid invasive procedures.
Further investigation is warranted in lesions that persist without obvious cause or in those that demonstrate concerning features such as extensive growth. One case of talon noir in a patient with diabetes required an excisional biopsy due to its atypical progression over 1 year with considerable hyperpigmentation and friability.7 Additional investigation such as dermoscopy may be required with paring of the skin to establish a diagnosis.1 Using a curette to pare the thickened stratum corneum, which has no nerve endings, does not require anesthetics.8 In talon noir, paring completely removes the lesion, leaving behind unaffected skin, while melanomas would retain their pigmentation due to melanin in the basal layer.2
Talon noir is a benign condition frequently misdiagnosed due to its resemblance to more serious pathologies such as melanoma. Awareness of its clinical and dermoscopic features can promote cost-effective care while reducing unnecessary procedures. Diagnostic paring of the skin with a curette offers a simple and reliable means of distinguishing talon noir from acral melanoma and other potential conditions.
- Elmas OF, Akdeniz N. Subcorneal hematoma as an imitator of acral melanoma: dermoscopic diagnosis. North Clin Istanb. 2019;7:56-59. doi:10.14744/nci.2019.65481
- Googe AB, Schulmeier JS, Jackson AR, et al. Talon noir: paring can eliminate the need for a biopsy. Postgrad Med J. 2014;90:730-731. doi:10.1136/postgradmedj-2014-132996
- Crissey JT, Peachey JC. Calcaneal petechiae. Arch Dermatol. 1961;83:501. doi:10.1001/archderm.1961.01580090151017
- Martin SB, Lucas JK, Posa M, et al. Talon noir in a young baseball player: a case report. J Pediatr Health Care. 2021;35:235-238. doi:10.1016 /j.pedhc.2020.10.009
- Bolognia JL, Schaffer JV, Duncan KO, et al. Dermatology Essentials. 2nd ed. Elsevier; 2022.
- Emer J, Sivek R, Marciniak B. Sports dermatology: part 1 of 2 traumatic or mechanical injuries, inflammatory conditions, and exacerbations of pre-existing conditions. J Clin Aesthetic Dermatol. 2015; 8:31-43.
- Choudhury S, Mandal A. Talon noir: a case report and literature review. Cureus. 2023;15:E35905. doi:10.7759/cureus.35905
- Oberdorfer KL, Farshchian M, Moossavi M. Paring of skin for superficially lodged foreign body removal. Cureus. 2023;15:E42396. doi:10.7759/cureus.42396
Using Superficial Curettage to Diagnose Talon Noir
Using Superficial Curettage to Diagnose Talon Noir

Ergonomics in Dermatologic Procedures: Mobility Exercises to Incorporate In and Out of the Office
Ergonomics in Dermatologic Procedures: Mobility Exercises to Incorporate In and Out of the Office
Practice Gap
Dermatology encompasses a wide range of procedures performed in both clinical and surgical settings. One comprehensive review of ergonomics in dermatologic surgery found a high prevalence of musculoskeletal injuries (MSIs).1 A survey conducted in 2010 revealed that 90% of dermatologic surgeons experienced MSIs, which commonly resulted in neck, shoulder, and/or back pain.2
Prolonged abnormal static postures and repetitive motions, which are common in dermatologic practice, can lead to muscle imbalances and focal muscular ischemia, increasing physicians’ susceptibility to MSIs. When muscle fibers experience enough repeated focal ischemia, they may enter a constant state of contraction leading to myofascial pain syndrome (MPS); these painful areas are known as trigger points and often are refractory to traditional stretching.3
Musculoskeletal injuries can potentially impact dermatologists’ career longevity and satisfaction. To date, the literature on techniques and exercises that may prevent or alleviate MSIs is limited.1,4 We collaborated with a colleague in physical therapy (R.P.) to present stretching, mobility, and strengthening techniques and exercises dermatologists can perform both in and outside the procedure room to potentially reduce pain and prevent future MSIs.
The Techniques
Stretching and Mobility Exercises—When dermatologists adopt abnormal static postures, they are at risk for muscular imbalances caused by repetitive flexion and/or rotation in one direction. Over time, these repetitive movements can result in loss of flexibility in the direction opposite to that in which they are consistently positioned.3 Regular stretching offers physiologic benefits such as maintaining joint range of motion, increasing blood flow to muscles, and increasing synovial fluid production—all of which contribute to reduced risk for MSIs.3 Multiple studies and a systematic review have found that regular stretching throughout the day serves as an effective method for preventing and mitigating MSI pain in health care providers.1,3-5
Considering the directional manner of MSIs induced by prolonged static positions, the most benefit will be derived from stretches or extension in the opposite direction of that in which the practitioner usually works. For most dermatologic surgeons, stretches should target the trapezius muscles, shoulders, and cervical musculature. Techniques such as the neck and shoulder combination stretch, the upper trapezius stretch, and the downward shoulder blade squeeze stretch can be performed regularly throughout the day.3,4 To perform the neck and shoulder combination stretch, place the arm in flexion to shoulder height and bend the elbow at a 90° angle. Gently pull the arm across the front of the body, point the head gazing in the direction of the shoulder being stretched, and hold for 10 to 20 seconds. Repeat with the other side (eFigure 1).

Some surgeons may experience pain that is refractory to stretching, potentially indicating the presence of MPS.3 Managing MPS via stretching alone may be a challenge. Physical therapists utilize various techniques to manually massage the tissue, but self-myofascial release—which involves the use of a tool such as a dense foam roller or massage ball, both of which can easily be purchased—may be convenient and effective for busy providers. To perform this technique, the operator lies with their back on a dense foam roller positioned perpendicular to the body and uses their legs to undulate or roll back and forth in a smooth motion (Figure 1). This may help to alleviate myofascial pain in the spinal intrinsic muscles, which often are prone to injury due to posture; it also warms the fascia and breaks up adhesions. Self-myofascial release may have similar acute analgesic effects to classic stretching while also helping to alleviate MPS.
Strengthening Exercises—Musculoskeletal injuries often begin with fatigue in postural stabilizing muscles of the trunk and shoulders, leading the dermatologist to assume a slouched posture. Dermatologists should perform strengthening exercises targeting the trunk and shoulder girdle, which help to promote good working posture while optimizing the function of the arms and hands. Ideally, dermatologists should incorporate strengthening exercises 3 to 4 times per week in combination with daily stretching.
The 4-point kneeling alternate arm and leg extensions technique targets many muscle groups that commonly are affected in dermatologists and dermatologic surgeons. While on all fours, the operator positions the hands under the shoulders and the knees under the hips. The neck remains in line with the back with the eyes facing the floor. The abdominal muscles are then pulled up and in while simultaneously extending the left arm and right leg until both are parallel to the floor. This position should be held for 5 seconds and then repeated with the opposite contralateral extremities (Figure 2). Exercises specific to each muscle group also can be performed, such as planks to enhance truncal stability or scapular wall clocks to strengthen the shoulder girdle (eFigure 2). To perform scapular wall clocks, wrap a single resistance band around both wrists. Next, press the hands and elbows gently into a wall pointing superiorly and imagine there is a clock on the wall with 12 o’clock at the top and 6 o’clock at the bottom. Press the wrists outward on the band, keep the elbows straight, and reach out with the right hand while keeping the left hand stable. Move the right hand to the 1-, 3-, and 5-o’clock positions. Repeat with the left hand while holding the right hand stable. Move the left hand to the 11-, 9-, 7-, and 6-o’clock positions. Repeat these steps for 3 to 5 sets.
It is important to note that a decreased flow of oxygen and nutrients to muscles contributes to MSIs. Aerobic exercises increase blood flow and improve the ability of the muscles to utilize oxygen. Engaging in an enjoyable aerobic activity (eg, walking, running, swimming, cycling) 3 to 4 times per week can help prevent MSIs; however, as with any new exercise regimen (including the strengthening techniques described here), it is important to consult your primary care physician before getting started.
Practice Implications
As dermatologists progress in their careers, implementation of these techniques can mitigate MSIs and their sequelae. The long-term benefits of stretching, mobility, and strengthening exercises are dependent on having ergonomically suitable environmental factors. In addition to their own mechanics and posture, dermatologists must consider all elements that may affect the ergonomics of their daily practice, including operating room layout, instrumentation and workflow, and patient positioning. Through a consistent approach to prevention using the techniques described here, dermatologists can minimize the risk for MSIs and foster sustainability in their careers.
- Chan J, Kim DJ, Kassira-Carley S, et al. Ergonomics in dermatologic surgery: lessons learned across related specialties and opportunities for improvement. Dermatol Surg. 2020;46:763-772. doi:10.1097 /DSS.0000000000002295
- Liang CA, Levine VJ, Dusza SW, et al. Musculoskeletal disorders and ergonomics in dermatologic surgery: a survey of Mohs surgeons in 2010. Dermatol Surg. 2012;38:240-248. doi:10.1111/j.1524-4725.2011.02237.x
- Valachi B, Valachi K. Preventing musculoskeletal disorders in clinical dentistry: strategies to address the mechanisms leading to musculoskeletal disorders. J Am Dent Assoc. 2003;134:1604-1612. doi:10.14219/jada.archive.2003.0106
- Carley SK, Strauss JD, Vidal NY. Ergonomic solutions for dermatologists. Int J Womens Dermatol. 2021;7(5 part B):863-866. doi:10.1016/j.ijwd.2021.08.006
- da Costa BR, Vieira ER. Stretching to reduce work-related musculoskeletal disorders: a systematic review. J Rehabil Med. 2008;40:321-328. doi:10.2340/16501977-0204
Practice Gap
Dermatology encompasses a wide range of procedures performed in both clinical and surgical settings. One comprehensive review of ergonomics in dermatologic surgery found a high prevalence of musculoskeletal injuries (MSIs).1 A survey conducted in 2010 revealed that 90% of dermatologic surgeons experienced MSIs, which commonly resulted in neck, shoulder, and/or back pain.2
Prolonged abnormal static postures and repetitive motions, which are common in dermatologic practice, can lead to muscle imbalances and focal muscular ischemia, increasing physicians’ susceptibility to MSIs. When muscle fibers experience enough repeated focal ischemia, they may enter a constant state of contraction leading to myofascial pain syndrome (MPS); these painful areas are known as trigger points and often are refractory to traditional stretching.3
Musculoskeletal injuries can potentially impact dermatologists’ career longevity and satisfaction. To date, the literature on techniques and exercises that may prevent or alleviate MSIs is limited.1,4 We collaborated with a colleague in physical therapy (R.P.) to present stretching, mobility, and strengthening techniques and exercises dermatologists can perform both in and outside the procedure room to potentially reduce pain and prevent future MSIs.
The Techniques
Stretching and Mobility Exercises—When dermatologists adopt abnormal static postures, they are at risk for muscular imbalances caused by repetitive flexion and/or rotation in one direction. Over time, these repetitive movements can result in loss of flexibility in the direction opposite to that in which they are consistently positioned.3 Regular stretching offers physiologic benefits such as maintaining joint range of motion, increasing blood flow to muscles, and increasing synovial fluid production—all of which contribute to reduced risk for MSIs.3 Multiple studies and a systematic review have found that regular stretching throughout the day serves as an effective method for preventing and mitigating MSI pain in health care providers.1,3-5
Considering the directional manner of MSIs induced by prolonged static positions, the most benefit will be derived from stretches or extension in the opposite direction of that in which the practitioner usually works. For most dermatologic surgeons, stretches should target the trapezius muscles, shoulders, and cervical musculature. Techniques such as the neck and shoulder combination stretch, the upper trapezius stretch, and the downward shoulder blade squeeze stretch can be performed regularly throughout the day.3,4 To perform the neck and shoulder combination stretch, place the arm in flexion to shoulder height and bend the elbow at a 90° angle. Gently pull the arm across the front of the body, point the head gazing in the direction of the shoulder being stretched, and hold for 10 to 20 seconds. Repeat with the other side (eFigure 1).
Some surgeons may experience pain that is refractory to stretching, potentially indicating the presence of MPS.3 Managing MPS via stretching alone may be a challenge. Physical therapists utilize various techniques to manually massage the tissue, but self-myofascial release—which involves the use of a tool such as a dense foam roller or massage ball, both of which can easily be purchased—may be convenient and effective for busy providers. To perform this technique, the operator lies with their back on a dense foam roller positioned perpendicular to the body and uses their legs to undulate or roll back and forth in a smooth motion (Figure 1). This may help to alleviate myofascial pain in the spinal intrinsic muscles, which often are prone to injury due to posture; it also warms the fascia and breaks up adhesions. Self-myofascial release may have similar acute analgesic effects to classic stretching while also helping to alleviate MPS.
Strengthening Exercises—Musculoskeletal injuries often begin with fatigue in postural stabilizing muscles of the trunk and shoulders, leading the dermatologist to assume a slouched posture. Dermatologists should perform strengthening exercises targeting the trunk and shoulder girdle, which help to promote good working posture while optimizing the function of the arms and hands. Ideally, dermatologists should incorporate strengthening exercises 3 to 4 times per week in combination with daily stretching.
The 4-point kneeling alternate arm and leg extensions technique targets many muscle groups that commonly are affected in dermatologists and dermatologic surgeons. While on all fours, the operator positions the hands under the shoulders and the knees under the hips. The neck remains in line with the back with the eyes facing the floor. The abdominal muscles are then pulled up and in while simultaneously extending the left arm and right leg until both are parallel to the floor. This position should be held for 5 seconds and then repeated with the opposite contralateral extremities (Figure 2). Exercises specific to each muscle group also can be performed, such as planks to enhance truncal stability or scapular wall clocks to strengthen the shoulder girdle (eFigure 2). To perform scapular wall clocks, wrap a single resistance band around both wrists. Next, press the hands and elbows gently into a wall pointing superiorly and imagine there is a clock on the wall with 12 o’clock at the top and 6 o’clock at the bottom. Press the wrists outward on the band, keep the elbows straight, and reach out with the right hand while keeping the left hand stable. Move the right hand to the 1-, 3-, and 5-o’clock positions. Repeat with the left hand while holding the right hand stable. Move the left hand to the 11-, 9-, 7-, and 6-o’clock positions. Repeat these steps for 3 to 5 sets.
It is important to note that a decreased flow of oxygen and nutrients to muscles contributes to MSIs. Aerobic exercises increase blood flow and improve the ability of the muscles to utilize oxygen. Engaging in an enjoyable aerobic activity (eg, walking, running, swimming, cycling) 3 to 4 times per week can help prevent MSIs; however, as with any new exercise regimen (including the strengthening techniques described here), it is important to consult your primary care physician before getting started.
Practice Implications
As dermatologists progress in their careers, implementation of these techniques can mitigate MSIs and their sequelae. The long-term benefits of stretching, mobility, and strengthening exercises are dependent on having ergonomically suitable environmental factors. In addition to their own mechanics and posture, dermatologists must consider all elements that may affect the ergonomics of their daily practice, including operating room layout, instrumentation and workflow, and patient positioning. Through a consistent approach to prevention using the techniques described here, dermatologists can minimize the risk for MSIs and foster sustainability in their careers.
- Chan J, Kim DJ, Kassira-Carley S, et al. Ergonomics in dermatologic surgery: lessons learned across related specialties and opportunities for improvement. Dermatol Surg. 2020;46:763-772. doi:10.1097 /DSS.0000000000002295
- Liang CA, Levine VJ, Dusza SW, et al. Musculoskeletal disorders and ergonomics in dermatologic surgery: a survey of Mohs surgeons in 2010. Dermatol Surg. 2012;38:240-248. doi:10.1111/j.1524-4725.2011.02237.x
- Valachi B, Valachi K. Preventing musculoskeletal disorders in clinical dentistry: strategies to address the mechanisms leading to musculoskeletal disorders. J Am Dent Assoc. 2003;134:1604-1612. doi:10.14219/jada.archive.2003.0106
- Carley SK, Strauss JD, Vidal NY. Ergonomic solutions for dermatologists. Int J Womens Dermatol. 2021;7(5 part B):863-866. doi:10.1016/j.ijwd.2021.08.006
- da Costa BR, Vieira ER. Stretching to reduce work-related musculoskeletal disorders: a systematic review. J Rehabil Med. 2008;40:321-328. doi:10.2340/16501977-0204
Ergonomics in Dermatologic Procedures: Mobility Exercises to Incorporate In and Out of the Office
Ergonomics in Dermatologic Procedures: Mobility Exercises to Incorporate In and Out of the Office

Best Practices for Capturing Clinical and Dermoscopic Images With Smartphone Photography
Best Practices for Capturing Clinical and Dermoscopic Images With Smartphone Photography
PRACTICE GAP
Photography is an essential tool in modern dermatologic practice, aiding in the evaluation, documentation, and monitoring of nevi, skin cancers, and other cutaneous pathologies.1 With the rapid technologic advancement of smartphone cameras, high-quality clinical and dermoscopic images have become increasingly easy to attain; however, best practices for optimizing smartphone photography are limited in the medical literature. We have collated a series of recommendations to help fill this knowledge gap.
A search of PubMed articles indexed for MEDLINE was conducted using the terms clinical imaging AND smartphone, clinical photography AND smartphone, dermatology AND photography, dermatology AND imaging, dermoscopy AND photography, and dermoscopy AND imaging. We also consulted with Elizabeth Seiverling, MD (Annville, Pennsylvania) and Jennifer Stein, MD (New York, New York)—both renowned experts in the fields of dermatology, dermoscopy, and medical photography—via email and video meetings conducted during the period from June 1, 2022, through August 20, 2022. Our goal in creating this guide is to facilitate standardized yet simple ways to integrate smartphone photography into current dermatologic practice.
THE TECHNIQUE
Clinical Photography
Clinical images should be captured in a space with ample indirect natural light, such as a patient examination room with frosted or draped windows, ensuring patient privacy is maintained.1,2 The smartphone’s flash can be used if natural lighting is insufficient, but caution should be exercised when photographing patients with darker skin types, as the flash may create an undesired glare. To combat this, consider using a small clip-on light-emitting diode ring light positioned at a 45° angle for more uniform lighting and reduced glare (eFigures 1 and 2).2 This additional light source helps to distribute light evenly across the patient’s skin, enhancing detail visibility, minimizing harsh shadows, and ensuring a more accurate representation of skin pigmentation.2
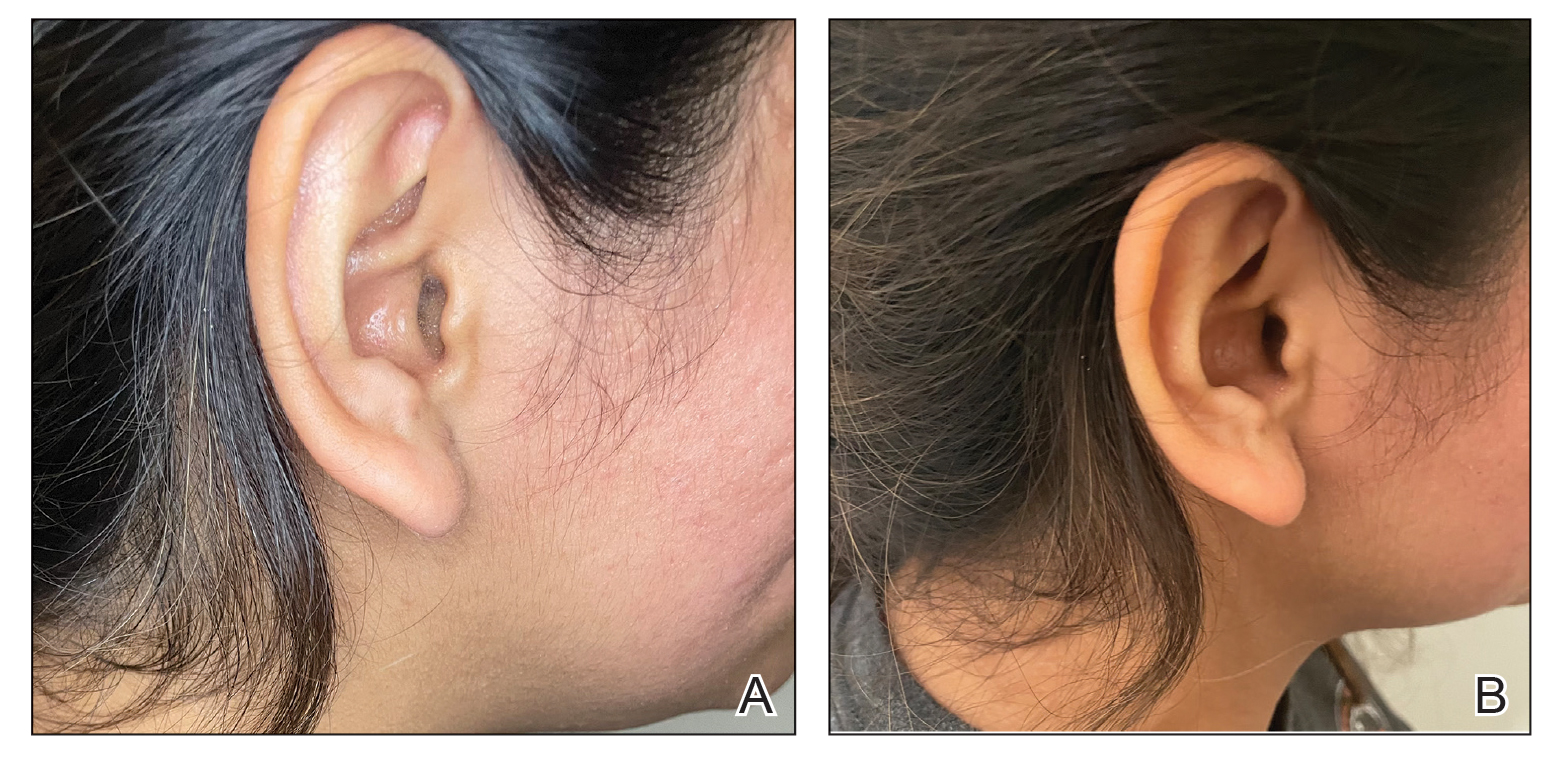
When a magnified image is required (eg, to capture suspicious lesions with unique and detailed findings such as irregular borders or atypical pigmentation), use the smartphone’s digital zoom function rather than physically moving the camera lens closer to the subject. Moving the camera too close can cause proximity distortion, artificially enlarging objects close to the lens and degrading the quality of the image.1,2 Unnecessary camera features such as portrait mode, live focus, and filters should be turned off to maintain image accuracy. It also is important to avoid excessive manual adjustments to exposure and brightness settings.1,2 The tap-to-focus feature that is integrated into many smartphone cameras can be utilized to ensure the capture of sharp, focused images. After verifying the image preview on the smartphone display, take the photograph. Immediately review the captured image to ensure it is clear and well lit and accurately depicts the area of interest, including its color, texture, and any relevant details, without glare or distortion. If the image does not meet these criteria, promptly reattempt to achieve the desired quality.
Dermoscopic Photography
Dermoscopy, which enables magnified examination of skin lesions, is increasingly being utilized in dermatology. While traditional dermoscopic photography requires specialized equipment, such as large single-lens reflex cameras with dedicated dermoscopic lens attachments, smartphone cameras now can be used to obtain dermoscopic images of reasonable quality.3,4 Adhering to specific practices can help to optimize the quality of dermoscopic images obtained via this technique.
Before capturing an image, it is essential to prepare both the lesion and the surrounding skin. Ensure the area is cleaned thoroughly and trim any hairs that may obscure the image. Apply an interface fluid such as rubbing alcohol or ultrasonography gel to improve image clarity by reducing surface tension and reflections, minimizing glare, and ensuring even light transmission throughout the lesion.5 As recommended for clinical photography, images should be captured in a space with ample indirect light. For best results, we recommend utilizing the primary photo capture option instead of portrait or panoramic mode or additional settings. It is crucial to disable features such as live focus, filters, night mode, and flash, as they may alter image accuracy; however, use of the tap-to-focus feature or manual settings adjustment is encouraged to ensure a high-resolution photograph.
Once these smartphone settings have been verified, position the dermatoscope directly over the lesion of interest. Next, place the smartphone camera lens directly against the eyepiece of the dermatoscope (Figure). Center the lesion in the field of view on the screen. Most smartphones enable adjustment to the image magnification on the photo capture screen. A single tap on the screen should populate the zoom options (eg, ×0.5, ×1, ×3) and allow for adjustment. For the majority of dermoscopic photographs, we recommend standard ×1 magnification, as it typically provides a clear and accurate representation of the lesion without introducing the possibility of image distortion. To obtain a close-up image, use the smartphone’s digital zoom function prior to taking the photograph rather than zooming in on the image after it has been captured; however, to minimize proximity distortion and maintain optimal image quality, avoid exceeding the halfway point on the camera’s zoom dial. After verifying the image preview on the smartphone display, capture the photograph. Immediate review is recommended to allow for prompt reattempt at capturing the image if needed.

PRACTICE IMPLICATIONS
The inherent convenience and accessibility offered by smartphone photography further solidifies its status as a valuable tool in modern dermatologic practice. By adhering to the best practices outlined in this guide, dermatologists can utilize smartphones to capture high-quality clinical and dermoscopic images that support accurate diagnosis and enhance patient care. This approach helps streamline workflows, enhance consistency in image quality, and standardize image capture across different settings and providers.
Additionally, smartphone photography can enhance both education and telemedicine by enabling physicians to easily share high-quality images with colleagues for virtual consultations, second opinions, and collaborative diagnoses. This sharing of images fosters learning opportunities, supports knowledge exchange, and allows for real-time feedback—all of which can improve clinical decision-making. Moreover, it broadens access to dermatologic expertise, strengthens communication between health care providers, and facilitates timely decision-making. As a result, patients benefit from more efficient, accurate, and collaborative care.
- Muraco L. Improved medical photography: key tips for creating images of lasting value. JAMA Dermatol. 2020;156:121-123. doi:10.1001 /jamadermatol.2019.3849
- Alvarado SM, Flessland P, Grant-Kels JM, et al. Practical strategies for improving clinical photography of dark skin. J Am Acad Dermatol. 2022;86:E21-E23. doi:10.1016/j.jaad.2021.09.001
- Pagliarello C, Feliciani C, Fantini C, et al. Use of the dermoscope as a smartphone close-up lens and LED annular macro ring flash. J Am Acad Dermatol. 2016;75:E27–E28. doi:10.1016/j.jaad .2015.12.04
- Zuo KJ, Guo D, Rao J. Mobile teledermatology: a promising future in clinical practice. J Cutan Med Surg. 2013;17:387-391. doi:10.2310/7750.2013.13030
- Gewirtzman AJ, Saurat J-H, Braun RP. An evaluation of dermscopy fluids and application techniques. Br J Dermatol. 2003;149:59-63. doi:10.1046/j.1365-2133.2003.05366.x
PRACTICE GAP
Photography is an essential tool in modern dermatologic practice, aiding in the evaluation, documentation, and monitoring of nevi, skin cancers, and other cutaneous pathologies.1 With the rapid technologic advancement of smartphone cameras, high-quality clinical and dermoscopic images have become increasingly easy to attain; however, best practices for optimizing smartphone photography are limited in the medical literature. We have collated a series of recommendations to help fill this knowledge gap.
A search of PubMed articles indexed for MEDLINE was conducted using the terms clinical imaging AND smartphone, clinical photography AND smartphone, dermatology AND photography, dermatology AND imaging, dermoscopy AND photography, and dermoscopy AND imaging. We also consulted with Elizabeth Seiverling, MD (Annville, Pennsylvania) and Jennifer Stein, MD (New York, New York)—both renowned experts in the fields of dermatology, dermoscopy, and medical photography—via email and video meetings conducted during the period from June 1, 2022, through August 20, 2022. Our goal in creating this guide is to facilitate standardized yet simple ways to integrate smartphone photography into current dermatologic practice.
THE TECHNIQUE
Clinical Photography
Clinical images should be captured in a space with ample indirect natural light, such as a patient examination room with frosted or draped windows, ensuring patient privacy is maintained.1,2 The smartphone’s flash can be used if natural lighting is insufficient, but caution should be exercised when photographing patients with darker skin types, as the flash may create an undesired glare. To combat this, consider using a small clip-on light-emitting diode ring light positioned at a 45° angle for more uniform lighting and reduced glare (eFigures 1 and 2).2 This additional light source helps to distribute light evenly across the patient’s skin, enhancing detail visibility, minimizing harsh shadows, and ensuring a more accurate representation of skin pigmentation.2
When a magnified image is required (eg, to capture suspicious lesions with unique and detailed findings such as irregular borders or atypical pigmentation), use the smartphone’s digital zoom function rather than physically moving the camera lens closer to the subject. Moving the camera too close can cause proximity distortion, artificially enlarging objects close to the lens and degrading the quality of the image.1,2 Unnecessary camera features such as portrait mode, live focus, and filters should be turned off to maintain image accuracy. It also is important to avoid excessive manual adjustments to exposure and brightness settings.1,2 The tap-to-focus feature that is integrated into many smartphone cameras can be utilized to ensure the capture of sharp, focused images. After verifying the image preview on the smartphone display, take the photograph. Immediately review the captured image to ensure it is clear and well lit and accurately depicts the area of interest, including its color, texture, and any relevant details, without glare or distortion. If the image does not meet these criteria, promptly reattempt to achieve the desired quality.
Dermoscopic Photography
Dermoscopy, which enables magnified examination of skin lesions, is increasingly being utilized in dermatology. While traditional dermoscopic photography requires specialized equipment, such as large single-lens reflex cameras with dedicated dermoscopic lens attachments, smartphone cameras now can be used to obtain dermoscopic images of reasonable quality.3,4 Adhering to specific practices can help to optimize the quality of dermoscopic images obtained via this technique.
Before capturing an image, it is essential to prepare both the lesion and the surrounding skin. Ensure the area is cleaned thoroughly and trim any hairs that may obscure the image. Apply an interface fluid such as rubbing alcohol or ultrasonography gel to improve image clarity by reducing surface tension and reflections, minimizing glare, and ensuring even light transmission throughout the lesion.5 As recommended for clinical photography, images should be captured in a space with ample indirect light. For best results, we recommend utilizing the primary photo capture option instead of portrait or panoramic mode or additional settings. It is crucial to disable features such as live focus, filters, night mode, and flash, as they may alter image accuracy; however, use of the tap-to-focus feature or manual settings adjustment is encouraged to ensure a high-resolution photograph.
Once these smartphone settings have been verified, position the dermatoscope directly over the lesion of interest. Next, place the smartphone camera lens directly against the eyepiece of the dermatoscope (Figure). Center the lesion in the field of view on the screen. Most smartphones enable adjustment to the image magnification on the photo capture screen. A single tap on the screen should populate the zoom options (eg, ×0.5, ×1, ×3) and allow for adjustment. For the majority of dermoscopic photographs, we recommend standard ×1 magnification, as it typically provides a clear and accurate representation of the lesion without introducing the possibility of image distortion. To obtain a close-up image, use the smartphone’s digital zoom function prior to taking the photograph rather than zooming in on the image after it has been captured; however, to minimize proximity distortion and maintain optimal image quality, avoid exceeding the halfway point on the camera’s zoom dial. After verifying the image preview on the smartphone display, capture the photograph. Immediate review is recommended to allow for prompt reattempt at capturing the image if needed.
PRACTICE IMPLICATIONS
The inherent convenience and accessibility offered by smartphone photography further solidifies its status as a valuable tool in modern dermatologic practice. By adhering to the best practices outlined in this guide, dermatologists can utilize smartphones to capture high-quality clinical and dermoscopic images that support accurate diagnosis and enhance patient care. This approach helps streamline workflows, enhance consistency in image quality, and standardize image capture across different settings and providers.
Additionally, smartphone photography can enhance both education and telemedicine by enabling physicians to easily share high-quality images with colleagues for virtual consultations, second opinions, and collaborative diagnoses. This sharing of images fosters learning opportunities, supports knowledge exchange, and allows for real-time feedback—all of which can improve clinical decision-making. Moreover, it broadens access to dermatologic expertise, strengthens communication between health care providers, and facilitates timely decision-making. As a result, patients benefit from more efficient, accurate, and collaborative care.
- Muraco L. Improved medical photography: key tips for creating images of lasting value. JAMA Dermatol. 2020;156:121-123. doi:10.1001 /jamadermatol.2019.3849
- Alvarado SM, Flessland P, Grant-Kels JM, et al. Practical strategies for improving clinical photography of dark skin. J Am Acad Dermatol. 2022;86:E21-E23. doi:10.1016/j.jaad.2021.09.001
- Pagliarello C, Feliciani C, Fantini C, et al. Use of the dermoscope as a smartphone close-up lens and LED annular macro ring flash. J Am Acad Dermatol. 2016;75:E27–E28. doi:10.1016/j.jaad .2015.12.04
- Zuo KJ, Guo D, Rao J. Mobile teledermatology: a promising future in clinical practice. J Cutan Med Surg. 2013;17:387-391. doi:10.2310/7750.2013.13030
- Gewirtzman AJ, Saurat J-H, Braun RP. An evaluation of dermscopy fluids and application techniques. Br J Dermatol. 2003;149:59-63. doi:10.1046/j.1365-2133.2003.05366.x
Best Practices for Capturing Clinical and Dermoscopic Images With Smartphone Photography
Best Practices for Capturing Clinical and Dermoscopic Images With Smartphone Photography

Conservative Approach to Treatment of Cyclosporine-Induced Gingival Hyperplasia With Azithromycin and Chlorhexidine
Conservative Approach to Treatment of Cyclosporine-Induced Gingival Hyperplasia With Azithromycin and Chlorhexidine
Cyclosporine is a calcineurin inhibitor and immunosuppressive medication with several indications, including prevention of parenchymal organ and bone marrow transplant rejection as well as treatment of numerous dermatologic conditions (eg, psoriasis, atopic dermatitis). Although it is an effective medication, there are many known adverse effects including nephrotoxicity, hypertension, and gingival hyperplasia.1 Addressing symptomatic cyclosporine-induced gingival hyperplasia can be challenging, especially if continued use of cyclosporine is necessary for adequate control of the underlying disease. We present a simplified approach for conservative management of cyclosporine-induced gingival hyperplasia that allows for continued use of cyclosporine.
Practice Gap
Cyclosporine-induced gingival hyperplasia is a fibrous overgrowth of the interdental papilla and labial gingiva that may lead to gum pain, difficulty eating, gingivitis, and/ or tooth decay or loss.2 The condition usually occurs 3 to 6 months after starting cyclosporine but may occur as soon as 1 month later.1,3 The pathophysiology of this adverse effect is incompletely understood, but several mechanisms have been implicated, including upregulation of the salivary proinflammatory cytokines IL-1α, IL-8, and IL-6.1 Additionally, patients with cyclosporine-induced gingival hyperplasia have increased bacterial colonization with species such as Porphyromonas gingivalis.4 Risk factors for cyclosporine- induced gingival hyperplasia include higher serum concentrations (>400 ng/mL) of cyclosporine, history of gingival hyperplasia, concomitant use of calcium channel blockers, and insufficient oral hygiene.2,3 A study by Seymour and Smith5 found that proper oral hygiene leads to less severe cases of cyclosporine-induced gingival hyperplasia but does not prevent gingival overgrowth. Treatment of cyclosporine-induced gingival hyperplasia traditionally involves targeting oral bacteria and reducing inflammation. Decreasing dental plaque through regular tooth-brushing and interdental cleaning may reduce symptoms such as bleeding and discomfort of the gums.
The intensity of cyclosporine-induced gingival hyperplasia can be reduced with chlorhexidine or azithromycin. Individually, each therapy has been shown to clinically improve cyclosporine-induced gingival hyperplasia; however, to our knowledge the combination of these treatments has not been reported.1 We present a simplified approach to treating cyclosporine-induced gingival hyperplasia using both azithromycin and chlorhexidine. This conservative approach results in effective and sustained improvement of gingival hyperplasia while allowing patients to continue cyclosporine therapy to control underlying disease with minimal adverse effects.
Technique
Before initiating treatment, it is important to confirm that the etiology of gingival hyperplasia is due to cyclosporine use and rule out nutritional deficiencies and autoimmune conditions as potential causes. Be sure to inquire about nutritional intake, systemic symptoms, and family history of autoimmune conditions. Our approach includes the use of azithromycin 500 mg once daily for 7 days followed by chlorhexidine 0.12% oral solution 15 mL twice daily (swish undiluted for 30 seconds, then spit) for at least 3 months for optimal management of gingival hyperplasia. Chlorhexidine should be continued for at least 6 months to maintain symptom resolution. While cyclosporine therapy may be continued throughout the duration of this regimen, consider switching to other immunosuppressive medications that are not associated with gingival hyperplasia (eg, tacrolimus) if symptoms are severe and/or resistant to therapy.1,6
We applied this technique to treat cyclosporine-induced gingival hyperplasia in a 28-year-old woman with a 3-year history of primary aplastic anemia. The patient initially presented with pain and bleeding of the gums of several months’ duration and reported experiencing gum pain when eating solid foods. Her medications included cyclosporine 225 mg daily for aplastic anemia and dapsone 100 mg daily for pneumocystis pneumonia prophylaxis, both of which were taken for the past 6 months. Oral examination revealed pink to bright red hyperplastic gingivae (Figure). She had no other symptoms associated with aplastic anemia and no signs of vitamin or nutritional deficiencies. She denied pre-existing periodontitis prior to starting cyclosporine and reported that the symptoms started several months after initiating cyclosporine therapy. Thus, the clinical diagnosis of cyclosporine-induced gingival hyperplasia was made, and treatment with azithromycin and chlorhexidine was initiated with marked reduction in symptoms.

Conservative management of gingival hyperplasia with oral hygiene including regular tooth-brushing and flossing and antimicrobial therapies was preferred in this patient to reduce gum pain and minimize the risk for tooth loss while also limiting the use of surgically invasive interventions. Due to limited therapeutic options for aplastic anemia, continued administration of cyclosporine was necessary in our patient to prevent further complications.
Practice Implications
The precise mechanism by which azithromycin treats gingival hyperplasia is unclear but may involve its antimicrobial and anti-inflammatory properties. Small concentrations of azithromycin have been shown to persist in macrophages and fibroblasts of the gingiva even with short-term administration of 3 to 5 days.7 Chlorhexidine is another antimicrobial agent often used in oral rinse solutions to decrease plaque formation and prevent gingivitis. Chlorhexidine can reduce cyclosporine-induced gingival overgrowth when used twice daily.8 After rinsing with chlorhexidine, saliva exhibits antibacterial activity for up to 5 hours; however, tooth and gum discoloration may occur.8
Recurrence of gingival hyperplasia is likely if cyclosporine is not discontinued or maintained with treatment.3 Conventional gingivectomy should be considered for cases in which conservative treatment is ineffective, aesthetic concerns arise, or gingival hyperplasia persists for more than 6 to 12 months after discontinuing cyclosporine.1
We theorize that the microbial properties of azithromycin and chlorhexidine help reduce periodontal inflammation and bacterial overgrowth in patients with cyclosporine-induced gingival hyperplasia, which allows for restoration of gingival health. Our case highlights the efficacy of our treatment approach using a 7-day course of azithromycin followed by twice-daily use of chlorhexidine oral rinse in the treatment of cyclosporine-induced gingival hyperplasia with continued use of cyclosporine.
- Chojnacka-Purpurowicz J, Wygonowska E, Placek W, et al. Cyclosporine-induced gingival overgrowth—review. Dermatol Ther. 2022;35:E15912.
- Greenburg KV, Armitage GC, Shiboski CH. Gingival enlargement among renal transplant recipients in the era of new-generation immunosuppressants. J Periodontol. 2008;79:453-460.
- Cyclosporine (ciclosporin)(systemic): drug information. UpToDate. Accessed December 19, 2023. https://www.uptodate.com/contents/table-of-contents/drug-information/general-drug-information
- Gong Y, Bi W, Cao L, et al. Association of CD14-260 polymorphisms, red-complex periodontopathogens and gingival crevicular fluid cytokine levels with cyclosporine A-induced gingival overgrowth in renal transplant patients. J Periodontal Res. 2013;48:203-212.
- Seymour RA, Smith DG. The effect of a plaque control programme on the incidence and severity of cyclosporin-induced gingival changes. J Clin Periodontol. 1991;18:107-110.
- Nash MM, Zaltzman JS. Efficacy of azithromycin in the treatment of cyclosporine-induced gingival hyperplasia in renal transplant recipients. Transplantation. 1998;65:1611-1615.
- Martín JM, Mateo E, Jordá E. Utilidad de la azitromicina en la hyperplasia gingival inducida por ciclosporina [azithromycin for the treatment of ciclosporin-induced gingival hyperplasia]. Actas Dermosifiliogr. 2016;107:780.
- Gau CH, Tu HS, Chin YT, et al. Can chlorhexidine mouthwash twice daily ameliorate cyclosporine-induced gingival overgrowth? J Formos Med Assoc. 2013;112:131-137.
Cyclosporine is a calcineurin inhibitor and immunosuppressive medication with several indications, including prevention of parenchymal organ and bone marrow transplant rejection as well as treatment of numerous dermatologic conditions (eg, psoriasis, atopic dermatitis). Although it is an effective medication, there are many known adverse effects including nephrotoxicity, hypertension, and gingival hyperplasia.1 Addressing symptomatic cyclosporine-induced gingival hyperplasia can be challenging, especially if continued use of cyclosporine is necessary for adequate control of the underlying disease. We present a simplified approach for conservative management of cyclosporine-induced gingival hyperplasia that allows for continued use of cyclosporine.
Practice Gap
Cyclosporine-induced gingival hyperplasia is a fibrous overgrowth of the interdental papilla and labial gingiva that may lead to gum pain, difficulty eating, gingivitis, and/ or tooth decay or loss.2 The condition usually occurs 3 to 6 months after starting cyclosporine but may occur as soon as 1 month later.1,3 The pathophysiology of this adverse effect is incompletely understood, but several mechanisms have been implicated, including upregulation of the salivary proinflammatory cytokines IL-1α, IL-8, and IL-6.1 Additionally, patients with cyclosporine-induced gingival hyperplasia have increased bacterial colonization with species such as Porphyromonas gingivalis.4 Risk factors for cyclosporine- induced gingival hyperplasia include higher serum concentrations (>400 ng/mL) of cyclosporine, history of gingival hyperplasia, concomitant use of calcium channel blockers, and insufficient oral hygiene.2,3 A study by Seymour and Smith5 found that proper oral hygiene leads to less severe cases of cyclosporine-induced gingival hyperplasia but does not prevent gingival overgrowth. Treatment of cyclosporine-induced gingival hyperplasia traditionally involves targeting oral bacteria and reducing inflammation. Decreasing dental plaque through regular tooth-brushing and interdental cleaning may reduce symptoms such as bleeding and discomfort of the gums.
The intensity of cyclosporine-induced gingival hyperplasia can be reduced with chlorhexidine or azithromycin. Individually, each therapy has been shown to clinically improve cyclosporine-induced gingival hyperplasia; however, to our knowledge the combination of these treatments has not been reported.1 We present a simplified approach to treating cyclosporine-induced gingival hyperplasia using both azithromycin and chlorhexidine. This conservative approach results in effective and sustained improvement of gingival hyperplasia while allowing patients to continue cyclosporine therapy to control underlying disease with minimal adverse effects.
Technique
Before initiating treatment, it is important to confirm that the etiology of gingival hyperplasia is due to cyclosporine use and rule out nutritional deficiencies and autoimmune conditions as potential causes. Be sure to inquire about nutritional intake, systemic symptoms, and family history of autoimmune conditions. Our approach includes the use of azithromycin 500 mg once daily for 7 days followed by chlorhexidine 0.12% oral solution 15 mL twice daily (swish undiluted for 30 seconds, then spit) for at least 3 months for optimal management of gingival hyperplasia. Chlorhexidine should be continued for at least 6 months to maintain symptom resolution. While cyclosporine therapy may be continued throughout the duration of this regimen, consider switching to other immunosuppressive medications that are not associated with gingival hyperplasia (eg, tacrolimus) if symptoms are severe and/or resistant to therapy.1,6
We applied this technique to treat cyclosporine-induced gingival hyperplasia in a 28-year-old woman with a 3-year history of primary aplastic anemia. The patient initially presented with pain and bleeding of the gums of several months’ duration and reported experiencing gum pain when eating solid foods. Her medications included cyclosporine 225 mg daily for aplastic anemia and dapsone 100 mg daily for pneumocystis pneumonia prophylaxis, both of which were taken for the past 6 months. Oral examination revealed pink to bright red hyperplastic gingivae (Figure). She had no other symptoms associated with aplastic anemia and no signs of vitamin or nutritional deficiencies. She denied pre-existing periodontitis prior to starting cyclosporine and reported that the symptoms started several months after initiating cyclosporine therapy. Thus, the clinical diagnosis of cyclosporine-induced gingival hyperplasia was made, and treatment with azithromycin and chlorhexidine was initiated with marked reduction in symptoms.
Conservative management of gingival hyperplasia with oral hygiene including regular tooth-brushing and flossing and antimicrobial therapies was preferred in this patient to reduce gum pain and minimize the risk for tooth loss while also limiting the use of surgically invasive interventions. Due to limited therapeutic options for aplastic anemia, continued administration of cyclosporine was necessary in our patient to prevent further complications.
Practice Implications
The precise mechanism by which azithromycin treats gingival hyperplasia is unclear but may involve its antimicrobial and anti-inflammatory properties. Small concentrations of azithromycin have been shown to persist in macrophages and fibroblasts of the gingiva even with short-term administration of 3 to 5 days.7 Chlorhexidine is another antimicrobial agent often used in oral rinse solutions to decrease plaque formation and prevent gingivitis. Chlorhexidine can reduce cyclosporine-induced gingival overgrowth when used twice daily.8 After rinsing with chlorhexidine, saliva exhibits antibacterial activity for up to 5 hours; however, tooth and gum discoloration may occur.8
Recurrence of gingival hyperplasia is likely if cyclosporine is not discontinued or maintained with treatment.3 Conventional gingivectomy should be considered for cases in which conservative treatment is ineffective, aesthetic concerns arise, or gingival hyperplasia persists for more than 6 to 12 months after discontinuing cyclosporine.1
We theorize that the microbial properties of azithromycin and chlorhexidine help reduce periodontal inflammation and bacterial overgrowth in patients with cyclosporine-induced gingival hyperplasia, which allows for restoration of gingival health. Our case highlights the efficacy of our treatment approach using a 7-day course of azithromycin followed by twice-daily use of chlorhexidine oral rinse in the treatment of cyclosporine-induced gingival hyperplasia with continued use of cyclosporine.
- Chojnacka-Purpurowicz J, Wygonowska E, Placek W, et al. Cyclosporine-induced gingival overgrowth—review. Dermatol Ther. 2022;35:E15912.
- Greenburg KV, Armitage GC, Shiboski CH. Gingival enlargement among renal transplant recipients in the era of new-generation immunosuppressants. J Periodontol. 2008;79:453-460.
- Cyclosporine (ciclosporin)(systemic): drug information. UpToDate. Accessed December 19, 2023. https://www.uptodate.com/contents/table-of-contents/drug-information/general-drug-information
- Gong Y, Bi W, Cao L, et al. Association of CD14-260 polymorphisms, red-complex periodontopathogens and gingival crevicular fluid cytokine levels with cyclosporine A-induced gingival overgrowth in renal transplant patients. J Periodontal Res. 2013;48:203-212.
- Seymour RA, Smith DG. The effect of a plaque control programme on the incidence and severity of cyclosporin-induced gingival changes. J Clin Periodontol. 1991;18:107-110.
- Nash MM, Zaltzman JS. Efficacy of azithromycin in the treatment of cyclosporine-induced gingival hyperplasia in renal transplant recipients. Transplantation. 1998;65:1611-1615.
- Martín JM, Mateo E, Jordá E. Utilidad de la azitromicina en la hyperplasia gingival inducida por ciclosporina [azithromycin for the treatment of ciclosporin-induced gingival hyperplasia]. Actas Dermosifiliogr. 2016;107:780.
- Gau CH, Tu HS, Chin YT, et al. Can chlorhexidine mouthwash twice daily ameliorate cyclosporine-induced gingival overgrowth? J Formos Med Assoc. 2013;112:131-137.
Conservative Approach to Treatment of Cyclosporine-Induced Gingival Hyperplasia With Azithromycin and Chlorhexidine
Conservative Approach to Treatment of Cyclosporine-Induced Gingival Hyperplasia With Azithromycin and Chlorhexidine

Pinto Bean Pressure Wraps: A Novel Approach to Treating Digital Warts
Practice Gap
Verruca vulgaris is a common dermatologic challenge due to its high prevalence and tendency to recur following routinely employed destructive modalities (eg, cryotherapy, electrosurgery), which can incur a considerable amount of pain and some risk for scarring.1,2 Other treatment methods for warts such as topical salicylic acid preparations, topical immunotherapy, or intralesional allergen injections often require multiple treatment sessions.3,4 Furthermore, the financial burden of traditional wart treatment can be substantial.4 Better techniques are needed to improve the clinician’s approach to treating warts. We describe a home-based technique to treat common digital warts using pinto bean pressure wraps to induce ischemic changes in wart tissue with similar response rates to commonly used modalities.
Technique
Our technique utilizes a small, hard, convex object that is applied directly over the digital wart. A simple self-adhesive wrap is used to cover the object and maintain constant pressure on the wart overnight. We typically use a dried pinto bean (a variety of the common bean Phaseolus vulgaris) acquired from a local grocery store due to its ideal size, hard surface, and convex shape (Figure 1). The bean is taped in place directly overlying the wart and covered with a self-adhesive wrap overnight. The wrap is removed in the morning, and often no further treatment is needed. The ischemic wart tissue is allowed to slough spontaneously over 1 to 2 weeks. No wound care or dressing is necessary (Figure 2). Larger warts may require application of the pressure wraps for 2 to 3 additional nights. While most warts resolve with this technique, we have observed a recurrence rate similar to that for cryotherapy. Patients are advised that any recurrent warts can be re-treated monthly, if needed, until resolution.
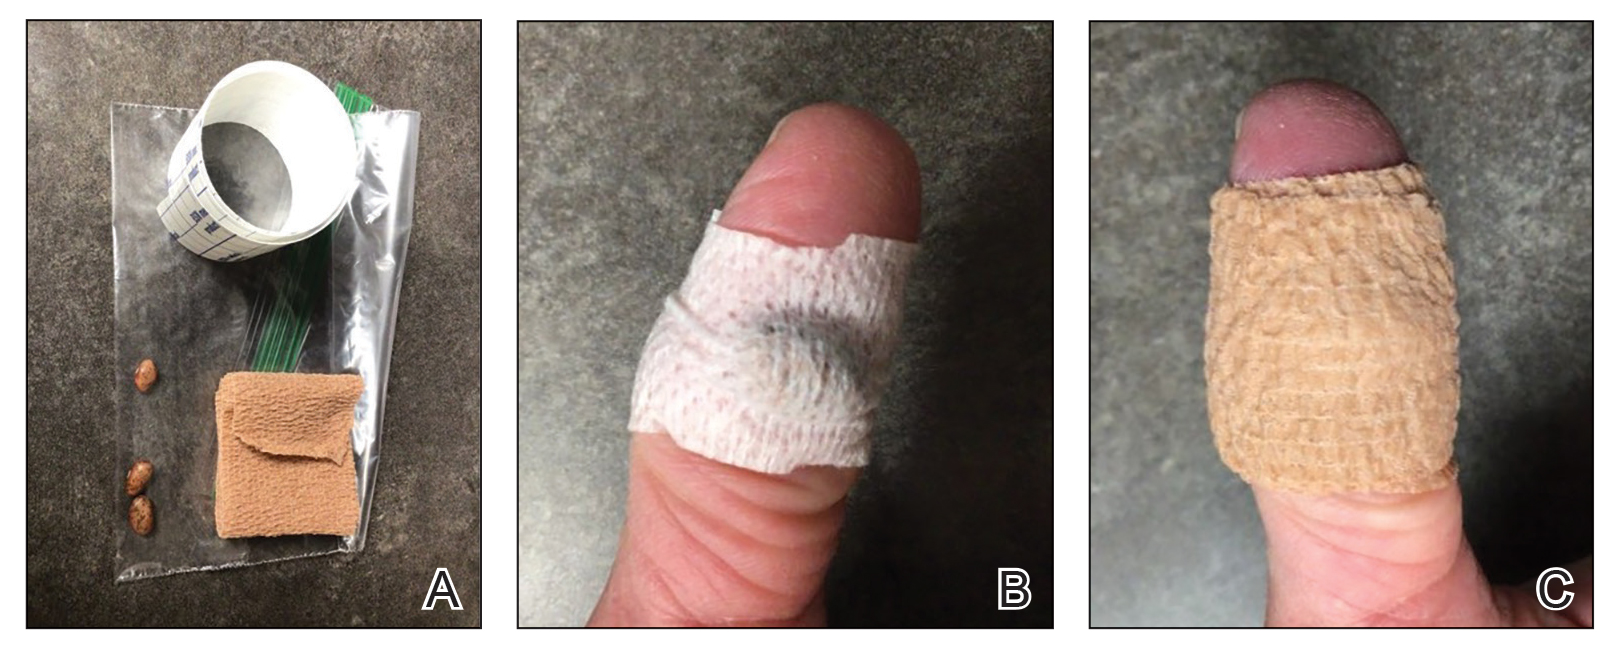
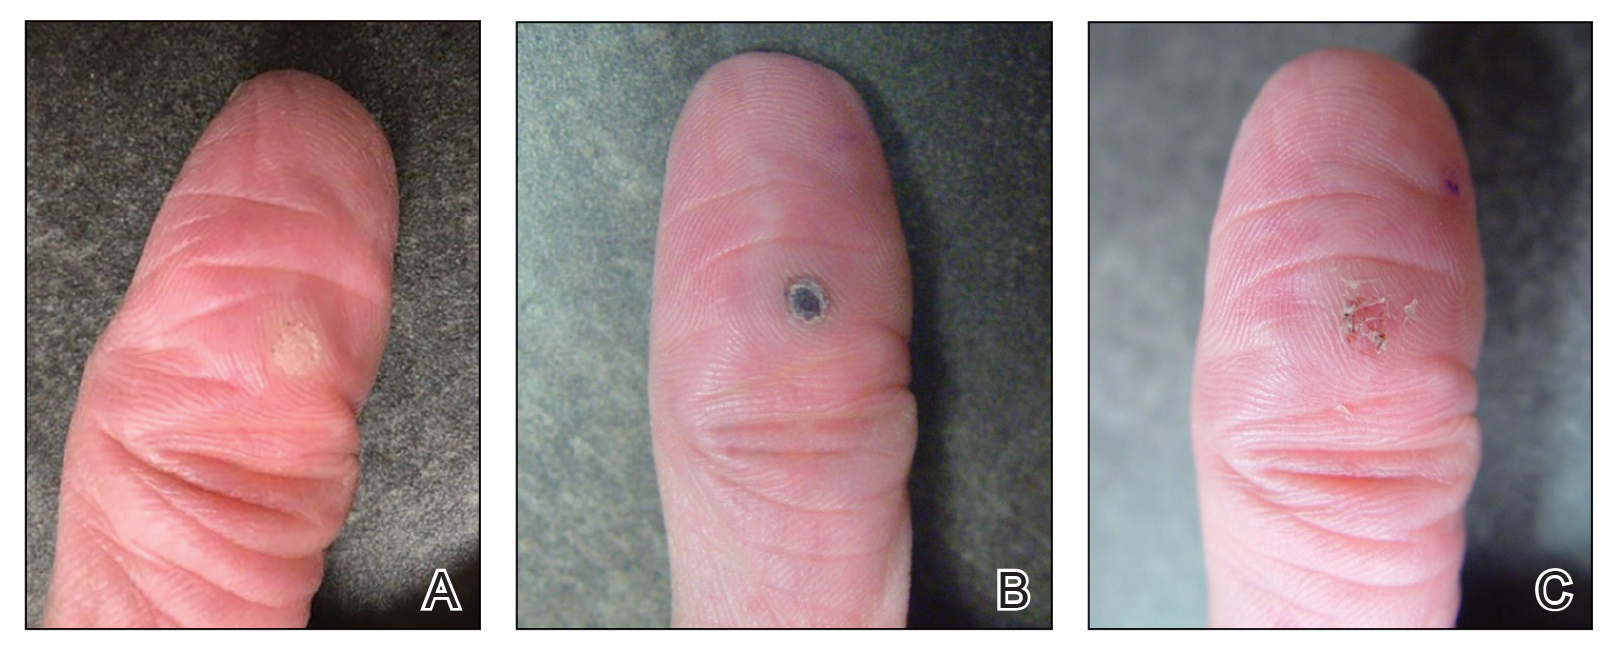
What to Use and How to Prepare—Any small, hard, convex object can be used for the pressure wrap; we also have used appropriately sized and shaped plastic shirt buttons with similar results. Home kits can be assembled in advance and provided to patients at their initial visit along with appropriate instructions (Figure 1A).
Effects on the Skin and Distal Digit—Application of pressure wraps does not harm normal skin; however, care should be taken when the self-adherent wrap is applied so as not to induce ischemia of the distal digit. The wrap should be applied using gentle pressure with patients experiencing minimal discomfort from the overnight application.
Indications—This pressure wrap technique can be employed on most digital warts, including periungual warts, which can be difficult to treat by other means. However, in our experience this technique is not effective for nondigital warts, likely due to the inability to maintain adequate pressure with the overlying dressing. Patients at risk for compromised digital perfusion, such as those with Raynaud phenomenon or systemic sclerosis, should not be treated with pressure wraps due to possible digital ischemia.
Precautions—Patients should be advised that the pinto bean should only be used if dry and should not be ingested. The bean can be a choking hazard for small children, therefore appropriate precautions should be used. Allergic contact dermatitis to the materials used in this technique is possible, but we have never observed this. The pinto bean can be reused for future application as long as it remains dry and provides a hard convex surface.
Practice Implications
The probable mechanism of the ischemic changes to the wart tissue likely is the occlusion of tortuous blood vessels in the dermal papillae, which are intrinsic to wart tissue and absent in normal skin.1 This pressure-induced ischemic injury allows for selective destruction of the wart tissue with sparing of the normal skin. Our technique is fairly novel, although at least one report in the literature has described the use of a mechanical device to induce ischemic changes in skin tags.5
The use of pinto bean pressure wraps to induce ischemic change in digital warts provides a low-risk and nearly pain-free alternative to more expensive and invasive treatment methods. Moreover, this technique allows for a low-cost home-based therapy that can be repeated easily for other digital sites or if recurrence is noted.
- Cardoso J, Calonje E. Cutaneous manifestations of human papillomaviruses: a review. Acta Dermatovenerol Alp Pannonica Adriat. 2011;20:145-154.
- Lipke M. An armamentarium of wart treatments. Clin Med Res. 2006;4:273-293. doi:10.3121/cmr.4.4.273
- Muse M, Stiff K, Glines K, et al. A review of intralesional wart therapy. Dermatol Online J. 2020;26:2. doi:10.5070/D3263048027
- Berna R, Margolis D, Barbieri J. Annual health care utilization and costs for treatment of cutaneous and anogenital warts among a commercially insured population in the US, 2017-2019. JAMA Dermatol. 2022;158:695-697. doi:10.1001/jamadermatol.2022.0964
- Fredriksson C, Ilias M, Anderson C. New mechanical device for effective removal of skin tags in routine health care. Dermatol Online J. 2009;15:9. doi:10.5070/D37tj2800k
Practice Gap
Verruca vulgaris is a common dermatologic challenge due to its high prevalence and tendency to recur following routinely employed destructive modalities (eg, cryotherapy, electrosurgery), which can incur a considerable amount of pain and some risk for scarring.1,2 Other treatment methods for warts such as topical salicylic acid preparations, topical immunotherapy, or intralesional allergen injections often require multiple treatment sessions.3,4 Furthermore, the financial burden of traditional wart treatment can be substantial.4 Better techniques are needed to improve the clinician’s approach to treating warts. We describe a home-based technique to treat common digital warts using pinto bean pressure wraps to induce ischemic changes in wart tissue with similar response rates to commonly used modalities.
Technique
Our technique utilizes a small, hard, convex object that is applied directly over the digital wart. A simple self-adhesive wrap is used to cover the object and maintain constant pressure on the wart overnight. We typically use a dried pinto bean (a variety of the common bean Phaseolus vulgaris) acquired from a local grocery store due to its ideal size, hard surface, and convex shape (Figure 1). The bean is taped in place directly overlying the wart and covered with a self-adhesive wrap overnight. The wrap is removed in the morning, and often no further treatment is needed. The ischemic wart tissue is allowed to slough spontaneously over 1 to 2 weeks. No wound care or dressing is necessary (Figure 2). Larger warts may require application of the pressure wraps for 2 to 3 additional nights. While most warts resolve with this technique, we have observed a recurrence rate similar to that for cryotherapy. Patients are advised that any recurrent warts can be re-treated monthly, if needed, until resolution.
What to Use and How to Prepare—Any small, hard, convex object can be used for the pressure wrap; we also have used appropriately sized and shaped plastic shirt buttons with similar results. Home kits can be assembled in advance and provided to patients at their initial visit along with appropriate instructions (Figure 1A).
Effects on the Skin and Distal Digit—Application of pressure wraps does not harm normal skin; however, care should be taken when the self-adherent wrap is applied so as not to induce ischemia of the distal digit. The wrap should be applied using gentle pressure with patients experiencing minimal discomfort from the overnight application.
Indications—This pressure wrap technique can be employed on most digital warts, including periungual warts, which can be difficult to treat by other means. However, in our experience this technique is not effective for nondigital warts, likely due to the inability to maintain adequate pressure with the overlying dressing. Patients at risk for compromised digital perfusion, such as those with Raynaud phenomenon or systemic sclerosis, should not be treated with pressure wraps due to possible digital ischemia.
Precautions—Patients should be advised that the pinto bean should only be used if dry and should not be ingested. The bean can be a choking hazard for small children, therefore appropriate precautions should be used. Allergic contact dermatitis to the materials used in this technique is possible, but we have never observed this. The pinto bean can be reused for future application as long as it remains dry and provides a hard convex surface.
Practice Implications
The probable mechanism of the ischemic changes to the wart tissue likely is the occlusion of tortuous blood vessels in the dermal papillae, which are intrinsic to wart tissue and absent in normal skin.1 This pressure-induced ischemic injury allows for selective destruction of the wart tissue with sparing of the normal skin. Our technique is fairly novel, although at least one report in the literature has described the use of a mechanical device to induce ischemic changes in skin tags.5
The use of pinto bean pressure wraps to induce ischemic change in digital warts provides a low-risk and nearly pain-free alternative to more expensive and invasive treatment methods. Moreover, this technique allows for a low-cost home-based therapy that can be repeated easily for other digital sites or if recurrence is noted.
- Cardoso J, Calonje E. Cutaneous manifestations of human papillomaviruses: a review. Acta Dermatovenerol Alp Pannonica Adriat. 2011;20:145-154.
- Lipke M. An armamentarium of wart treatments. Clin Med Res. 2006;4:273-293. doi:10.3121/cmr.4.4.273
- Muse M, Stiff K, Glines K, et al. A review of intralesional wart therapy. Dermatol Online J. 2020;26:2. doi:10.5070/D3263048027
- Berna R, Margolis D, Barbieri J. Annual health care utilization and costs for treatment of cutaneous and anogenital warts among a commercially insured population in the US, 2017-2019. JAMA Dermatol. 2022;158:695-697. doi:10.1001/jamadermatol.2022.0964
- Fredriksson C, Ilias M, Anderson C. New mechanical device for effective removal of skin tags in routine health care. Dermatol Online J. 2009;15:9. doi:10.5070/D37tj2800k
Nailing the Nail Biopsy: Surgical Instruments and Their Function in Nail Biopsy Procedures
Practice Gap
The term nail biopsy (NB) may refer to a punch, excisional, shave, or longitudinal biopsy of the nail matrix and/or nail bed.1 Nail surgeries, including NBs, are performed relatively infrequently. In a study using data from the Medicare Provider Utilization and Payment Database 2012-2017, only 1.01% of Mohs surgeons and 0.28% of general dermatologists in the United States performed NBs. Thirty-one states had no dermatologist-performed NBs, while 3 states had no nail biopsies performed by any physician, podiatrist, nurse practitioner, or physician assistant, indicating that there is a shortage of dermatology clinicians performing nail surgeries.2
Dermatologists may not be performing NBs due to unfamiliarity with nail unit anatomy and lack of formal NB training during residency.3 In a survey of 240 dermatology residents in the United States, 58% reported performing fewer than 10 nail procedures during residency, with 25% observing only.4 Of those surveyed, 1% had no exposure to nail procedures during 3 years of residency. Furthermore, when asked to assess their competency in nail surgery on a scale of not competent, competent, and very competent, approximately 30% responded that they were not competent.4 Without sufficient education on procedures involving the nail unit, residents may be reluctant to incorporate nail surgery into their clinical practice.
Due to their complexity, NBs require the use of several specialized surgical instruments that are not used for other dermatologic procedures, and residents and attending physicians who have limited nail training may be unfamiliar with these tools. To address this educational gap, we sought to create a guide that details the surgical instruments used for the nail matrix tangential excision (shave) biopsy technique—the most common technique used in our nail specialty clinic. This guide is intended for educational use by dermatologists who wish to incorporate NB as part of their practice.
Tools and Technique
As a major referral center, our New York City–based nail specialty clinic performs a large volume of NBs, many of them performed for clinically concerning longitudinal melanonychias for which a nail matrix shave biopsy most often is performed. We utilize a standardized tray consisting of 12 surgical instruments that are needed to successfully perform a NB from start to finish (Figure). In addition to standard surgical tray items, such as sutures and tissue scissors, additional specialized instruments are necessary for NB procedures, including a nail elevator, an English nail splitter, and skin hook.
After the initial incisions are made at 45° angles to the proximal nail fold surrounding the longitudinal band, the nail elevator is used to separate the proximal nail plate from the underlying nail bed. The English nail splitter is used to create a transverse split separating the proximal from the distal nail plate, and the proximal nail plate then is retracted using a clamp. The skin hook is used to retract the proximal nail fold to expose the pigment in the nail matrix, which is biopsied using the #15 blade and sent for histopathology. The proximal nail fold and retracted nail plate then are put back in place, and absorbable sutures are used to repair the defect. In certain cases, a 3-mm punch biopsy may be used to sample the nail plate and/or the surrounding soft tissue.
Practice Implications
A guide to surgical tools used during NB procedures, including less commonly encountered tools such as a nail elevator and English nail splitter, helps to close the educational gap of NB procedures among dermatology trainees and attending physicians. In conjunction with practical training with cadavers and models, a guide to surgical tools can be reviewed by trainees before hands-on exposure to nail surgery in a clinical setting. By increasing awareness of the tools needed to complete the procedure from start to finish, dermatologists may feel more prepared and confident in their ability to perform NBs, ultimately allowing for more rapid diagnosis of nail malignancies.
- Grover C, Bansal S. Nail biopsy: a user’s manual. Indian Dermatol Online J. 2018;9:3-15. doi:10.4103/idoj.IDOJ_268_17
- Wang Y, Lipner SR. Retrospective analysis of nail biopsies performed using the Medicare Provider Utilization and Payment Database 2012 to 2017. Dermatol Ther. 2021;34:e14928. doi:10.1111/dth.14928
- Hare AQ, Rich P. Clinical and educational gaps in diagnosis of nail disorders. Dermatol Clin. 2016;34:269-273. doi:10.1016/j.det.2016.02.002
- Lee EH, Nehal KS, Dusza SW, et al. Procedural dermatology training during dermatology residency: a survey of third-year dermatology residents. J Am Acad Dermatol. 2011;64:475-483.e4835. doi:10.1016/j.jaad.2010.05.044
Practice Gap
The term nail biopsy (NB) may refer to a punch, excisional, shave, or longitudinal biopsy of the nail matrix and/or nail bed.1 Nail surgeries, including NBs, are performed relatively infrequently. In a study using data from the Medicare Provider Utilization and Payment Database 2012-2017, only 1.01% of Mohs surgeons and 0.28% of general dermatologists in the United States performed NBs. Thirty-one states had no dermatologist-performed NBs, while 3 states had no nail biopsies performed by any physician, podiatrist, nurse practitioner, or physician assistant, indicating that there is a shortage of dermatology clinicians performing nail surgeries.2
Dermatologists may not be performing NBs due to unfamiliarity with nail unit anatomy and lack of formal NB training during residency.3 In a survey of 240 dermatology residents in the United States, 58% reported performing fewer than 10 nail procedures during residency, with 25% observing only.4 Of those surveyed, 1% had no exposure to nail procedures during 3 years of residency. Furthermore, when asked to assess their competency in nail surgery on a scale of not competent, competent, and very competent, approximately 30% responded that they were not competent.4 Without sufficient education on procedures involving the nail unit, residents may be reluctant to incorporate nail surgery into their clinical practice.
Due to their complexity, NBs require the use of several specialized surgical instruments that are not used for other dermatologic procedures, and residents and attending physicians who have limited nail training may be unfamiliar with these tools. To address this educational gap, we sought to create a guide that details the surgical instruments used for the nail matrix tangential excision (shave) biopsy technique—the most common technique used in our nail specialty clinic. This guide is intended for educational use by dermatologists who wish to incorporate NB as part of their practice.
Tools and Technique
As a major referral center, our New York City–based nail specialty clinic performs a large volume of NBs, many of them performed for clinically concerning longitudinal melanonychias for which a nail matrix shave biopsy most often is performed. We utilize a standardized tray consisting of 12 surgical instruments that are needed to successfully perform a NB from start to finish (Figure). In addition to standard surgical tray items, such as sutures and tissue scissors, additional specialized instruments are necessary for NB procedures, including a nail elevator, an English nail splitter, and skin hook.
After the initial incisions are made at 45° angles to the proximal nail fold surrounding the longitudinal band, the nail elevator is used to separate the proximal nail plate from the underlying nail bed. The English nail splitter is used to create a transverse split separating the proximal from the distal nail plate, and the proximal nail plate then is retracted using a clamp. The skin hook is used to retract the proximal nail fold to expose the pigment in the nail matrix, which is biopsied using the #15 blade and sent for histopathology. The proximal nail fold and retracted nail plate then are put back in place, and absorbable sutures are used to repair the defect. In certain cases, a 3-mm punch biopsy may be used to sample the nail plate and/or the surrounding soft tissue.
Practice Implications
A guide to surgical tools used during NB procedures, including less commonly encountered tools such as a nail elevator and English nail splitter, helps to close the educational gap of NB procedures among dermatology trainees and attending physicians. In conjunction with practical training with cadavers and models, a guide to surgical tools can be reviewed by trainees before hands-on exposure to nail surgery in a clinical setting. By increasing awareness of the tools needed to complete the procedure from start to finish, dermatologists may feel more prepared and confident in their ability to perform NBs, ultimately allowing for more rapid diagnosis of nail malignancies.
- Grover C, Bansal S. Nail biopsy: a user’s manual. Indian Dermatol Online J. 2018;9:3-15. doi:10.4103/idoj.IDOJ_268_17
- Wang Y, Lipner SR. Retrospective analysis of nail biopsies performed using the Medicare Provider Utilization and Payment Database 2012 to 2017. Dermatol Ther. 2021;34:e14928. doi:10.1111/dth.14928
- Hare AQ, Rich P. Clinical and educational gaps in diagnosis of nail disorders. Dermatol Clin. 2016;34:269-273. doi:10.1016/j.det.2016.02.002
- Lee EH, Nehal KS, Dusza SW, et al. Procedural dermatology training during dermatology residency: a survey of third-year dermatology residents. J Am Acad Dermatol. 2011;64:475-483.e4835. doi:10.1016/j.jaad.2010.05.044