User login
Combo could target LSCs, treat CML
Image by Difu Wu
Researchers say they have identified a mechanism governing malignant reprogramming of progenitors into self-renewing leukemia stem cells (LSCs).
And their discovery has revealed a potential new therapeutic approach for chronic myeloid leukemia (CML).
Experiments in mice showed that a targeted monoclonal antibody could impair LSCs’ ability to regenerate and made them easier to eradicate with a tyrosine kinase inhibitor.
Catriona Jamieson, MD, PhD, of the University of California, San Diego, and her colleagues described this research in PNAS.
The researchers found that downregulation of Muscleblind-like 3 (MBNL3) RNA binding proteins resulted in re-expression of a human embryonic stem cell-specific alternative splicing gene regulatory network—a mechanism that controls embryonic stem cell pluripotency and fate. One effect of this was reprogramming of progenitor cells into LSCs in blast crisis CML.
“This is the first description of cancer stem cell generation through decreased expression of a transcriptional repressor of an embryonic pattern of alternative splicing that enhances stem cell self-renewal and survival,” Dr Jamieson said.
“Rather than acquiring multiple DNA mutations, as was previously thought, cancer stem cells in chronic myeloid leukemia switch to embryonic RNA splicing, which enhances their capacity to self-renew or clone themselves.”
“If we can detect and turn off embryonic splicing, we may be able to prevent cancer stem cells from propagating themselves. Also, if we target embryonic versions of proteins that are re-expressed by cancer, like CD44 variant 3, with specific antibodies together with tyrosine kinase inhibitors, we may be able to circumvent cancer relapse—a leading cause of cancer-related mortality.”
The researchers tested this theory in mice. They found that treatment with a humanized pan-CD44 monoclonal antibody and a targeted tyrosine kinase antagonist disrupted the development of LSCs in their protected microenvironment.
This forced the cells to enter the bloodstream, where dasatinib could effectively target them. ![]()
Cord blood banking resource
Stem cells collected from donated umbilical cord blood have been approved by the Food and Drug Administration to treat more than 80 diseases, including leukemia and lymphoma, according to the Cord Blood Center.
Expectant parents can save stem cells from their child’s umbilical cord blood for use in medical procedures and transplants for their child and can choose to store or donate these stem cells to a patient who might need them, which is called cord blood banking. There are more than half a million donated cord blood units worldwide, with thousands more units added every year.
By learning more about cord blood and about the science behind stem cell transplants, parents can then decide if storing their child’s leftover umbilical cord cells is the right option for their family.
The FDA does caution consumers to make sure that any stem cell treatment they are considering has been approved by the agency or is being studied in clinical trials.
For more information, go to the Cord Blood Center website.
Bearing the wait
If you have ever waited anxiously for the results of a blood test or biopsy, you may be surprised to learn that some psychologists at the University of California, Riverside, believe that there can be a bright side to those dark days you spent worrying (“Two Definitions of Waiting Well.” Emotion 2015 Oct 12 [epub ahead of print]).
Surveying more than 200 recent law school graduates every 2 weeks during their 4-month wait for the results of the California bar exam, the researchers discovered that those who rode it out anxiously and pessimistically handled the bad news of failure “more productively.” And they welcomed the good news “more joyously” than did their peers who had “suffered little during the wait.”

While these psychologists’ findings may be of some help to aspiring lawyers or freshly minted physicians waiting to hear if they have passed their boards, I don’t think we should take them to heart when ordering lab work or imaging studies on our patients. After all, flunking the bar exam may be a life-altering event, but it isn’t a life-ending one such as learning that the biopsy you waited a week for has detected a cancer that has metastasized beyond the reaches of radiation and chemotherapy.
The bottom line is that waiting for potentially bad news is anxiety provoking regardless of whether it is for the results of a qualifying exam or a simple CBC. And, as physicians, it is our responsibility to do whatever we can to minimize that anxiety by following some simple commonsense rules of courtesy and decency.
First, we must understand that even low-risk preop screening lab work that we may view as innocuous may trigger significant anxiety in many patients. For example, a patient who knew someone whose leukemia was discovered as the result of a preop screening CBC may worry that a similar fate will be revealed by his blood test.
Second, we should ask ourselves every time we order some lab work or imaging study if it is really necessary. Are we just trying to cover our behinds and protect ourselves from a malpractice suit? Do we know what we are going to do with an equivocal borderline result? An unnecessary blood test isn’t just a waste of someone’s money and a symptom of sloppy medicine. It can be the cause of an anxiety-provoking wait for the patient.
Finally, if we are going to order a lab test, even if it is just for preop screening, it is our obligation to inform the patient of the result in a timely fashion. In my universe, that means the same day that the physician receives the result. In today’s world with its panoply of communication platforms, informing the patient can be as simple as leaving a message on a system previously approved by the patient. Obviously, bad or complicated news should be delivered directly by the physician with a phone call. Of course, informing the patient of even normal lab work results takes time, but it is the courteous and decent thing to do and signals to the patient that she has a physician who cares. If it seems like too much work, it may be that the physician is ordering too much lab work.
Dr. Wilkoff practiced primary care pediatrics in Brunswick, Maine, for nearly 40 years. He has authored several books on behavioral pediatrics including “How to Say No to Your Toddler.”
If you have ever waited anxiously for the results of a blood test or biopsy, you may be surprised to learn that some psychologists at the University of California, Riverside, believe that there can be a bright side to those dark days you spent worrying (“Two Definitions of Waiting Well.” Emotion 2015 Oct 12 [epub ahead of print]).
Surveying more than 200 recent law school graduates every 2 weeks during their 4-month wait for the results of the California bar exam, the researchers discovered that those who rode it out anxiously and pessimistically handled the bad news of failure “more productively.” And they welcomed the good news “more joyously” than did their peers who had “suffered little during the wait.”
While these psychologists’ findings may be of some help to aspiring lawyers or freshly minted physicians waiting to hear if they have passed their boards, I don’t think we should take them to heart when ordering lab work or imaging studies on our patients. After all, flunking the bar exam may be a life-altering event, but it isn’t a life-ending one such as learning that the biopsy you waited a week for has detected a cancer that has metastasized beyond the reaches of radiation and chemotherapy.
The bottom line is that waiting for potentially bad news is anxiety provoking regardless of whether it is for the results of a qualifying exam or a simple CBC. And, as physicians, it is our responsibility to do whatever we can to minimize that anxiety by following some simple commonsense rules of courtesy and decency.
First, we must understand that even low-risk preop screening lab work that we may view as innocuous may trigger significant anxiety in many patients. For example, a patient who knew someone whose leukemia was discovered as the result of a preop screening CBC may worry that a similar fate will be revealed by his blood test.
Second, we should ask ourselves every time we order some lab work or imaging study if it is really necessary. Are we just trying to cover our behinds and protect ourselves from a malpractice suit? Do we know what we are going to do with an equivocal borderline result? An unnecessary blood test isn’t just a waste of someone’s money and a symptom of sloppy medicine. It can be the cause of an anxiety-provoking wait for the patient.
Finally, if we are going to order a lab test, even if it is just for preop screening, it is our obligation to inform the patient of the result in a timely fashion. In my universe, that means the same day that the physician receives the result. In today’s world with its panoply of communication platforms, informing the patient can be as simple as leaving a message on a system previously approved by the patient. Obviously, bad or complicated news should be delivered directly by the physician with a phone call. Of course, informing the patient of even normal lab work results takes time, but it is the courteous and decent thing to do and signals to the patient that she has a physician who cares. If it seems like too much work, it may be that the physician is ordering too much lab work.
Dr. Wilkoff practiced primary care pediatrics in Brunswick, Maine, for nearly 40 years. He has authored several books on behavioral pediatrics including “How to Say No to Your Toddler.”
AHA: One in three black Americans will experience PAD
ORLANDO – One in three black Americans and one in five whites and Hispanics will develop lower extremity peripheral artery disease during their lifetime, according to the first-ever lifetime risk estimate calculated for this important manifestation of atherosclerotic vascular disease.
“Our results suggest that race is a critical factor in PAD [peripheral artery disease] risk. Current clinical guidelines recommend measuring ankle-brachial index according to age, traditional cardiovascular risk factors, and leg symptoms. Our results suggest race should also be taken into account,” Dr. Kunihiro Matsushita said at the American Heart Association scientific sessions.
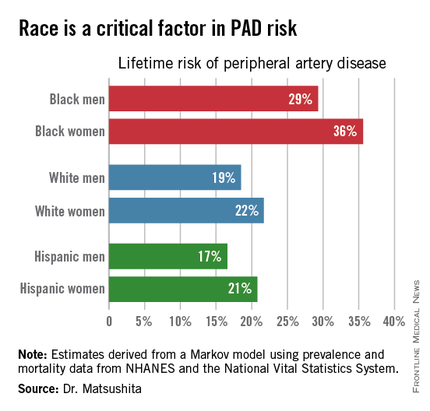
This lifetime risk estimate for PAD was derived from national prevalence and mortality data from the National Health and Nutrition Examination Survey (NHANES) and the National Vital Statistics System. The analytic methods employed have previously been used to estimate lifetime risk of kidney disease and other major health issues with significant impact upon quality of life and longevity, noted Dr. Matsushita of Johns Hopkins University, Baltimore.
Over an 80-year time horizon, the projected risk of experiencing PAD was similar for men and women of the same race, but 1.5-fold higher for blacks, compared with whites or Hispanics (see chart).
An estimated 10% of black Americans will develop PAD by age 60. Among whites and Hispanics, a 10% prevalence is not reached until age 70. For individuals who don’t have PAD by age 65, their risk during the next 15 years is in the range of 28%-30% for black men and women, and 16%-18% in white or Hispanic men and women, according to Dr. Matsushita.
He declared having no financial conflicts related to this study. His work is supported by an AHA award.
ORLANDO – One in three black Americans and one in five whites and Hispanics will develop lower extremity peripheral artery disease during their lifetime, according to the first-ever lifetime risk estimate calculated for this important manifestation of atherosclerotic vascular disease.
“Our results suggest that race is a critical factor in PAD [peripheral artery disease] risk. Current clinical guidelines recommend measuring ankle-brachial index according to age, traditional cardiovascular risk factors, and leg symptoms. Our results suggest race should also be taken into account,” Dr. Kunihiro Matsushita said at the American Heart Association scientific sessions.
This lifetime risk estimate for PAD was derived from national prevalence and mortality data from the National Health and Nutrition Examination Survey (NHANES) and the National Vital Statistics System. The analytic methods employed have previously been used to estimate lifetime risk of kidney disease and other major health issues with significant impact upon quality of life and longevity, noted Dr. Matsushita of Johns Hopkins University, Baltimore.
Over an 80-year time horizon, the projected risk of experiencing PAD was similar for men and women of the same race, but 1.5-fold higher for blacks, compared with whites or Hispanics (see chart).
An estimated 10% of black Americans will develop PAD by age 60. Among whites and Hispanics, a 10% prevalence is not reached until age 70. For individuals who don’t have PAD by age 65, their risk during the next 15 years is in the range of 28%-30% for black men and women, and 16%-18% in white or Hispanic men and women, according to Dr. Matsushita.
He declared having no financial conflicts related to this study. His work is supported by an AHA award.
AT THE AHA SCIENTIFIC SESSIONS
Key clinical point: The threshold for screening for peripheral artery disease should be lower in black patients.
Major finding: One in three black Americans will develop peripheral artery disease by age 80, as will one in five whites or Hispanics.
Data source: This lifetime risk estimate for peripheral artery disease was derived from a Markov model with data input on the prevalence of the disorder and its associated mortality obtained from NHANES and the National Vital Statistics System.
Disclosures: The presenter reported having no financial conflicts. His research is supported by an AHA award.

Bone can reactivate dormant MM cells, study suggests

to the tibia of a mouse
Image courtesy of the Garvan
Institute of Medical Research
Cancer cells that lie dormant in the bone can be “woken up” by changes in their surroundings, according to researchers.
The group used microscopy techniques to study multiple myeloma (MM) cells that lay “sleeping” in mouse bones.
The experiment revealed that dormant cells can be reactivated when bone tissue is broken down around them, suggesting new possibilities for
treating metastatic cancers in bone.
“Once a cancer spreads to bone, it becomes notoriously difficult to treat,” said study author Peter Croucher, PhD, of the Garvan Institute of Medical Research in Sydney, New South Wales, Australia.
“So it’s important to establish exactly what wakes those cells in bone. Is it some signal within the cells themselves, or is it a change in their environment?”
The researchers set out to discover which scenario is correct and reported their findings in Nature Communications.
Using a technique called intravital 2-photon microscopy, the team tracked the fate of dormant MM cells in the tibia of living mice.
They introduced MM cells into the mice and watched as a small number of the cells lodged in the tibia and “went to sleep.” These cells could be detected because they contained a fluorescent dye that was quickly lost from dividing cells.
“Because we were looking at a long bone like a tibia, we could watch the same sleeping cancer cells, in the same bone, in the same mouse, over a long period of time, and this is something that hasn’t been done before,” said Tri Giang Phan, PhD, of the Garvan Institute of Medical Research.
Dr Croucher said that studying the same set of cells over a period of months revealed vital clues about what caused them to reactivate.
“Because we’ve done it this way, we can show that there are a great many dormant cells, yet only some of them get woken up, and those that do wake, wake at different times,” he noted.
“We even saw some cells that woke then went back to sleep again. The fact that these myeloma cells behave so differently, despite coming from the same cancer cell line, gave us our first clue that it is a signal from outside the cells that is controlling when they wake.”
Explaining the phenomenon
The researchers’ next challenge was to determine the precise nature of the “wake-up call” from bone.
“[W]e’ve shown that bone’s dynamic process of building up and breaking down can send signals to cancer cells to stay sleeping or to wake,” said Michelle McDonald, PhD, of the Garvan Institute of Medical Research.
“We were able to show that myeloma cells are usually kept asleep by close association with a layer of osteoblast-like cells, called bone-lining cells, in the endosteum. The bone-lining cells are essentially inactive, so we can think of them as providing a quiet environment in which myeloma cells sleep undisturbed.”
“Crucially, we can wake those myeloma cells by activating osteoclasts, which break down bone tissue. We think the osteoclasts are physically changing the local environment of the cancer cells and waking them up in the process, as if they were literally throwing them out of bed.”
“We know that bone remodeling is going on in all of us. So a myeloma cell could be woken in an essentially random fashion, by having its local environment remodeled by osteoclasts. Essentially, a cancer cell could be woken by being in the wrong place at the wrong time.”
Implications for treatment
So what do these findings mean for treating secondary cancers in bone?
“Now we can see that the cancer cells are woken by changes in the surrounding bone, we can think in a whole new way about treating bone metastasis,” Dr Croucher said. “And there are 2 treatment approaches in particular that have promise.”
“The first is that we could inhibit the breakdown of bone by osteoclasts so as to keep cancer cells in long-term hibernation. In fact, there are already drugs that can do this, such as bisphosphonates, and there’s already evidence that these drugs do improve survival in breast cancer patients.”
“The other, more radical, option is to do the opposite—to wake the sleeping cells by activating osteoclasts and driving the breakdown of bone. Most cancer treatments target active, dividing cells. So waking the sleeping cells should make them susceptible to those therapies and, ultimately, could eradicate any residual disease.” ![]()
Antibody shows early promise for hemophilia A

Results observed in healthy subjects suggest ACE910, a factor VIIIa-mimetic bispecific antibody, may be safe and effective for patients with severe hemophilia A.
The data indicate that a weekly injection of ACE910 may prevent excessive bleeding, whereas existing hemophilia treatments require 2 to 3 injections per week.
Furthermore, ACE910 may be less likely to prompt factor VIII inhibitors, and the drug may be effective in patients who already have inhibitors.
Researchers reported the results of this phase 1 trial in Blood.
The team enrolled healthy male volunteers (ages 20 to 44), 40 of whom were Japanese and 24 of whom were Caucasian.
In part A of the study, the Japanese volunteers were randomized to receive 1 of 5 doses of ACE910 (ranging from 0.001 to 1 mg/kg) or placebo subcutaneously. There were 6 subjects per ACE910 dose group and 10 subjects who received placebo.
In part B, the Caucasian volunteers were randomized to receive 1 of 3 doses (ranging from 0.1 to 1 mg/kg) or placebo subcutaneously. There were 6 subjects in each group.
The volunteers were monitored based on their dose group, ranging from 4 weeks of observation for 0.001 mg/kg to 24 weeks for 1 mg/kg.
In all 48, subjects received ACE910. The researchers said that doses up to 1 mg/kg appeared to be safe. There were 15 adverse events (AEs) in 13 (27.1%) subjects receiving ACE910, compared to 6 AEs in 4 (25%) subjects receiving placebo.
There was 1 moderate AE (nasopharyngitis in 1 Caucasian subject receiving ACE910 at 0.1 mg/kg), but all other events were mild. There were no serious AEs or AEs that led to study withdrawal. The incidence of AEs did not differ according to dose or ethnicity.
The researchers did not observe any cases of hypercoagulability, hypersensitivity, serum cytokine concentration abnormality, or injection site reaction.
ACE910 absorbed into the plasma at a steady rate similar for both Japanese and Caucasian volunteers and remained in the blood with a half-life of 4 to 5 weeks, suggesting the drug’s therapeutic effects could be sustained with once-weekly subcutaneous dosing of ACE910.
Two subjects (1 Japanese and 1 Caucasian) were positive for anti-ACE910 antibodies. One subject was positive for antibodies before and after receiving ACE910, and the other was only positive after.
“These data are very encouraging for patients with severe hemophilia A, irrespective of the presence of factor VIII inhibitors, as ACE910 has the potential to offer the opportunity to live more normal lives without constantly planning around the next injection,” said study author Midori Shima, MD, PhD, of Nara Medical University in Kashihara, Japan.
“The first clinical investigation of this drug in hemophilia A patients with or without factor VIII inhibitors has already been implemented, and phase 3 studies are being planned to start in the near future.”
Interim results of a phase 1 study of ACE910 in hemophilia A patients (with and without inhibitors) were presented at ISTH 2015. And ACE910 was recently granted breakthrough designation from the US Food and Drug Administration. ![]()
Group creates model of arterial thrombus formation
Image by Andre E.X. Brown
A group of biophysicists have developed a mathematical model of arterial thrombus formation.
The team described the process of platelet aggregation as being similar to the video game Tetris and derived equations that allowed them to reproduce the wave process of platelet aggregate formation in a blood vessel.
Mikhail Panteleev, PhD, of Moscow State University in Russia, and his colleagues described this work in PLOS ONE.
Looking at thrombus formation in the same way as the tiles stack up in Tetris is a key aspect of the team’s model. In the game, the tiles either drop down onto a flat surface or become attached to parts sticking out from the rest of the block.
The researchers said there are only 2 differences between thrombus formation and the game.
Unlike in Tetris, when a layer of a thrombus is complete, it does not disappear. So, as time passes, a thrombus is capable of obstructing the space it is in.
And Tetris includes tiles of several different shapes. But, in a thrombus, the “falling tiles” are always the same—thrombocytes.
Having described the mathematical process of how vacant areas on the surface of a growing thrombus are filled, the researchers were able to build first a 1-dimensional model (as in Tetris) and then a 2-dimensional model (where thrombocytes are deposited in a dimensional plane).
At one point, the researchers began to consider certain thrombocytes as being dimensionless and the thrombus itself as being continuous. In other words, they went from a discrete model to a continuous model.
In a discrete model, the system under study consists of individual particles, and the behavior of each particle can be tracked individually. In a continuous model, the system under study consists of solid objects that can freely change their size or any other characteristic.
The sequential solution of the equations enabled the researchers to reproduce the dynamics of thrombus growth and study clot behavior under various conditions—in the case of damage to the vascular wall, for example.
Active media and autowaves
The researchers said the process of thrombus formation is like an autowave. And the blood, which carries platelets and proteins for coagulation, is an active medium.
The term “active medium” plays a key role in non-linear dynamics—the science of mathematical modeling of a range of systems, from mixtures of interacting chemicals and lasers to forest fires and even social networks.
One way to describe an active medium is to use the example of a forest fire. Every dry tree is not simply a passive object but a potential source of thermal energy. If there is a fire near a dry tree, it too will start to burn and provide more heat, which can then ignite other trees. The ability of elements in the system to release energy is a key feature of an active medium.
In active media, a local event (lightning striking a tree, for example) can initiate a transition process in a system from one state to another (in this case, a dry tree becomes a burning tree).
This process spreads like a wave in space, and the specific physical nature of the system is not so important. The same equation can be used to describe entirely different cases.
The term “autowave” means the wave propagation process is not passive, as in the case of seismic waves traveling from an earthquake’s epicenter, but active. At each point, the wave receives more energy.
In the case of thrombus formation, these terms apply to thrombocytes flowing in plasma. The thrombocytes can go from a free-flowing state to a deposited state.
Under normal circumstances, thrombocytes flow freely in the bloodstream, but if the vascular wall becomes damaged, they start to adhere to one another and to the vascular wall.
The blood also contains proteins required for thrombus formation. Even if there are no thrombocytes, reactions with these proteins are able to help form a clot to block a damaged vessel, and these reactions also occur in the form of autowaves.
Normally, thrombi prevent blood loss in the human body when a blood vessel has become damaged. Sometimes, however, thrombus formation occurs not as a result of an injury with damage to a blood vessel, but as a result of a reaction to a pathological process.
This type of thrombus formation can block a vessel completely and cut off the blood supply to tissues and organs. This, in turn, can lead to myocardial infarction, stroke, or gangrene of the extremities.
The researchers say their new model correctly describes arterial thrombus formation. These particular thrombi consist mainly of thrombocytes, and blood proteins play a relatively small role in the process.
“We have always had difficulty working with arterial blood clots in particular, in terms of developing and implementing computer models, because the subject involves a very difficult combination of mechanics (cell attachments), hydrodynamics with variable geometry, and biochemistry,” Dr Panteleev said.
“In our paper in PLOS ONE, we tried to use the most primitive description of a thrombus as a continuous medium, rather than discrete particles. This approximation is rough in many respects, and it limits the scope of the research, but it is able to give us some common patterns.”
“On the one hand, we plan to continue to apply it to specific tasks, as far as is possible, and on the other hand, we are developing more sophisticated and advanced models with 3-dimensional blood cells, the full mechanics of their interaction, and the proper biochemistry.” ![]()
Tools may provide better genome analysis

Photo by Darren Baker
Scientists say they have developed 2 types of data analysis software that could help genomics researchers identify genetic drivers of disease with greater efficiency and accuracy.
Details on these tools were published in PLOS Computational Biology and Scientific Reports.
The first tool, MEGENA (for Multiscale Embedded Gene Co-expression Network Analysis), projects gene expression data onto a 3-dimensional sphere.
This allows scientists to study hierarchical organizational patterns in complex networks that are characteristic of diseases such as cancer, obesity, and Alzheimer’s disease.
When tested on data from The Cancer Genome Atlas (TCGA), MEGENA identified novel regulatory targets in breast and lung cancers, outperforming other co-expression analysis methods.
The second tool, SuperExactTest, establishes the first theoretical framework for assessing the statistical significance of multi-set intersections and enables users to compare large sets of data, such as gene sets produced from genome-wide association studies (GWAS) and differential expression analysis.
Scientists ran SuperExactTest on existing TCGA and GWAS data, identifying a core set of cancer genes and detecting related patterns among complex diseases.
Both tools come from the Multiscale Network Modeling Laboratory, led by Bin Zhang, PhD, an associate professor at Icahn School of Medicine at Mount Sinai in New York, New York.
“These tools fill important and unmet needs in genomics,” Dr Zhang said. “MEGENA will help scientists flesh out novel pathways and key targets in complex diseases, while SuperExactTest will provide a clearer understanding of the genome by comparing a large number of gene signatures.”
MEGENA and SuperExactTest are available as R packages on Dr Zhang’s website and CRAN (the Comprehensive R Archive Network), a repository of open-source software. ![]()
Practice Transition Planning: When Is the Right Time?
If you are a solo orthopedic surgeon or practice in a small group and are 55 years or older, this article is for you. The answer to the question “When is the right time to begin planning for the transition out of practice?” is now. And planning is the most important word in that sentence.
Joining your peers who’ve quit, often rather quickly, because of Obamacare, electronic health records (EHRs), or the implementation of ICD-10 (International Classification of Diseases, Tenth Revision) may prove unsatisfying. As the saying goes, “act in haste, repent at leisure.” And as a gerontologist friend of mine liked to say, “Retiring from medicine without retiring to something is risky.” He often quipped that golf didn’t count.
Recent survey results help support his point. In the 2014 Medscape Orthopedist Compensation Report,1 respondents were asked:
What is the most rewarding part of your job?
- Gratitude/relationships with patients 43%
- Being very good at what I do/Finding answers, diagnoses 31%
- Making good money at a job that I like 10%
- Knowing that I’m making the world a better place 7%
- Being proud of being a doctor 4%
- Nothing 1%
- Let’s hope you are not part of the 1%!
In the often-quoted Deloitte 2013 Survey of U.S. Physicians,2 6 in 10 respondents predicted that many physicians will retire earlier than planned in the next 1 to 3 years. Yet even in that survey, 41% of surgical specialists said that patient relationships were the most satisfying factor about practicing medicine. Protecting and promoting individual health was second (33%), and intellectual stimulation was third (16%).2
As Steve Marsh, managing partner at The Medicus Firm, Dallas, was quoted as saying about this data, “For older doctors, being a physician is much more of a lifestyle than a job.”3 In my 40 years of working with physicians, I agree. And that’s why you, dear readers, must begin the transition planning process now, if you are 55 years or older, or soon, if you are approaching this age. Unraveling yourself from the patient relationships and the profession you have enjoyed for so long will feel like a big loss for the majority of you. There will be a grieving process. You’re not just leaving a “job,” you’re leaving your “life’s work,” and the sooner you begin planning for this shift, the less uncomfortable it will be.
Transition Planning Timeline
As the Chinese saying goes, “the longest journey begins with a single step.” The first, most challenging step in transition planning is deciding to address the issue head on—whether you see yourself practicing well into your late 60s or stepping aside 3 years from now.
Here are 7 questions to get you started. Discuss them with your spouse and a trusted advisor or mentor.
1. Have you done everything that you wanted to accomplish professionally? What’s left on your “to-do” list?
2. Are you satisfied with the legacy you are leaving to your community, partners, or employees?
3. What does your spouse think? His or her age and stage may dictate some choices. One wife said she believed in Henny Youngman’s advice: “Promise to take your wife for better or worse, but not for lunch.” Younger spouses in satisfying careers may not be ready to quit or slow down.
4. What could fill the void of, as the Medscape survey indicated, the “gratitude/patient relationships” and “being good at what you do” that you would be leaving behind? Could going on medical missions satisfy your need to keep your hands in? Or volunteering for the community clinic?
5. If you were to retire within the next 6 months, what would your routine look like? Because the first year is often filled with travel and long-postponed fun, think beyond that and describe year 3. (Assume good health and adequate finances.)
6. Are there options for part-time practice? Could you ease out instead of going basically full throttle until your retirement date?
7. Are challenges such as stress, fatigue, cognitive decline, or a feeling of burnout a reality for you? Be honest with yourself. These are real issues that not only impact your decision about when to transition, but also patient safety and care.
If you’ve reached 60 years of age and haven’t thought about questions like these, you aren’t alone. Many orthopedic surgeons delay this planning exercise for the same reasons other business owners do:
You are too busy spending all of your time putting out fires. Who has time to plan? Learning the new ICD-10 codes for local coverage determinations (LCDs), hiring a new physician assistant, firing the receptionist, and, oh by the way, taking care of a full schedule of patients, takes time and reduces the time to plan.
You think “it’s not time yet.” We often hear surgeons say, “Gosh, I don’t feel __ years old!” or “I plan to work until I’m 70.” Sound familiar?
You’re afraid to think about what life would be like without your profession. So you do nothing. Imagining a life without being needed on a daily basis can be daunting. Reread the survey results above. If you don’t have interesting and emotionally rewarding activities that will fill the void, that can cause anxiety. And the fact is, the demands on physicians, especially those in solo practice, haven’t left much time for outside interests.
Discussing personal goals and financial matters with others is messy or taboo. Transitioning out of practice is an awkward and uncomfortable topic. Plus, whom do you call for help with planning the next stage of your life?
These and others on a long list of excuses and anxieties result in fewer than 70% of all surgical specialists we talk with having a viable transition plan. Many, of course, have done a superb job of funding their retirement plans and have the assets set aside to fund a comfortable lifestyle. A lot has been written on the financial aspects of retirement. Your financial advisor, broker, or banker has formulas, tools, and advice that you’ve probably been following for decades. The 2014 Medscape Orthopedist Compensation Report shows the average salary is $413,000, with private practice doctors earning even more, $439,000 on average.1 Although such salaries should ensure the funding of retirement savings plans, undeniably, the financial crisis and stock market collapse of 2008 delayed many surgeons’ retirement. Even today, some surgeons who are considering their practice finish line are looking over their shoulder at market returns with a sense of insecurity.
Recruitment Is More Likely Than Cash Out
Thinking you can sell your practice for big bucks is a false hope. In the 1970s and early 1980s, before the onslaught of managed care, it was possible to sell your practice. A young surgeon would welcome having space, staff, and patients at the ready. This is no longer the case, since patient loyalty is now impacted by health insurance plan membership.
Pocketing a hefty sum from selling the office building may not be much of a windfall either. It depends on that all-important real estate formula: location, location, location. In addition, dividends from and investment in a surgery center rarely continue once you are no longer operating.
To maximize the profit potential that remains in this last phase of practice—which in turn can attract surgical talent as you transition—you’ve got to sharpen the sword and pay attention. One surgeon attributed a revenue decline of about 30% over the last 5 years to a combination of lesser insurance reimbursements, his taking more time off, and failing to pay attention to his staff’s write-off habits. Revenue cycle, management, coding, and practice operations must be finely tuned to optimize profitability, and failing to manage your practice effectively will make it less attractive when recruiting a younger surgeon to take your place or assume the patient base. Consider a practice evaluation regardless of where you are in your planning, which will help the practice prioritize improvements that deliver the best benefit and value within the context of your transition plan.
And if recruitment is part of that plan, be prepared to spend significant time on the search. Solo and small groups are finding it challenging to recruit just-out-of-training associates. This generation of new physicians values work-life balance and is more likely to prefer employment to entrepreneurship. Additionally, established physicians who have not invested in or adopted new technologies, such as EHR, will have a tough time attracting top talent. Having been trained using EHRs, few, if any, young doctors will find a reversion to paper records acceptable—and, in fact, most find it a turnoff. Thus, depending on your transition plan and your age and stage, updating technology may be a necessary investment.
Stepping Down But Not Out
If you’re thinking about slowing down but not ceasing practice completely just yet, 2 options are worth considering: practicing part-time and/or becoming a nonoperative orthopedist.
The 2014 Orthopaedic Practice in the United States (OPUS) report issued by the American Academy of Orthopaedic Surgeons shows that the average age of part-time surgeons is 69.14 years and that 48.6% are generalists.5 Part-time surgeons surveyed reported working an average of 23 hours per week and performing 5 procedures per month, compared with full-time surgeons who clock in at 56 hours per week and perform 31 procedures per month.5
Senior surgeons who want to pull back their hours or become nonoperative orthopedists may be quite marketable to group practices. There are several reasons for this. First, population growth will not be supported by the number of physicians graduating from Medicare-sponsored residency slots—which have not increased since 1997. Second, the physician workforce is growing older, and younger surgeons are harder to recruit. They tend to emphasize work-life balance over working the countless hours their senior counterparts did, and, thus, don’t treat as many patients as older colleagues did. And, third, a nonoperative or part-time physician may be more appealing to patients than nonphysician providers, yet accomplish the same purpose of keeping operating surgeons out of the office and in the operating room. So, that former competitor down the street may become a potential employer. You won’t be a voting partner, but that may be a low priority as you step into part-time practice.
We imagine an opportunity for nonoperative orthopedists similar to concierge internists, who go out of network and charge reasonable fees for longer appointments and less paperwork hassle. And this opportunity isn’t only for those practicing in groups. Solo orthopedists may see this change in practice attractive, as it offers reduced professional liability premiums, holds some clear attraction for patients not eager to go under the knife, and makes it easier to arrange time off for the doctor.
As I often tell clients about their business: “Plan your work, and work your plan.” This same maxim holds true of planning for retirement. The intangible aspects of leaving your livelihood require thought and contemplation. My hope is that you’ll put pen to paper and document the answers to the questions posed in this article, so they begin to become as important as the financial aspects of your retirement planning. Of course, the plan may be waylaid midstream owing to reimbursement challenges, an offer you can’t refuse from the hospital, or a change in your health or that of your spouse. However, taking that single step and starting your plan will give you the foundation necessary to move forward or pivot in the journey ahead.
1. Peckham C. Medscape Orthopedist Compensation Report 2014. Medscape website. http://www.medscape.com/features/slideshow/compensation/2014/orthopedics#1. Published April 15, 2014. Accessed October 29, 2015.
2. Deloitte 2013 Survey of U.S. Physicians: Physician Perspectives About Health Care Reform and the Future of the Medical Profession. Deloitte Center for Health Solutions website. http://www2.deloitte.com/content/dam/Deloitte/us/Documents/life-sciences-health-care/us-lshc-deloitte-2013-physician-survey-10012014.pdf. Accessed October 29, 2015.
3. Hyden M. Are physicians retiring early? MGMA Connection Plus. Medical Group Management Association website. http://www.mgma.com/practice-resources/mgma-connection-plus/online-only/2015/august-(1)/are-physicians-retiring-early. Published July 28, 2015. Accessed November 10, 2015.
4. The Doctor is Out: A Physician’s Guide to Closing a Practice. North Carolina Medical Board website. http://www.ncmedboard.org/images/uploads/article_images/Physicians_Guide_to_Closing_a_Practice_05_12_2014.pdf. Published May 12, 2014. Accessed October 29, 2015.
5. Oreluk H, Cherf J. Practice settings and productivity. AAOS Now. 2015;9(10). http://www.aaos.org/news/aaosnow/oct15/managing1.asp. Accessed October 29, 2015.
If you are a solo orthopedic surgeon or practice in a small group and are 55 years or older, this article is for you. The answer to the question “When is the right time to begin planning for the transition out of practice?” is now. And planning is the most important word in that sentence.
Joining your peers who’ve quit, often rather quickly, because of Obamacare, electronic health records (EHRs), or the implementation of ICD-10 (International Classification of Diseases, Tenth Revision) may prove unsatisfying. As the saying goes, “act in haste, repent at leisure.” And as a gerontologist friend of mine liked to say, “Retiring from medicine without retiring to something is risky.” He often quipped that golf didn’t count.
Recent survey results help support his point. In the 2014 Medscape Orthopedist Compensation Report,1 respondents were asked:
What is the most rewarding part of your job?
- Gratitude/relationships with patients 43%
- Being very good at what I do/Finding answers, diagnoses 31%
- Making good money at a job that I like 10%
- Knowing that I’m making the world a better place 7%
- Being proud of being a doctor 4%
- Nothing 1%
- Let’s hope you are not part of the 1%!
In the often-quoted Deloitte 2013 Survey of U.S. Physicians,2 6 in 10 respondents predicted that many physicians will retire earlier than planned in the next 1 to 3 years. Yet even in that survey, 41% of surgical specialists said that patient relationships were the most satisfying factor about practicing medicine. Protecting and promoting individual health was second (33%), and intellectual stimulation was third (16%).2
As Steve Marsh, managing partner at The Medicus Firm, Dallas, was quoted as saying about this data, “For older doctors, being a physician is much more of a lifestyle than a job.”3 In my 40 years of working with physicians, I agree. And that’s why you, dear readers, must begin the transition planning process now, if you are 55 years or older, or soon, if you are approaching this age. Unraveling yourself from the patient relationships and the profession you have enjoyed for so long will feel like a big loss for the majority of you. There will be a grieving process. You’re not just leaving a “job,” you’re leaving your “life’s work,” and the sooner you begin planning for this shift, the less uncomfortable it will be.
Transition Planning Timeline
As the Chinese saying goes, “the longest journey begins with a single step.” The first, most challenging step in transition planning is deciding to address the issue head on—whether you see yourself practicing well into your late 60s or stepping aside 3 years from now.
Here are 7 questions to get you started. Discuss them with your spouse and a trusted advisor or mentor.
1. Have you done everything that you wanted to accomplish professionally? What’s left on your “to-do” list?
2. Are you satisfied with the legacy you are leaving to your community, partners, or employees?
3. What does your spouse think? His or her age and stage may dictate some choices. One wife said she believed in Henny Youngman’s advice: “Promise to take your wife for better or worse, but not for lunch.” Younger spouses in satisfying careers may not be ready to quit or slow down.
4. What could fill the void of, as the Medscape survey indicated, the “gratitude/patient relationships” and “being good at what you do” that you would be leaving behind? Could going on medical missions satisfy your need to keep your hands in? Or volunteering for the community clinic?
5. If you were to retire within the next 6 months, what would your routine look like? Because the first year is often filled with travel and long-postponed fun, think beyond that and describe year 3. (Assume good health and adequate finances.)
6. Are there options for part-time practice? Could you ease out instead of going basically full throttle until your retirement date?
7. Are challenges such as stress, fatigue, cognitive decline, or a feeling of burnout a reality for you? Be honest with yourself. These are real issues that not only impact your decision about when to transition, but also patient safety and care.
If you’ve reached 60 years of age and haven’t thought about questions like these, you aren’t alone. Many orthopedic surgeons delay this planning exercise for the same reasons other business owners do:
You are too busy spending all of your time putting out fires. Who has time to plan? Learning the new ICD-10 codes for local coverage determinations (LCDs), hiring a new physician assistant, firing the receptionist, and, oh by the way, taking care of a full schedule of patients, takes time and reduces the time to plan.
You think “it’s not time yet.” We often hear surgeons say, “Gosh, I don’t feel __ years old!” or “I plan to work until I’m 70.” Sound familiar?
You’re afraid to think about what life would be like without your profession. So you do nothing. Imagining a life without being needed on a daily basis can be daunting. Reread the survey results above. If you don’t have interesting and emotionally rewarding activities that will fill the void, that can cause anxiety. And the fact is, the demands on physicians, especially those in solo practice, haven’t left much time for outside interests.
Discussing personal goals and financial matters with others is messy or taboo. Transitioning out of practice is an awkward and uncomfortable topic. Plus, whom do you call for help with planning the next stage of your life?
These and others on a long list of excuses and anxieties result in fewer than 70% of all surgical specialists we talk with having a viable transition plan. Many, of course, have done a superb job of funding their retirement plans and have the assets set aside to fund a comfortable lifestyle. A lot has been written on the financial aspects of retirement. Your financial advisor, broker, or banker has formulas, tools, and advice that you’ve probably been following for decades. The 2014 Medscape Orthopedist Compensation Report shows the average salary is $413,000, with private practice doctors earning even more, $439,000 on average.1 Although such salaries should ensure the funding of retirement savings plans, undeniably, the financial crisis and stock market collapse of 2008 delayed many surgeons’ retirement. Even today, some surgeons who are considering their practice finish line are looking over their shoulder at market returns with a sense of insecurity.
Recruitment Is More Likely Than Cash Out
Thinking you can sell your practice for big bucks is a false hope. In the 1970s and early 1980s, before the onslaught of managed care, it was possible to sell your practice. A young surgeon would welcome having space, staff, and patients at the ready. This is no longer the case, since patient loyalty is now impacted by health insurance plan membership.
Pocketing a hefty sum from selling the office building may not be much of a windfall either. It depends on that all-important real estate formula: location, location, location. In addition, dividends from and investment in a surgery center rarely continue once you are no longer operating.
To maximize the profit potential that remains in this last phase of practice—which in turn can attract surgical talent as you transition—you’ve got to sharpen the sword and pay attention. One surgeon attributed a revenue decline of about 30% over the last 5 years to a combination of lesser insurance reimbursements, his taking more time off, and failing to pay attention to his staff’s write-off habits. Revenue cycle, management, coding, and practice operations must be finely tuned to optimize profitability, and failing to manage your practice effectively will make it less attractive when recruiting a younger surgeon to take your place or assume the patient base. Consider a practice evaluation regardless of where you are in your planning, which will help the practice prioritize improvements that deliver the best benefit and value within the context of your transition plan.
And if recruitment is part of that plan, be prepared to spend significant time on the search. Solo and small groups are finding it challenging to recruit just-out-of-training associates. This generation of new physicians values work-life balance and is more likely to prefer employment to entrepreneurship. Additionally, established physicians who have not invested in or adopted new technologies, such as EHR, will have a tough time attracting top talent. Having been trained using EHRs, few, if any, young doctors will find a reversion to paper records acceptable—and, in fact, most find it a turnoff. Thus, depending on your transition plan and your age and stage, updating technology may be a necessary investment.
Stepping Down But Not Out
If you’re thinking about slowing down but not ceasing practice completely just yet, 2 options are worth considering: practicing part-time and/or becoming a nonoperative orthopedist.
The 2014 Orthopaedic Practice in the United States (OPUS) report issued by the American Academy of Orthopaedic Surgeons shows that the average age of part-time surgeons is 69.14 years and that 48.6% are generalists.5 Part-time surgeons surveyed reported working an average of 23 hours per week and performing 5 procedures per month, compared with full-time surgeons who clock in at 56 hours per week and perform 31 procedures per month.5
Senior surgeons who want to pull back their hours or become nonoperative orthopedists may be quite marketable to group practices. There are several reasons for this. First, population growth will not be supported by the number of physicians graduating from Medicare-sponsored residency slots—which have not increased since 1997. Second, the physician workforce is growing older, and younger surgeons are harder to recruit. They tend to emphasize work-life balance over working the countless hours their senior counterparts did, and, thus, don’t treat as many patients as older colleagues did. And, third, a nonoperative or part-time physician may be more appealing to patients than nonphysician providers, yet accomplish the same purpose of keeping operating surgeons out of the office and in the operating room. So, that former competitor down the street may become a potential employer. You won’t be a voting partner, but that may be a low priority as you step into part-time practice.
We imagine an opportunity for nonoperative orthopedists similar to concierge internists, who go out of network and charge reasonable fees for longer appointments and less paperwork hassle. And this opportunity isn’t only for those practicing in groups. Solo orthopedists may see this change in practice attractive, as it offers reduced professional liability premiums, holds some clear attraction for patients not eager to go under the knife, and makes it easier to arrange time off for the doctor.
As I often tell clients about their business: “Plan your work, and work your plan.” This same maxim holds true of planning for retirement. The intangible aspects of leaving your livelihood require thought and contemplation. My hope is that you’ll put pen to paper and document the answers to the questions posed in this article, so they begin to become as important as the financial aspects of your retirement planning. Of course, the plan may be waylaid midstream owing to reimbursement challenges, an offer you can’t refuse from the hospital, or a change in your health or that of your spouse. However, taking that single step and starting your plan will give you the foundation necessary to move forward or pivot in the journey ahead.
1. Peckham C. Medscape Orthopedist Compensation Report 2014. Medscape website. http://www.medscape.com/features/slideshow/compensation/2014/orthopedics#1. Published April 15, 2014. Accessed October 29, 2015.
2. Deloitte 2013 Survey of U.S. Physicians: Physician Perspectives About Health Care Reform and the Future of the Medical Profession. Deloitte Center for Health Solutions website. http://www2.deloitte.com/content/dam/Deloitte/us/Documents/life-sciences-health-care/us-lshc-deloitte-2013-physician-survey-10012014.pdf. Accessed October 29, 2015.
3. Hyden M. Are physicians retiring early? MGMA Connection Plus. Medical Group Management Association website. http://www.mgma.com/practice-resources/mgma-connection-plus/online-only/2015/august-(1)/are-physicians-retiring-early. Published July 28, 2015. Accessed November 10, 2015.
4. The Doctor is Out: A Physician’s Guide to Closing a Practice. North Carolina Medical Board website. http://www.ncmedboard.org/images/uploads/article_images/Physicians_Guide_to_Closing_a_Practice_05_12_2014.pdf. Published May 12, 2014. Accessed October 29, 2015.
5. Oreluk H, Cherf J. Practice settings and productivity. AAOS Now. 2015;9(10). http://www.aaos.org/news/aaosnow/oct15/managing1.asp. Accessed October 29, 2015.
Magnetic Resonance Imaging of Complications of Anterior Cruciate Ligament Reconstruction
Magnetic resonance imaging (MRI) is the preferred modality in the evaluation of complications of anterior cruciate ligament reconstruction (ACL-R).1-3 ACL-R complications may be broadly characterized as those resulting in decreased range of motion (ROM), eg, arthrofibrosis and impingement, and those resulting in increased laxity, ie, graft disruption.4 Short tau inversion recovery (STIR) sequences best minimize artifact related to field inhomogeneity in the presence of metal-containing fixation devices. Patients with contraindications to MRI may undergo high-resolution computed tomographic arthrography of the knee for evaluation of postoperative graft abnormalities.1
Arthrofibrosis refers to focal or diffuse synovial scar tissue, which may limit ROM. Preoperative irritation, preoperative limited ROM, and reconstruction within 4 weeks of trauma may all play a role in the development of arthrofibrosis.5,6 The focal form, cyclops lesion, named for its arthroscopic appearance, has been reported in 1% to 10% of patients with ACL-R.1 On MRI, focal arthrofibrosis may be seen as a focal or diffuse intermediate signal lesion in the anterior intercondylar notch extending linearly along the intercondylar roof1 (Figure 1).
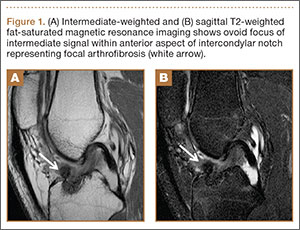
MRI can be used to accurately determine the position of the femoral and tibial tunnels. Correct femoral tunnel position results in isometry of the graft during full ROM of the knee. Graft impingement can occur when the tibial tunnel is placed too far anteriorly such that the graft contacts the roof of the intercondylar notch before the knee is able to fully extend.7 A tibial tunnel placed anterior to the intersection of the Blumensaat line and the tibia is at higher risk for impingement.1,4 Impingement may be accompanied by signal change in the graft on intermediate-weighted and fluid-sensitive sequences. The signal abnormality is usually focal and persists longer than the expected signal changes related to revascularization of immature grafts within the first year (Figure 2). If left untreated, impingement may progress to graft rupture.4
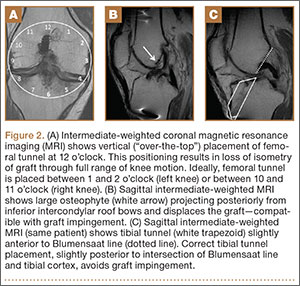
Complete graft rupture is diagnosed on the basis of discontinuity of the graft fibers. MRI findings include fluid-filled defect or absence of intact graft fibers. Other reliable signs include large joint effusion, anterior tibial translation, pivot-shift–type marrow edema pattern, and horizontal orientation, laxity, or resorption of the graft fibers.1,8,9 The diagnosis of partial graft rupture may be challenging, as there are several other causes of increased graft signal, including revascularization (within 12 months after procedure), signal heterogeneity between individual bundles of hamstring grafts, and focal signal changes related to impingment (Figures 3, 4).

Fluid within the tunnels is a normal finding after surgery and typically resolves within the first 18 months.1 Cyst formation within the tibial tunnel is an uncommon complication of ACL-R and may be incidental to or present with clinical symptoms caused by extension into the pretibial soft tissues or expansion of the tunnel (Figure 5). Communication of cyst with joint space is important, as a noncommunicating cyst requires simple excision without need for bone grafting.7

Hardware-related complications (eg, loosening of fixation devices) are uncommon but may require revision surgery (Figure 6). Septic arthritis after ACL-R has a cumulative incidence of 0.1% to 0.9% and may be difficult to diagnose clinically because of the lack of classic symptoms of a septic joint.1 Diagnosis requires joint aspiration.

MRI is reliably and accurately used to assess ACL-R complications. The clinical history helps in stratifying complications that result in decreased ROM or increased laxity.
1. Bencardino JT, Beltran J, Feldman MI, Rose DJ. MR imaging of complications of anterior cruciate ligament graft reconstruction. Radiographics. 2009;29(7):2115-2126.
2. Recht MP, Kramer J. MR imaging of the postoperative knee: a pictorial essay. Radiographics. 2002;22(4):765-774.
3. Papakonstantinou O, Chung CB, Chanchairujira K, Resnick DL. Complications of anterior cruciate ligament reconstruction: MR imaging. Eur Radiol. 2003;13(5):1106-1117.
4. Meyers AB, Haims AH, Menn K, Moukaddam H. Imaging of anterior cruciate ligament repair and its complications. AJR Am J Roentgenol. 2010;194(2):476-484.
5. Kwok CS, Harrison T, Servant C. The optimal timing for anterior cruciate ligament reconstruction with respect to the risk of postoperative stiffness. Arthroscopy. 2013;29(3):556-565.
6. Mayr HO, Weig TG, Plitz W. Arthrofibrosis following ACL reconstruction—reasons and outcome. Arch Orthop Trauma Surg. 2004;124(8):518-522.
7. Ghazikhanian V, Beltran J, Nikac V, Feldman M, Bencardino JT. Tibial tunnel and pretibial cysts following ACL graft reconstruction: MR imaging diagnosis. Skeletal Radiol. 2012;41(11):1375-1379.
8. Collins MS, Unruh KP, Bond JR, Mandrekar JN. Magnetic resonance imaging of surgically confirmed anterior cruciate ligament graft disruption. Skeletal Radiol. 2008;37(3):233-243.
9. Saupe N, White LM, Chiavaras MM, et al. Anterior cruciate ligament reconstruction grafts: MR imaging features at long-term follow-up—correlation with functional and clinical evaluation. Radiology. 2008;249(2):581-590.
Magnetic resonance imaging (MRI) is the preferred modality in the evaluation of complications of anterior cruciate ligament reconstruction (ACL-R).1-3 ACL-R complications may be broadly characterized as those resulting in decreased range of motion (ROM), eg, arthrofibrosis and impingement, and those resulting in increased laxity, ie, graft disruption.4 Short tau inversion recovery (STIR) sequences best minimize artifact related to field inhomogeneity in the presence of metal-containing fixation devices. Patients with contraindications to MRI may undergo high-resolution computed tomographic arthrography of the knee for evaluation of postoperative graft abnormalities.1
Arthrofibrosis refers to focal or diffuse synovial scar tissue, which may limit ROM. Preoperative irritation, preoperative limited ROM, and reconstruction within 4 weeks of trauma may all play a role in the development of arthrofibrosis.5,6 The focal form, cyclops lesion, named for its arthroscopic appearance, has been reported in 1% to 10% of patients with ACL-R.1 On MRI, focal arthrofibrosis may be seen as a focal or diffuse intermediate signal lesion in the anterior intercondylar notch extending linearly along the intercondylar roof1 (Figure 1).
MRI can be used to accurately determine the position of the femoral and tibial tunnels. Correct femoral tunnel position results in isometry of the graft during full ROM of the knee. Graft impingement can occur when the tibial tunnel is placed too far anteriorly such that the graft contacts the roof of the intercondylar notch before the knee is able to fully extend.7 A tibial tunnel placed anterior to the intersection of the Blumensaat line and the tibia is at higher risk for impingement.1,4 Impingement may be accompanied by signal change in the graft on intermediate-weighted and fluid-sensitive sequences. The signal abnormality is usually focal and persists longer than the expected signal changes related to revascularization of immature grafts within the first year (Figure 2). If left untreated, impingement may progress to graft rupture.4
Complete graft rupture is diagnosed on the basis of discontinuity of the graft fibers. MRI findings include fluid-filled defect or absence of intact graft fibers. Other reliable signs include large joint effusion, anterior tibial translation, pivot-shift–type marrow edema pattern, and horizontal orientation, laxity, or resorption of the graft fibers.1,8,9 The diagnosis of partial graft rupture may be challenging, as there are several other causes of increased graft signal, including revascularization (within 12 months after procedure), signal heterogeneity between individual bundles of hamstring grafts, and focal signal changes related to impingment (Figures 3, 4).
Fluid within the tunnels is a normal finding after surgery and typically resolves within the first 18 months.1 Cyst formation within the tibial tunnel is an uncommon complication of ACL-R and may be incidental to or present with clinical symptoms caused by extension into the pretibial soft tissues or expansion of the tunnel (Figure 5). Communication of cyst with joint space is important, as a noncommunicating cyst requires simple excision without need for bone grafting.7
Hardware-related complications (eg, loosening of fixation devices) are uncommon but may require revision surgery (Figure 6). Septic arthritis after ACL-R has a cumulative incidence of 0.1% to 0.9% and may be difficult to diagnose clinically because of the lack of classic symptoms of a septic joint.1 Diagnosis requires joint aspiration.
MRI is reliably and accurately used to assess ACL-R complications. The clinical history helps in stratifying complications that result in decreased ROM or increased laxity.
1. Bencardino JT, Beltran J, Feldman MI, Rose DJ. MR imaging of complications of anterior cruciate ligament graft reconstruction. Radiographics. 2009;29(7):2115-2126.
2. Recht MP, Kramer J. MR imaging of the postoperative knee: a pictorial essay. Radiographics. 2002;22(4):765-774.
3. Papakonstantinou O, Chung CB, Chanchairujira K, Resnick DL. Complications of anterior cruciate ligament reconstruction: MR imaging. Eur Radiol. 2003;13(5):1106-1117.
4. Meyers AB, Haims AH, Menn K, Moukaddam H. Imaging of anterior cruciate ligament repair and its complications. AJR Am J Roentgenol. 2010;194(2):476-484.
5. Kwok CS, Harrison T, Servant C. The optimal timing for anterior cruciate ligament reconstruction with respect to the risk of postoperative stiffness. Arthroscopy. 2013;29(3):556-565.
6. Mayr HO, Weig TG, Plitz W. Arthrofibrosis following ACL reconstruction—reasons and outcome. Arch Orthop Trauma Surg. 2004;124(8):518-522.
7. Ghazikhanian V, Beltran J, Nikac V, Feldman M, Bencardino JT. Tibial tunnel and pretibial cysts following ACL graft reconstruction: MR imaging diagnosis. Skeletal Radiol. 2012;41(11):1375-1379.
8. Collins MS, Unruh KP, Bond JR, Mandrekar JN. Magnetic resonance imaging of surgically confirmed anterior cruciate ligament graft disruption. Skeletal Radiol. 2008;37(3):233-243.
9. Saupe N, White LM, Chiavaras MM, et al. Anterior cruciate ligament reconstruction grafts: MR imaging features at long-term follow-up—correlation with functional and clinical evaluation. Radiology. 2008;249(2):581-590.